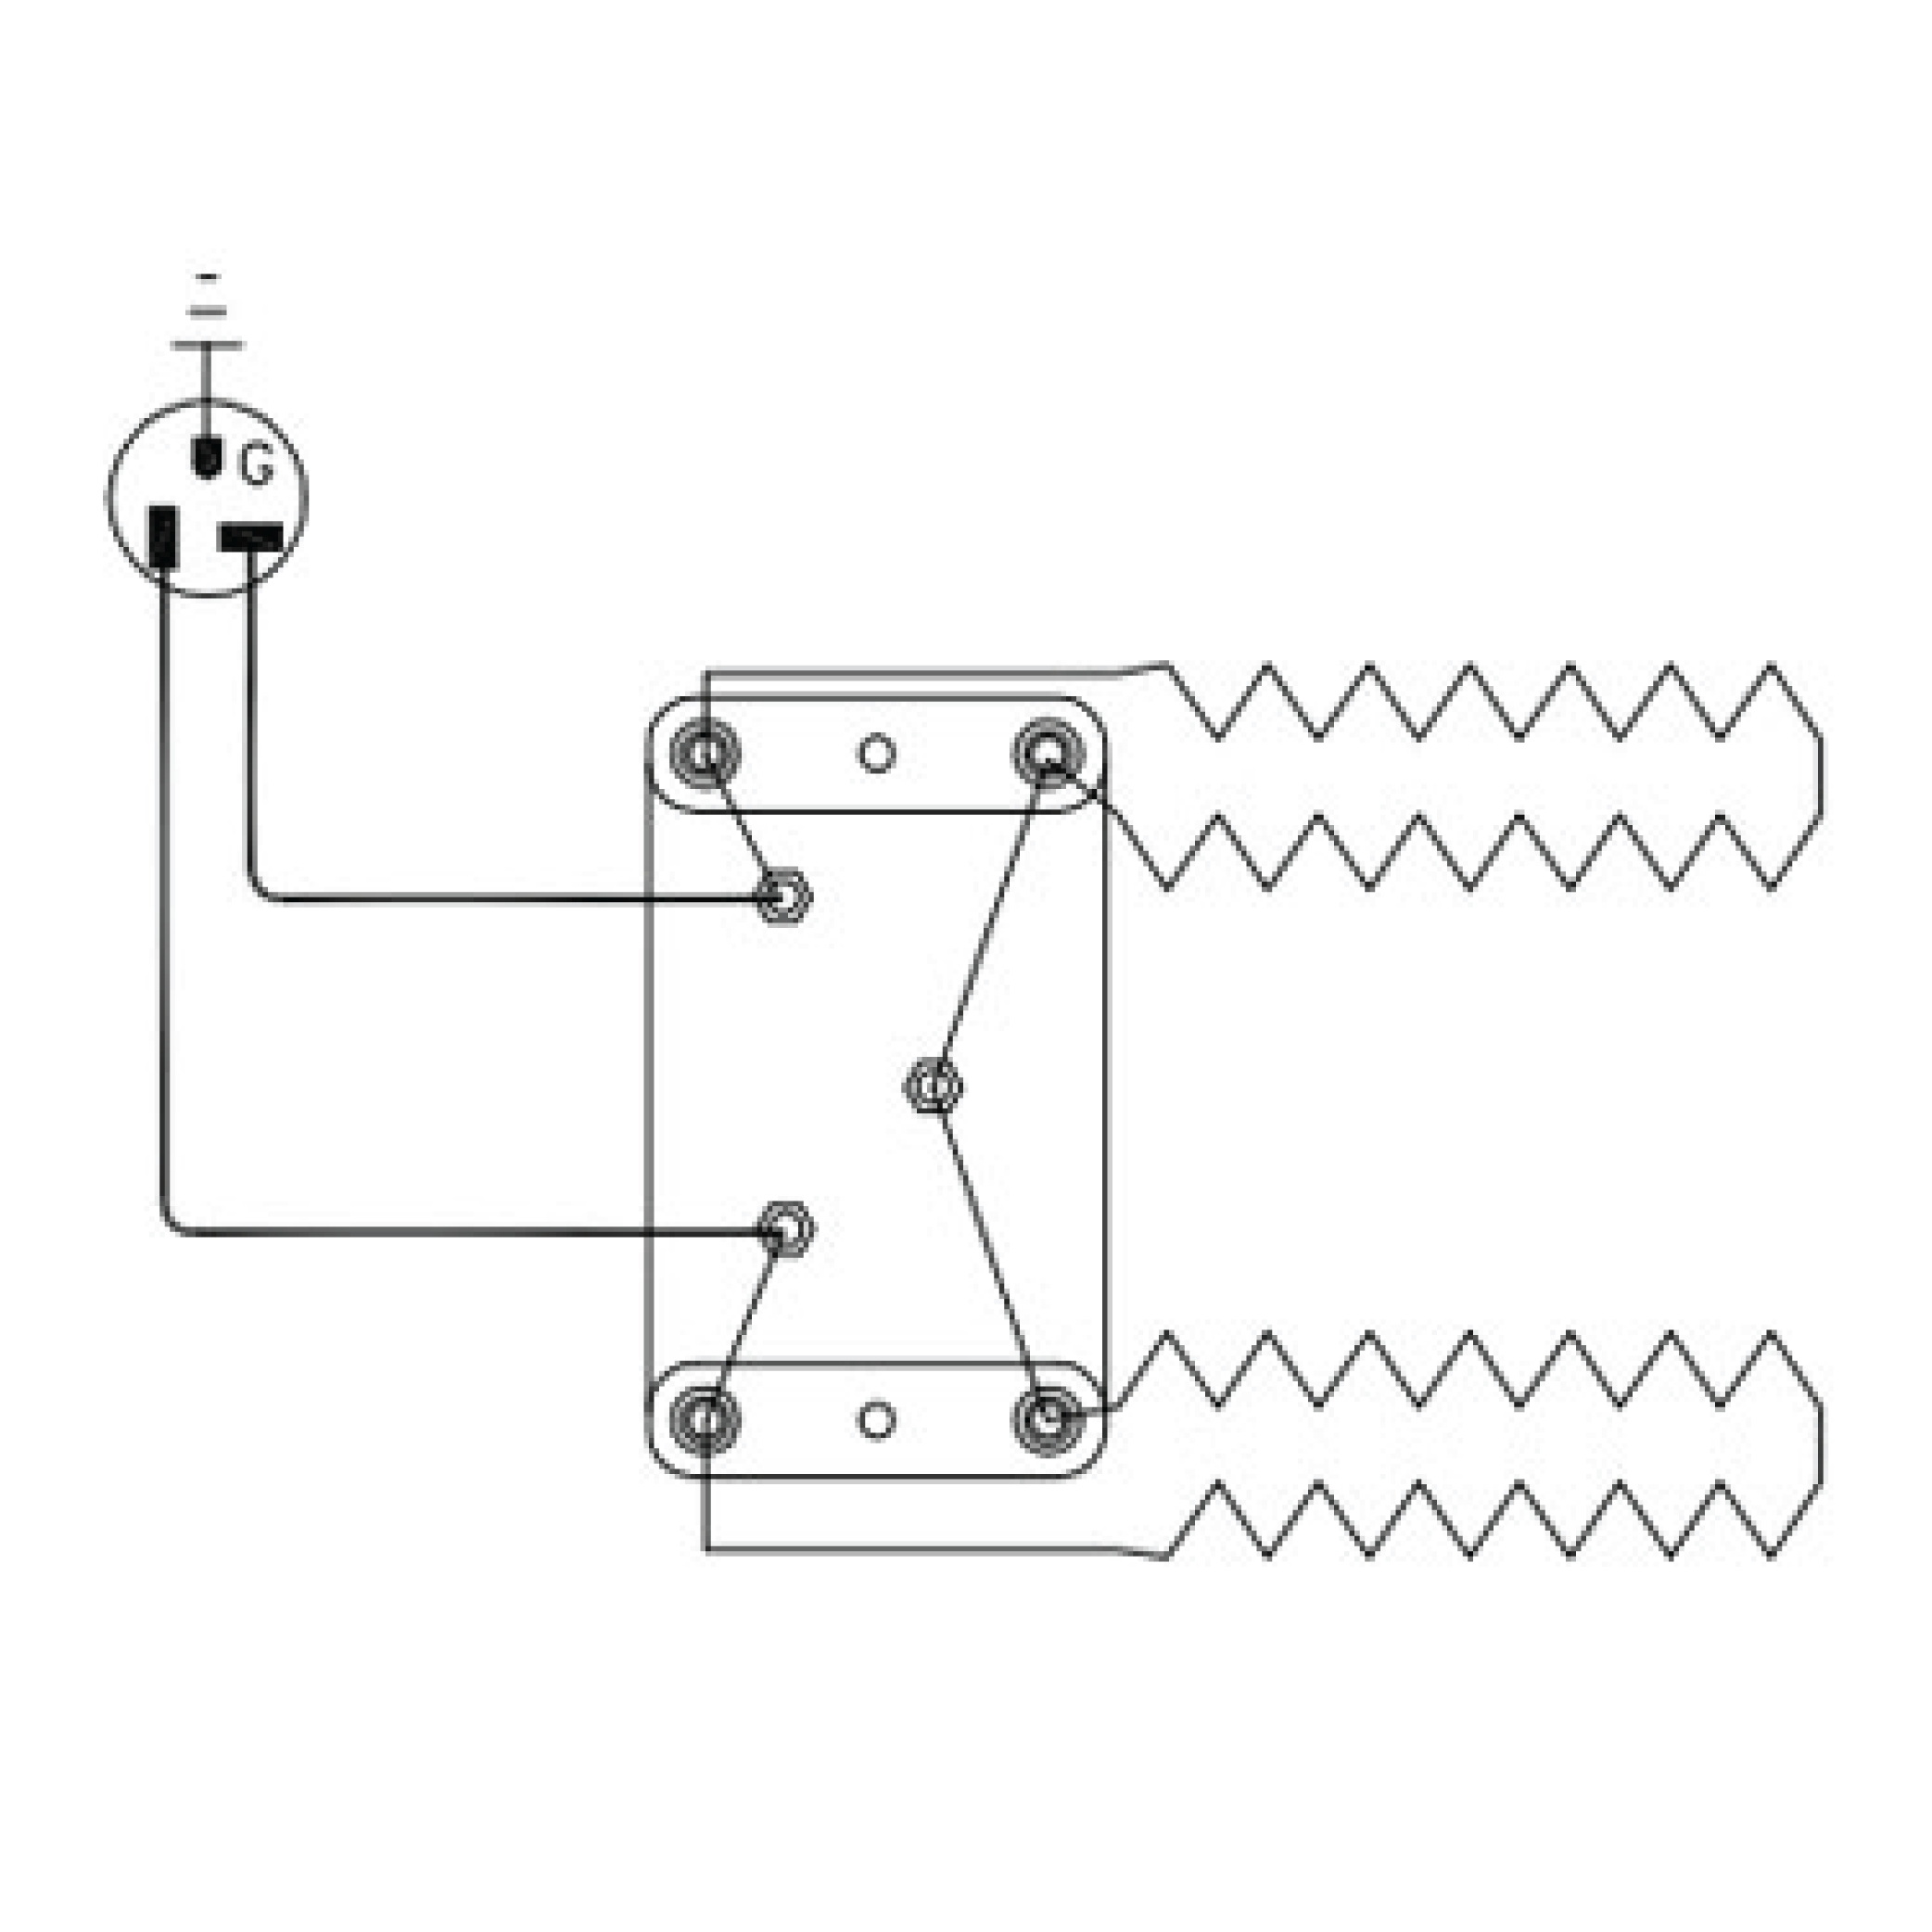
Knowledgebase and FAQs
Operation
The type of thermocouple on a Genesis can be either Type K or Type S.
Here’s a one-sentence version:
To create a custom delayed-start program on the Genesis control, go to LOAD > 4-Custom > select a User slot > OK > EDIT > name the program > insert and define segments with Rate, Temp, and Hold > SAVE > press STRT > choose "Start Later" > enter the Start Code (set it in MENU > Configuration > Start Code if needed) > enter delay time in hh:mm format > SAVE to begin countdown.
Go to "Menu"
Scroll down to "7-Factory Config"
Enter Code "443"
Scroll down to "12-Output 3 Alarm"
Press "Disabled"
Check your version on your control.
Network Compatibility
Genesis controllers work best with WPA, WPA2, and WEP networks. The controllers are compatible with 802.11/b/g/n networks and only accept 2.4 GHz.
When loading a kiln, keep the bottom shelf ½"–1" off the floor, maintain at least 1" clearance from thermocouples, use 3 aligned posts per shelf placed 3–4" from edges, allow 8" clearance at the top, and space pottery carefully—greenware can touch, but glazed pieces need at least ¼" gap; avoid overhangs, ensure shelves are kiln-washed, and angle large surfaces away from elements and thermocouples.
Although this is not something that we have specifically tested for, the general answer is about 50 to 75 pounds per square foot of bottom surface area.
When placing posts, keep them a few inches in from the shelf edge to prevent warping, use 3 per shelf for stability (4 for heavy loads), align all posts vertically from shelf to shelf, and avoid placing the bottom shelf level with the lowest side element—half shelves at the same height can share posts where they meet.
Advancer shelves are great - just expensive.
The Kiln Sitter Tube assembly should stick into the kiln about 1". This will allow air to circulate around the cone and allow it to have a more accurate representation of the kiln temperature.
Kiln-sitters need to be adjusted and inspected before the first firing and then again every 10 firings or so.
Very Important! Be sure that the adjustments on the kiln-sitter have been properly set. See the kiln-sitter manual for details.
Sometimes when you press the Bisque or Glaze button on the One-Touch control you are not able to change the options. The control does nothing.
You can download an Excel spreadsheet that will generate any program (with graph and times) based on a particular cone number.
On the DynaTrol, you will need to use the Vary-Fire programming. On a 3-button Bartlett or 4-button One-Touch, enter a custom program.
A customer asks: I would like to program my kiln to heat to Cone 6 then cool normally to 950°F and then hold for one hour at 950°F and then cool naturally.
The DynaTrol control panel can be programmed to fire to up to 2400° F or 1315° C.
Make sure you have programmed the kiln properly and it is supposed to be firing.
This customizable kiln program under USER 4 can be used for slumping, tack fusing, or full fusing by adjusting the top temperature step (marked with “*”)—typically 1220°F for slumping, 1350°F for tack fuse, and 1480°F for full fuse—and you may also need to tweak the hold time at peak temperature based on your results.
Hold Time in a kiln program occurs at the peak temperature, while Preheat Hold happens at a lower set temperature (typically 200°F), and if any thermocouple is already above the preheat temperature at start-up, the kiln will skip the preheat phase.
For ideal firing results, thermocouples in each zone should be close regarding how far they protrude into the kiln.
When packed, the thermocouples on the Jupiter JD and DaVinci kilns are mounted to the kiln sections without the thermocouple lead wire attached. This is because the panel is packed separately.
L&L kilns use Type K (inexpensive, less durable) and Type S (platinum-based, long-lasting) thermocouples in various styles; Type K options include exposed, protected, and metal-sheathed designs for different kiln builds and temperatures, while Type S thermocouples are more durable and used in high-end applications—choosing the right style depends on kiln type, wall thickness, and firing temperature.
The type of thermocouple on a DynaTrol (with the Blue face) can be either Type K or Type S.
General Information on ThermocouplesThe pyrometers and all of the electronic kiln controllers for L&L kilns work with a “Type K Thermocouple”.
A thermocouple (TC) is a temperature sensor. It reads the temperature in the kiln and gives the information to the DynaTrol or pyrometer. A TC is made from 2 different metals.
Maintenance
When replacing kiln bricks that require field-drilled peepholes, use a ¾" or 1" drill bit or hole saw, drilling slowly and perpendicular to the stainless steel case through the pre-punched hole—clear the bit frequently, and have someone watch from the side to help maintain alignment for accurate and clean drilling.
Fix lid seal if a bright red glow is visible around the seal when kiln is operating and/or excessive heat loss can be felt around seal.
Firebrick cracks as it is heated and cooled- it is to be expected. When the kiln is hot, all the cracks fill in from the expanding brick.
For brick repair
To maintain proper kiln performance and ventilation, make sure all peepholes are sealed with plugs, the vent hole is correctly sized per Vent-Sure instructions, any third-party vent matches your kiln's volume in cubic feet, and inspect the lid and bottom for cracks—patch or replace if they leak excessive heat at high temperatures.
Facing is meant to penetrate into the brick 1/2" or so. When it is fired, it makes that part of the brick harder and more reflective. Be sure not to use too much!
It is very common for kiln stands to rust. This happens from condensation in the air and possibly from moisture coming from the kiln bottom during bisque firings.
Tighten the case by turning the screws of the case clamps.
The control board needs replacement if the transformer is working, voltage is reaching the board but there's no display, or if there's a display but no output to the power relays—indicating failed internal transistors.
Look for any burned spots or deteriorating wire.
Yes - there is no problem putting a smaller element in a larger holder. Just be careful on the first firing so that the element doesn't come out of the holder while it is still "springy".
Use a drill bit with a diameter of 1/8" to 3/16"
Elements in electric kilns fail over time due to heat, contamination, physical stress, and increased resistance, but you can reduce maintenance costs by using high-quality elements, avoiding contamination, ensuring proper installation and spacing, maintaining clean and intact element channels, avoiding unnecessary soak times, and regularly measuring element resistance to catch aging before performance drops.
Your Jupiter, DaVinci, or Doll kiln will have its elements either wired in parallel or wired in series.
Normally it is best to have elements that are all the same age. That way it is easier for the kiln to fire more evenly top to bottom.
Plug element holes if they are too large.
We have had several improvements in our element holder designs over the years and have been able to increase the interior size of the holder to accommodate a larger element.
The pliers to get for grabbing the wire and bending it around the bolt are called Linesmans Pliers.
Mostly you just have to remember how each kiln is wired or look at the wire diagram. Usually in series elements the wire is big and fat, and in parallel elements they are thin.
We double-twist element ends that are 14 gauge and thinner. We do not twist element ends on 13 gauge, 14 gauge, and 11 gauge wire or the thicker APM wires.
Electrically speaking, all the elements in most L&L kilns are the same (exceptions are front-loaders with door elements, B models, J/K18R kilns, JD/J230PB with HD Series wired elements, and pos
The special tool we used to make for assembling Easy-Fire spring-loaded hinges is no longer available.
People have had good success using a long heavy screwdriver to do this - one a
Sometimes the heat around a kiln can become too much for the standard DaVinci cord connections.
Dig it out of the wall carefully.Use safety glasses and a dremel to carefully grind the glaze off the