

DynaTrol Operation Manual
PDF INSTRUCTIONS: See this link for a PDF version. (This online version can also be printed, and it will print QR codes for the videos.)
CONTROL CAUTIONS
The controller is used to control temperature; it is not a safety device.
- Do not operate the controller in temperatures above 125°F or below 32°F (NOTE: The board components are rated for 50°C below zero, so the control (and kiln) can be stored outside in a covered area).
- Never leave your kiln unattended at the end of a firing. (The Delay feature gives you control over this).
- The controller contains electronic components that are sensitive to static electricity. Before handling the controller, dissipate any static charge you may have by touching metal or a screw on the controller panel, the electrical box, the kiln lid, or some other grounded object.
- Ensure the kiln has been set up with thermocouples in the proper order. For EASY-FIRE and EQUAD-PRO kilns, see their specific Assembly Instructions. The kiln sections are numbered with a small sticker on the end of each section’s power cord for Davinci and Jupiter kilns. The top section on any L&L kiln is section #1. The #2 section is always the section directly under the #1 section on any sectional L&L kiln. On three-section kilns, section #3 is the bottom section. On kilns with more than three sections, sections are numbered 1 through 4 or 1 through 5, top to bottom. Likewise, the top thermocouple is labeled #1 and should be in the top section of the kiln. The #2 thermocouple is the bottom thermocouple in a two-section kiln. The #2 thermocouple is the middle thermocouple on three or more section kilns. The #3 thermocouple is always in the bottom section of the kiln. Your kiln must be set up like this. Be sure to double-check this even if you set up the kiln yourself.
- When hooking up the thermocouple wires to the thermocouples on the kiln, be sure to follow these color codes:
THERMOCOUPLE WIRE COLOR CODING
|
- Always check the position of the thermocouple probe on the inside of the kiln before starting a firing. The current temperature displayed on the controller is measured at the end of the thermocouple. NOTE: If the thermocouple tip (where the temperature is measured) is back inside the brick insulation of the kiln (even a little bit) it will make the control think that the kiln is not as hot as it really is. That could lead to an overfiring!
- Always review the current program before firing to ensure the correct profile is programmed.
- We recommend having your kiln shut off by a manual fused disconnect switch located near the kiln. That way you can turn off all electricity to the kiln when you are not using it. This would prevent any sort of accidental turning on of the kiln by an electrical surge.
- Follow the other precautions listed in your Kiln Instructions and in the Troubleshooting Guide.
SUGGESTIONS FOR LEARNING
- We suggest watching the videos below and getting familiar with the control before you begin using your kiln.
- Browse these instructions to get familiar with what they offer. The step-by-step examples should be particularly useful for learning, especially in the more complex process of adding a cool-down or 16-segment program.
Turning On the DynaTrol

See https://www.youtube.com/video/39uw3rqdRJo?si=lk7v4pb6TmC60lRR
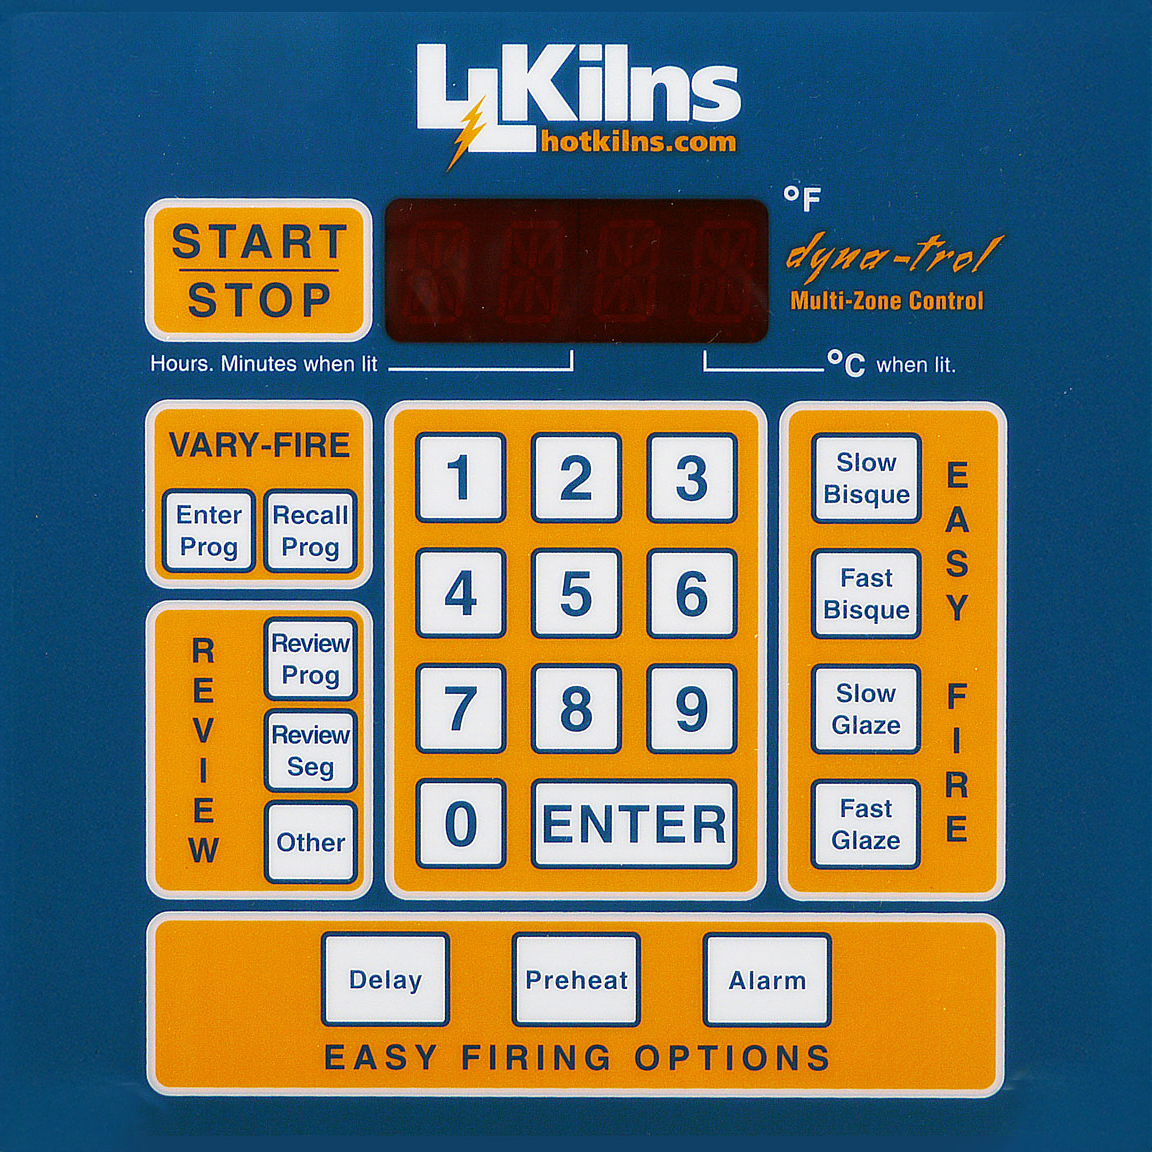
DISPLAY AND KEYBOARD
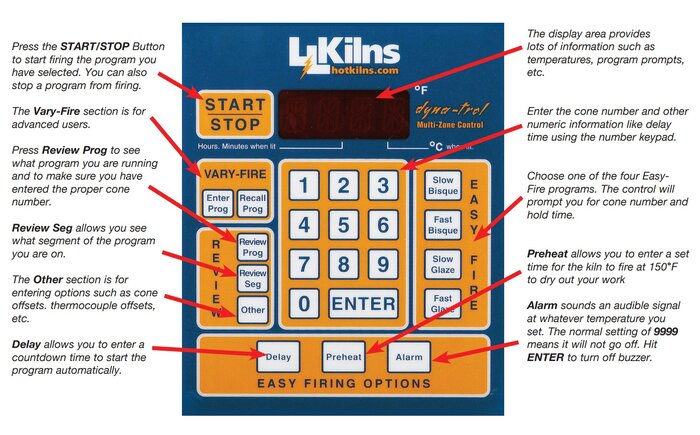
The front panel of the controller has seven distinct parts:
- START/STOP Key
- LED Display
- VARY-FIRE PROGRAMMER Section
- REVIEW AND SPECIAL OPTIONS Section
- NUMBER KEYS Section
- EASY-FIRE Section
- EASY OPTIONS Section
EASY OPTIONS section for setting Delay Time, Pre Heat Time, and Alarm Temperature.
EASY FIRE section for choosing one of four preset Easy Fire profiles.
Number keys section for entering temperatures and times. Change which thermocouple you are reading. Turn On/Off ability to see which zones are firing. Reprogram the number of zones of control.
LED DISPLAY - four-digit display showing times and temperatures. Indicate Deg F or C
START/STOP Key
- Starts the firing or, if there is a firing in progress, stops the firing.
- NOTE: This key has no function during programming.
EASY-FIRE SECTION
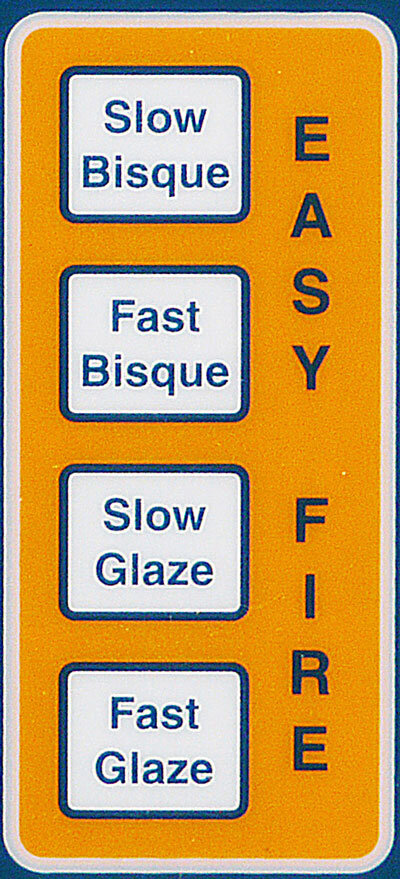
Choose the EASY-FIRE mode you want to use.
Slow Bisque - Used for setting a slow bisque firing profile.
Approximately 13 hours to fire to cone 04.
Fast Bisque - Used for setting a fast bisque firing profile.
Approximately 10 hours to fire to cone 04.
Slow Glaze - Used for setting a slow glaze firing profile.
Approximately 6.5 hours to fire to cone 04.
Fast Glaze - Used for setting a fast glaze firing profile.
Approximately 3 hours to fire to cone 04.
EASY-OPTIONS SECTION
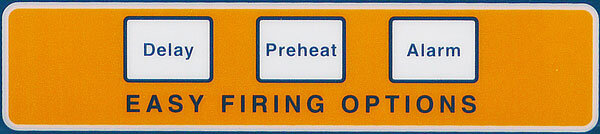
Choose the EASY options (Delay Time, Preheat Time, Alarm)
- Alarm – Sound an audible alarm at a temperature you specify. Pressing the Alarm key while firing allows the reprogramming of the alarm to a low or high temperature alarm.
- Preheat – Used to put in a preheat time at 150°F to 200°F to allow the ceramic work to dry out completely.
- Delay – Used to delay firing until you want the program to start
VARY-FIRE PROGRAMMING SECTION

- Enter Prog - This button allows you to initiate programming. Up to 6 profiles (programs) may be programmed and saved.
- Recall Prog - Allows one-step recall of one of the programmed profiles (programs). Program your own firing profiles and recall them for use.
LED DISPLAY
- Displays temperatures, times, and messages. The LED (Light Emitting Diode) has room for four digits or letters in the display.
- When the decimal point is displayed between the middle 2 digits, a time is being displayed.
- If there is a decimal to the right of the last digit, the temperature is being displayed in degrees Celsius (Centigrade). By pressing #8 on the numerical Keypad while you are firing a profile you can turn on and off the ability to see which zones are firing. The little LED lights under the numerals in the display act as indicators of the zones firing. There are three of these little indicators, and all three will blink on and off even if your kiln only has two or one heating zones.
REVIEW SECTION
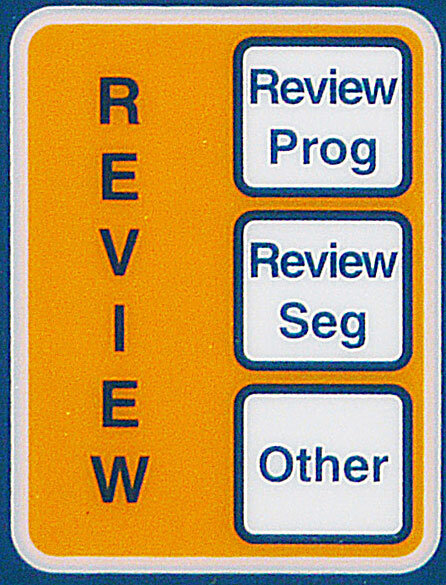
- REVIEW PROGRAM - The information displayed when Review Prog is pressed varies depending on whether you are using EASY-FIRE or VARY-FIRE. When Review Prog is pressed, each of the steps in the current firing profile is displayed one after another.
- When a firing is complete, Review Prog is used to see the final temperature reached during the firing.
- REVIEW SEGMENT - It is used to view the current firing segment or to skip from the current segment to the next segment. When Review Segment is pressed during a firing, the current stage of the firing is displayed. If it is pressed in between firings, STOP will flash, and then the current temperature will be displayed. When you press Review Seg twice you will see the program set point temperature. When you press it three times, you will see the control board temperature.
OTHER (OPTIONS)
- Cone Offset, Thermocouple Offset, Identify Control for KISS software (note: KISS software is no longer being offered), Set 16 Segment Program, View Cone Table, and change between °F and °C. There are several “OTHER” options. (See Section 7 for more details).
- Reset feature RSET
- Cone Lookup Table CONE
- Controller ID Id
- 16-step program 16-S (only comes up if you have VARY-FIRE Program #5 in active memory or if you have an EASY-FIRE program in active memory)
- Cone temperature offsets CNOS
- Temperature scales °F or °C CHG°
- Error codes ON or OFF ERCd
- Thermocouple offset TCOS
- Board temperature bd T
NUMBER KEYS
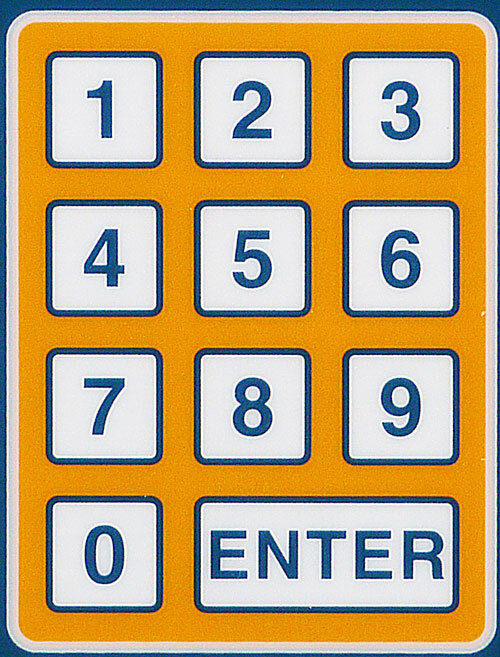
Contains the ENTER key and the number keys.
- Numeric keys - These are used for entering times, temperatures, and other numbers. The number “1” is also used to acknowledge the ErrP error signal when you first turn the kiln on. Press “1”, “2” or “3” while firing to change which thermocouple reading you see in the LED display.
- Press 5 while firing and see the current rate of climbing in degrees per hour. This is useful to look at near the end of the program so you can look on a cone chart to accurately see what temperature your kiln will shut off.
- Press 7 will run the amperage diagnostic routine, displaying the amperage rating for each kiln section. If the kiln is not equipped with the optional current sensor, all amperage readings will be zero.
- Press 8 while firing to turn On/Off the ability to see which zones are firing by the LED display dots. The dot on the left is the top zone, the dot in the center is the center zone, and the dot on the right is the bottom zone. The dot on the very far right is only on if you are running on the Celsius temperature scale.
- Press 0 while firing to see how much time has elapsed since the program began
- ENTER Key – Used to enter or acknowledge numbers and programs
OVERVIEW: HOW THE DYNATROL WORKS
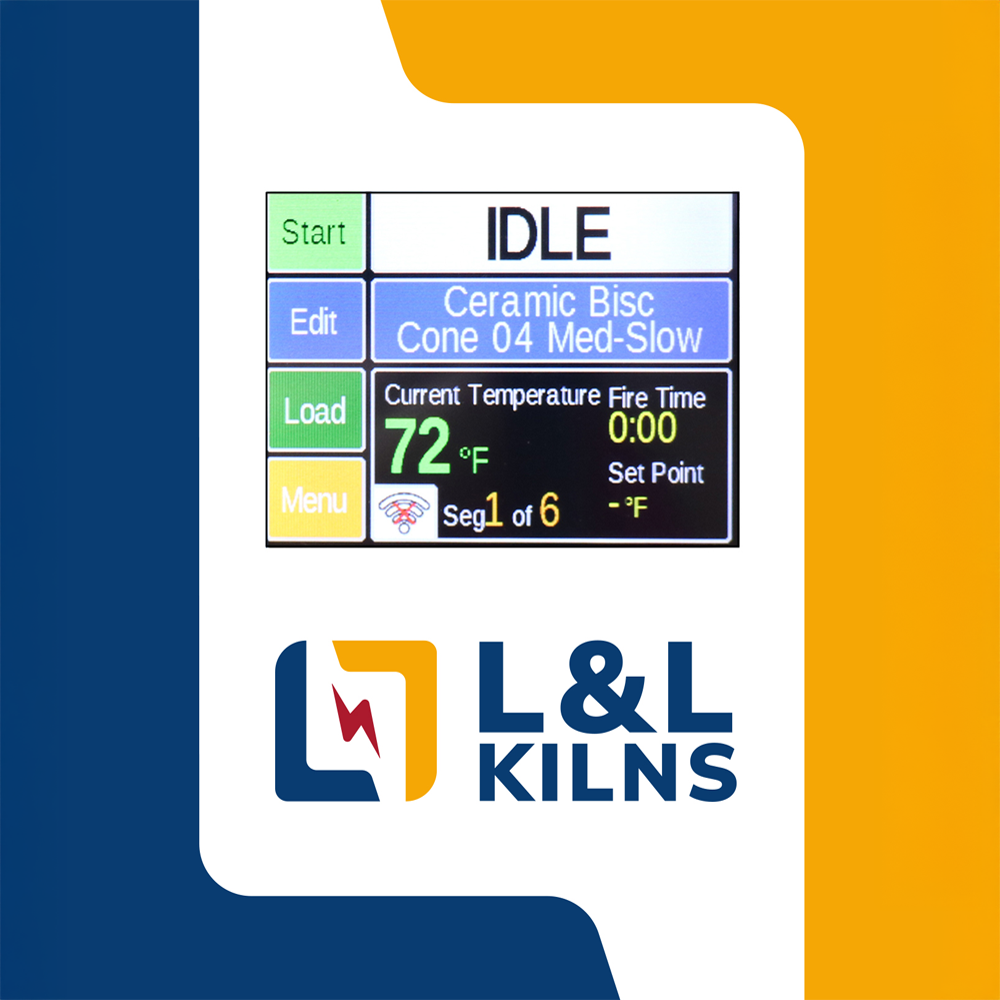
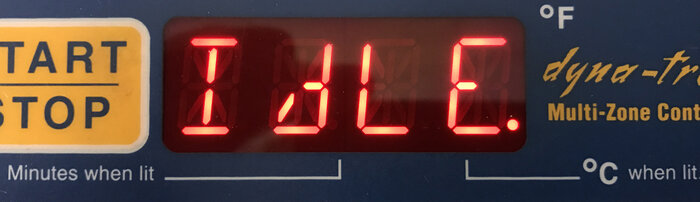
- When electrical power is connected to the DynaTrol, the display will be lit, and WAIT will be displayed for about 5 seconds. Then, IdLE, TC2, and the current temperature will cycle over and over on the display. This cycling IdLE message means that the DynaTrol is on and ready to be programmed, but the kiln is not running yet.
- The current temperature is measured at the tip of the three thermocouples (TC1, TC2, TC3). If the thermocouple wires are connected to the thermocouples and if the tips of the thermocouples are inserted inside the kiln, the current temperature displayed is the temperature inside the kiln. The default thermocouple reading is TC2. In other words, unless you specifically ask the control to show you the temperature at TC1 or TC3, then it will only show you the temperature at TC2. This is done by simply pressing the #1 button to see the temperature at TC1, or the #3 button to see the temperature at TC3.
- When the START/STOP button is pressed after either an EASY-FIRE (also sometimes called “Cone-Fire") or a VARY-FIRE profile has been selected, the DynaTrol starts to increase the temperature in the kiln towards the first set temperature at the programmed rate of rise. The kiln will be cycling (clicking) on and off to accomplish the exact rate of temperature rise. When the displayed temperature reaches the first set temperature in the first segment, the first hold phase can begin. If there is a hold time programmed in this segment, the DynaTrol will hold at the first set temperature for the programmed amount of hold time until the end of the first segment of the firing. The second segment ramp stage then begins with the temperature increasing toward the second set temperature at the second ramp rate. Once it reaches the second set temperature, it will hold there if there is a hold time programmed for the second segment (if there is no hold time, then it simply goes on to the next segment). The control continues through this sequence until the end of the firing profile.
- With the VARY-FIRE mode, you may program six different programs with up to eight segments in each program. VARY-FIRE programs can be changed to whatever you need them to be. Each segment in a given program has a ramp rate (set in degrees Fahrenheit or Centigrade, heating or cooling, per hour), a set point temperature or cone number (the temperature that the ramp rate will heat or cool to), and an optional hold time at that temperature for up to 99 hours and 99 minutes.
- In the “EASY-FIRE” mode, the number of segments and the firing profile are preset according to the EASY-FIRE Temperature Profiles shown in the Appendix section. The ramp portion of a segment does not always need to increase in temperature. You can program a decrease in temperature at a specific rate also. EASY-FIRE programs can have preheat segments and cooling segments added to them, or they can stand alone.
WHEN YOU HAVE LESS THAN THREE THERMOCOUPLES
- If your kiln has only two thermocouples, you will not be able to find TC3 as there is no third thermocouple. The DynaTrol comes pre-programmed from the factory for your kiln’s particular specifications.
- If your kiln only has one thermocouple many of the features in the DynaTrol are not used. Rather than seeing IdLE and a TC1, TC2, or TC3, you will only see IdLE and a temperature flashing on and off. Likewise, any menu choice that controls relationships between the different “zones” in the kiln will either not even appear in the menu or will not affect the DynaTrol’s operation.
PROGRAMMING
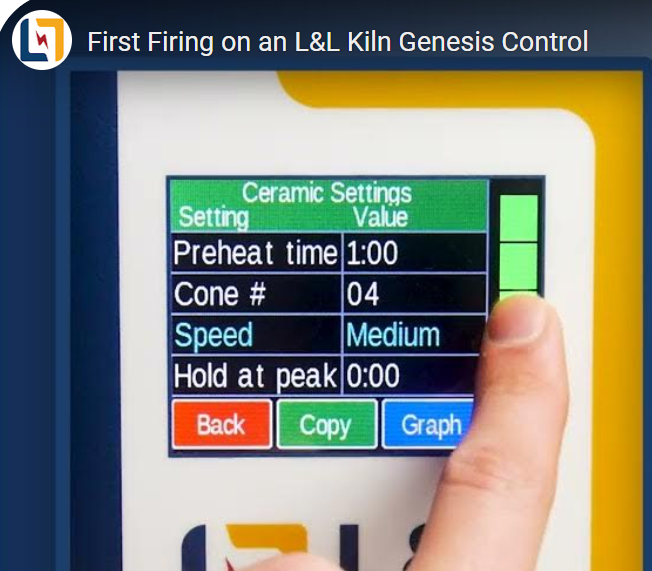
EASY-FIRE
The EASY-FIRE mode allows you to fire to a CONE NUMBER at one of four different speeds and then hold at that final temperature if desired. EASY-FIRE also allows you to add a preheat time to the beginning of the program and/or a slower cooling time or a more complex program to the end of it. These are the four preset EASY-FIRE programs that have been designed to do most typical ceramic firing cycles:
- Slow Bisque (very slow; approximately 13+ hours heating time only)
- Fast Bisque (slow; approximately 10+ hours heating time only)
- Slow Glaze (medium; approximately 6-1/2+ hours heating time only)
- Fast Glaze (fast; approximately 3+ hours heating time only).
These preset programs have specific ramps and speeds built into them. You can enter any cone number up to cone 10 *(see note below) as the hottest set point. This allows for some degree of customization while still keeping the programming simple and easy. The EASY-FIRE mode uses the Orton Foundation’s patented method to achieve the correct heat work, making these programs ideal for firing ceramics. The advantage of using the EASY-FIRE method is that a very complicated firing profile may be chosen with just a few keystrokes (see Appendix F for these firing profiles). These program’s final temperature set points are based on a 108°F temperature rise per hour for a large Orton self-supporting cone (rather than the small Orton cones or regular large Orton cones). Your real rate of climb may be different in the end; depending on a lot of different variables. Expect to see a lower final temp if the kiln goes slower or a higher one if it climbs faster.
NOTE: Some L&L Kilns are not designed to go to cone 10 or 2350°F. Consult your kiln’s control panel data nameplate label for the maximum operating temperature.
First Firing
See this page and scroll down to DynaTrol Section.
Easy-Fire Programming
See this page for a list of all Easy-Fire Programs and the typical length of time they take
To use EASY-FIRE:
Press: No need to press anything
Display: IdLE and TC(#)
Comment: Make sure IdLE and TC(#), and the current temperature are flashing. Note: If you only have one thermocouple enabled then you will not see TC(#).
Press: Press one of the four easy firing profile buttons: SLOW BISQUE, FAST BISQUE, SLOW GLAZE, or FAST GLAZE.
Display: You will see S-bC, F-bC, S-GL, or F-GL.
Comment: This is where you choose the Easy-fire program you want to run.
Press: ENTER
Display: See CONE and Cone Number flashing
Comment: This can be any cone from 022 to 10. If you type a wrong number here, press 0000 until all zeros appear in the display, press ENTER, then type the correct cone number.
Press: Type the cone number you want to fire to (for instance 05)
Display: See HOLd and 0.00 flashing
Comment: You are now about to enter a hold time (if any). Type the hold time or leave at 0.00. Numbers to the left of the decimal are hours; to the right are minutes. (Adding hold time will increase heat-work and effectively fire to a higher cone. The EASY-FIRE programs do NOT compensate for this.)
Press: Press a number if you want a hold time like 0.05 and then ENTER. If you want the hold to be 0.00 then just press ENTER.
Display: IdLE and TC2 and the current temperature will be flashing in the display.
Comment: You are done programming. Note: If you see RA 8, then you have the Controlled Cooldown turned on. See Section 6.4. If you only have one thermocouple enabled, you won’t see TC(#).
Press: START/STOP
Display: --ON--
Comment: This will begin firing.
Press: Review Prog
Display: See Section 8.1 for details on what you should see.
Comment: Do a program review to make sure the program is what you want.
EASY-FIRE Example 1
- Slow Bisque Firing Profile to Cone 04, Pre-heat of 1 hour, 2 minute Hold - Use the following steps for a bisque firing to cone 04, a 2 minute temperature hold at the peak temperature, and a preheat stage with 1 hour hold time.
- THIS IS JUST AN EXAMPLE. You can change the firing profile, cone number, hold time, or preheat time to fit your specific needs.
- To begin programming, the display must be reading IdLE, TC(#), and the current temperature. If you only have one thermocouple enabled, then you will not see TC(#).
Press: Slow Bisque
Display: S-bC
Comment: If you press the wrong button, before pressing ENTER, simply press the correct button.
Press: ENTER
Display: Alternately flashing:
CONE and #
Comment: The Slow Bisque profile is now selected. The word CONE and the last entered cone number will alternately flash. Now enter the cone number - 04.
Press: 04
Display: 04
Comment: (none)
Press: ENTER
Display: Alternately flashing:
HOLd & 0.00
Comment: The cone number has been accepted. Now enter the 10 minute hold time.
Press: 0010
Display: 00.10
Comment: Numbers left of the decimal are hours; right of decimal are minutes. If wrong, press 0000, then type again.
Press: ENTER
Display: IdLE and TC(#) flash, then current temperature
Comment: The 10 minute hold time is accepted. IdLE means the profile is set. If you see RA 8, Controlled Cooldown is on. If only one thermocouple is enabled, you won’t see TC(#).
Press: preheat
Display: Alternately flashing:
HLd and 0.00
Comment: Preheat has been selected; enter the hold time now.
Press: 100
Display: 1.00
Comment: Numbers left of the decimal are hours; right are minutes. For 1 hour, you could also enter .60. If wrong, press 0000, then retype.
Press: ENTER
Display: IdLE and TC(#) flash, then current temperature
Comment: Accepts 1 hour hold. IdLE indicates preheat stage is complete. If only one thermocouple is enabled, no TC(#).
Press: START/STOP
Display: -On-
Comment: After –On– appears, elements cycle on. If a time is shown instead of temperature, a delay start is active. To cancel delay, press START/STOP, then DELAY, then 0000, then ENTER. Then press START/STOP to re-start.
Press: Review Prog
Display: (none)
Comment: Review the program to ensure it’s correct (Section 8.1 for details).
EASY-FIRE Example 2
- Fast Glaze to Cone 06, 10-minute hold, 2-hour delay before start.
- Use these steps for a glaze firing to cone 06, 10-minute hold, and 2-hour delay. You can change any of these parameters as needed.
- If you only have one thermocouple enabled, you won’t see TC(#).
Press: Fast Glaze
Display: F-GL
Comment: If you press the wrong button, before pressing ENTER, press the correct button.
Press: ENTER
Display: Alternately flashing:
CONE and #
Comment: Fast Glaze is selected. The last entered cone number will flash with CONE.
Press: 06
Display: 06
Comment: If you type a wrong number, press 0000, then type the correct number.
Press: ENTER
Display: Alternately flashing:
HOLd & 0.00
Comment: The cone is accepted; now enter the hold time. If you see RA 8, Controlled Cooldown is on.
Press: 0010
Display: 00.10
Comment: 10 minutes hold. Left of decimal = hours, right = minutes. If wrong, press 0000, then retype.
Press: ENTER
Display: IdLE / TC(#) flash, then current temperature
Comment: Accepts 10 minute hold. If one thermocouple is enabled, no TC(#).
Press: Delay
Display: Alternately flashing:
dELA and 0.00
Comment: 0.00 or last delay time will flash with dELA.
Press: 200
Display: 02.00
Comment: 2 hours delay. Left of decimal = hours; right = minutes. If wrong, press 0000, then retype.
Press: ENTER
Display: IdLE / TC(#) flash, then current temperature
Comment: The 2-hour delay is accepted. If one thermocouple is enabled, no TC(#).
Press: START/STOP
Display: -On- then 2.00
Comment: Starts the 2-hour countdown. Kiln heats once timer hits zero.
Press: Review Prog
Display: (none)
Comment: Review the program if needed (Section 8.1 for details).
EASY-FIRE OPTIONS SECTION
Delay Button
- This button delays the start of a firing...
- To program a delay time, the display must read IdLE, TC(#), and current temperature. (If one thermocouple is enabled, no TC(#).)
Press: Press Delay
Display: See dELA and 0.00 cycling
Comment: (none)
Press: Press number keys to enter delay time
Display: Examples:
00.75 for 75 minutes
14.30 for 14 hours 30 minutes
Comment: Left of decimal = hours, right = minutes.
Press: ENTER
Display: IdLE / TC(#)
Comment: If only one thermocouple is enabled, no TC(#).
Once you program any EASY-FIRE or VARY-FIRE program, this delay will appear as a timer counting down when you press START/STOP. The firing begins once it reaches zero. It remains set until you change it.
Example: Program a one hour delay
Press: Delay
Display: Alternately flashing:
dELA and 0.00
Comment: Ready for 1 hour delay.
Press: 100
Display: 1.00
Comment: 1 hour. Left of decimal = hours; right = minutes.
Press: ENTER
Display: IdLE, TC(#) flashes, then current temperature
Comment: IdLE means it’s accepted. If one thermocouple is enabled, no TC(#).
Preheat Button
Preheat can be used with EASY-FIRE mode only... (rest of your explanation text remains unchanged).
Press: To preheat the kiln for a set time, first program an EASY-FIRE program...
Display: (none)
Comment: (none)
Press: PREHEAT
Display: See HLd and 0.00 cycling
Comment: (none)
Press: Enter the amount of Preheat time
Display: e.g. 03.00 for 3 hours, 0.75 for 75 mins
Comment: Left of decimal = hours; right = minutes.
Press: ENTER
Display: IdLE, TC(#) flash, then current temperature
Comment: If one thermocouple is enabled, no TC(#).
Preheat Example: Set a preheat time of 3 hours.
- Remember: choose and program an EASY-FIRE profile first...
- If you only have one thermocouple enabled, you won’t see TC(#).
Press: Preheat
Display: Alternately flashing:
HLd and 0.00
Comment: If you see IdLE it means a VARY-FIRE program is active. Preheat only works with EASY-FIRE.
Press: ENTER
Display: Alternately flashing:
HLd and 0.00
Comment: Now enter how long you want to hold at 200°F (example: 3 hours).
Press: 300
Display: 3.00
Comment: 3 hours. If you type wrong, press 0000, then type again.
Press: ENTER
Display: IdLE, TC(#) flash, then current temperature
Comment: IdLE indicates the preheat time is accepted. If one thermocouple is enabled, no TC(#).
Alarm Button
- This button’s function allows programming an audible alarm temperature...
- You may set the alarm before or during a firing...
- Example: set alarm to 600°F
Press: Alarm
Display: Alternately flashing:
ALRM and #
Comment: If no alarm is entered within 10s, it returns to IdLE, TC2, and current temperature. If only one thermocouple is enabled, no TC(#).
Press: 600
Display: 600
Comment: For 600°F. If wrong, press 0000, then type again.
Press: ENTER
Display: IdLE, TC 2 flash, then current temperature
Comment: The alarm is set. If only one thermocouple is enabled, no TC(#).
Downramping/Controlled Cooling with EASY-FIRE
- If your kiln is cooling too rapidly...
- A kiln with a light load or large chamber may cool more quickly...
- You may want to test your kiln’s natural cooldown rate...
- Method #1: add a simple one-segment cooldown to end of EASY-FIRE.
- Method #2: add a more complex VARY-FIRE program for multi-segment cooldown.
Controlled Cooling

See https://www.youtube.com/video/zQUCwQ1fdro?si=XPv5S1va2UQzQH41
Method #1 Using the simple Easy-Fire method
Access the hidden menu by pressing OTHER followed by 443.
Use the OTHER key to scroll through the options until you reach COOL and press ENTER. (Note – COOL is towards the end of the options.)
Press 1 on the keypad to toggle this option ON/OFF and press ENTER to confirm your selection.
Now with the COOL option turned on, extra parameters will be added to the typical EASY-FIRE programming options (RA8, F*8, Hld8).
Simply input your rate of cooling for RA8 and the temperature to controlled cool down to for F*8. You can add a hold at that final temperature as well.
As long as COOL is enabled, these parameters will be shown to you. After each firing these options will default back to 0. Leave RA8 at 0 if you don’t want a controlled cool for this program.
Method #2 using the more sophisticated Vary-Fire method
First you enter the cooling segment. (NOTE: If your kiln is brand new this cooling segment is already entered in your DynaTrol. If you are not sure that it is in there, it will not hurt anything to re-enter it.
Start by pressing the ENTER PROG button in the VARY-FIRE Section
Press 6 and then press ENTER to program USER 6.
Program USER 6 with the desired cool down program. 150 degrees F per hour down to 1400 F is a good cooling program. Once we finish these steps, USER 6 will start when your EASY-FIRE program reaches complete (CPLT). If you do not know how to program a VARY-FIRE program, see Section 7.
NOTE: Segment 1 of USER 6 is utilized by the controller and cannot be used for the program. Therefore the number of segments you input for the program will need to be one greater than the number of segments that are really being used for the cooling. Once you begin programming USER 6; when the display asks for RA1 press ENTER, ENTER, ENTER and begin the cool-down part of the program with segment 2.
Press the desired EASY-FIRE program button (i.e. Slow Bisque, Fast Bisque, Slow Glaze or Fast Glaze).
Program the EASY-FIRE portion for the program. Do this just as you would for any EASY-FIRE program.
To tell it to join the cooling program to the EASY-FIRE program, press the Other button until 16-S appears in the display. Press ENTER.
Press the 1 key until the desired condition is displayed. On will allow EASY-FIRE program to flow into VARY-FIRE USER 6 and OFF will disable this option.
Press the ENTER button. Programming is now complete. If 16-S is On then the controller will complete the EASY-FIRE program and, upon finishing it, will run the VARY-FIRE USER 6 program.
NOTE: 16-S will appear in the Program Review when you press the Review Prog button. Once the USER 6 is programmed with the controlled cooling segment you do not need to enter it every time. In place of steps 1-3; do the following: 1) Press Recall Prog. 2) Press #6. 3) Press ENTER. Then follow with steps 4-8 above.
Note: It does not matter whether COOL in the Hidden Menu is turned on or off for the second method.
EASY-FIRE Example 3 with a controlled cooldown (using Vary-Fire method)
Slow Glaze Firing Profile to Cone 6, 5 minute Hold, Controlled Cooldown.
Press: Enter Prog
Display: Alternately flashing: USER and #
Comment: You FIRST have to program the cooldown program BEFORE you program the EASY-FIRE program. Otherwise the control thinks you are going to use VARY-FIRE program #6 as your main program.
Press: 6
Display: 6
Comment: You are going to program VARY-FIRE program No. 6
Press: ENTER
Display: Alternately flashing:
SEGS and 2 (or some other number 2-8)
Comment: This is the number of segments you will need. In most cases you will want 2 segments. The first segment IS NOT USED and it doesn’t matter what it says.
Press: 2
Display: 2
Comment: This tells the control you will be programming two segments
Press: ENTER
Display: Alternately flashing:
RA 1 and 0500 (or some other number)
Comment: This is the ramp of segment 1. It doesn’t matter what the value is because it will be ignored.
Press: ENTER
Display: Alternately flashing:
oF 1 and 0200 (or some other number)
Comment: This is the temperature set point of segment 1. It doesn’t matter what the value is because it will be ignored.
Press: ENTER
Display: Alternately flashing:
HLd1 and 0200 (or some other number)
Comment: This is hold value of segment 1. It doesn’t matter what the value is because it will be ignored.
Press: ENTER
Display: Alternately flashing:
RA 2 and 0000 (or some other number)
Comment: This is asking you what ramp value to put in for segment 2. This will be our cooldown rate in degrees F.
Press: 150
Display: 150
Comment: We will cool at a rate of 150 deg F per hour.
Press: ENTER
Display: Alternately flashing:
oF 2 and 0000 (or some other number)
Comment: This is asking you what temperature value to put in for segment 2, the target to cool down to. Must be lower than final cone temperature.
Press: 1400
Display: 1400
Comment: We will have a controlled cooldown to 1400°F.
Press: ENTER
Display: Alternately flashing:
HLd2 and 0000
Comment: This is asking you for a hold time in segment 2.
Press: 0000
Display: 00.00
Comment: Hold of zero
Press: ENTER
Display: Alternately flashing:
ALRM and 9999
Comment: This is asking you for an alarm temperature. 9999 keeps it off.
Press: ENTER
Display: IdLE, TC(#) flashes then the current temperature
Comment: The cooling segment is complete. Now we must enter the heating part of the program. If only one thermocouple is enabled then you will not see TC(#).
Press: Slow Glaze
Display: S-GL
Comment: If you press the wrong button, before pressing ENTER, simply press the correct button.
Press: ENTER
Display: Alternately flashing:
CONE and #
Comment: Slow Glaze is selected. The word CONE and the last entered cone number will alternately flash on the display.
Press: 6
Display: Alternately flashing:
CONE and 6
Comment: If you type a wrong number, press 0000, press ENTER, then type the correct cone number.
Press: ENTER
Display: Alternately flashing:
HOLd and 0.00
Comment: The cone number has been accepted and the hold time is entered now.
Press: 05
Display: 05
Comment: The Hold time is displayed. If you type a wrong number, press zero 4 times, then type the correct number.
Press: ENTER
Display: IdLE, TC(#) flashes then the current temperature
Comment: Accepts a hold time of 5 minutes and then IdLE indicates the heating part of the program is complete. If only one thermocouple is enabled then you will not see TC(#).
Press: Other, Other, Other, Other
Display: 16-S
Comment: This means “16 segment”. This is how we add the two programs to each other.
Press: ENTER
Display: OFF
Comment: The 16 segment feature is turned off as the default setting.
Press: 1
Display: On
Comment: Pressing 1 turns the 16 segment feature on. You can toggle between OFF and On by pressing 1 again.
Press: ENTER
Display: IdLE
Comment: You have now activated the 16 segment feature which will start VARY-FIRE Program No 6 when the EASY-FIRE program finishes
Press: START/STOP
Display: -On-
Comment: Starts the program..
Press: Review Prog
Display: (none)
Comment: You will see 16-S at the end of the displays that scroll. This tells you that VARY-FIRE Program #6 will start when your EASY-FIRE program ends.
VARY-FIRE CUSTOM PROGRAMMING
GENERAL CONCEPT
- The VARY-FIRE mode allows you to program exactly how you want the kiln to fire. It provides a very broad range of programming possibilities designed to allow these kilns to be used in many different ways. The DynaTrol allows you to permanently store 6 separate programs with up to 8 ramp/hold segments in each program.
- Each segment has one cooling or heating ramp, a temperature setpoint, and an optional hold time at that setpoint.
- These programs are stored in a non-volatile memory bank, meaning they will stay in memory even when all power is turned off.
- The DynaTrol allows you to hold at a low temperature for a long time (i.e. you can have an automatic drying period similar to the Preheat option in the EASY-FIRE mode). Then, it can automatically ramp up to your final temperature, switching to different heating or cooling rates along the way. You can ramp slowly through critical periods or soak at any temperature within or at the end of a firing for more consistent maturing of work. Your program can include a controlled cool down to avoid heat shock.
- Many of these options are permanently programmed into the EASY-FIRE programs to maximize their ability to properly fire your ceramics. However, with the VARY-FIRE programs, you have complete control over nearly every aspect of the firing, so you can adjust the kiln performance to your exact needs. This can allow the kiln to be used for non-ceramic applications such as glass slumping, annealing, enameling, growing crystals, jewelry, heat treating, testing, and other industrial uses.
- In the VARY-FIRE mode, your saved programs are called USER1, USER2, … USER6. These are the names that will define your programs and make them easy to recall in order to use them to fire the kiln.
- These six program slots: USER1, USER2, … USER6, etc., come with generic programs already in place. These programs can be replaced with your own custom programs, and the original programs can be recalled at any time in the future. If they are recalled, however, they will replace any of the custom programs that you have saved under USER1, USER2, … USER6.
Factory Loaded VARY-FIRE Programs
The six factory-loaded programs in the VARY-FIRE’s custom program slots are as follows (these may vary with the age of the control):
- USER1 is a glass slumping program
- USER2 is a glass tack fuse program
- USER3 is a glass full fuse program
- USER4 is a glass bead annealing program
- USER5 is a lost-wax burnout program
- USER6 is a slow cooling cycle that can be added to a CONE 6 firing (or can be altered to add to any firing) but only when the 16-S option is selected
NOTE: See the Appendix H section in this manual for exactly what each of these programs will do.
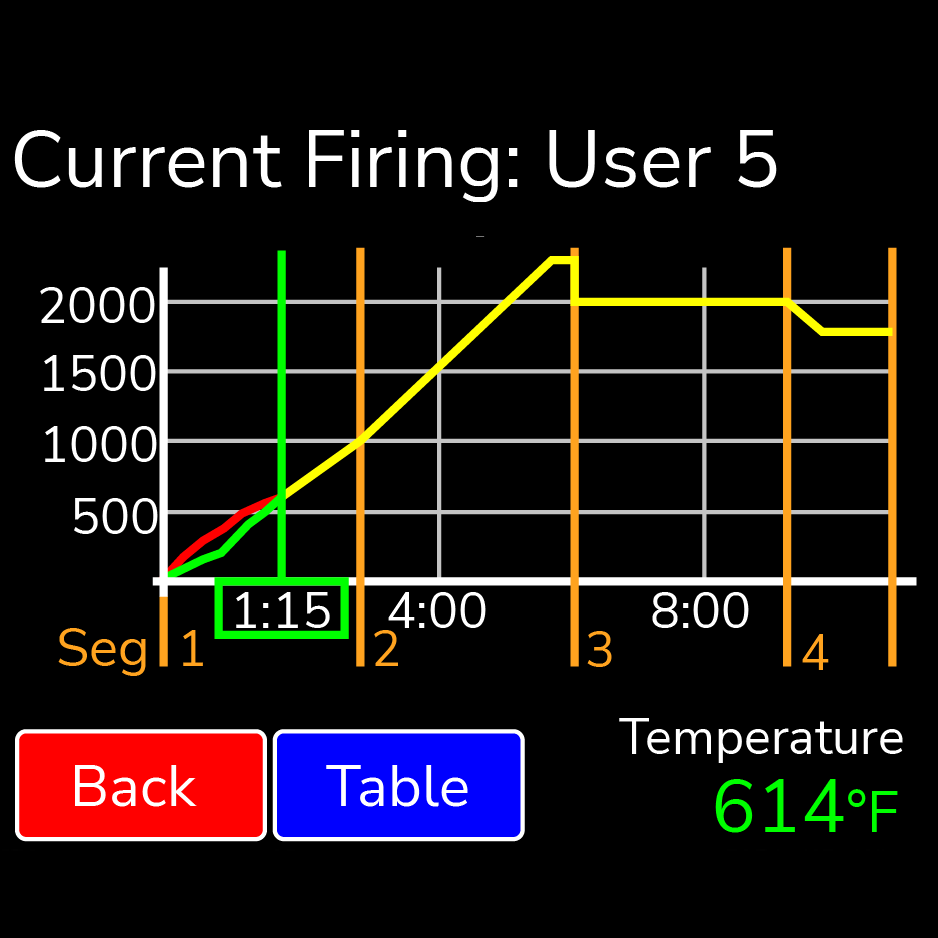
VARY-FIRE Chart Concept
VARY-FIRE programs, in general, are best thought of in terms of a chart.
For example, a three-segment program with a maximum set point temperature of 1575°F, a one-hour hold time, and a controlled cooldown.
- In segment 1, ramp rates are at first only 100°F per hour until the entire kiln’s temperature reaches 200°F.
- Then, with no hold time in segment 1, the control automatically switches to segment 2, which will allow the kiln to rise at 500°F per hour until its maximum setpoint at 1575°F.
- Then it will hold for one hour at 1575°F.
- Then, in segment 3, it will cool from 1575°F to 1000°F at 143°F per hour.
- Once the kiln temperature cools to 1000°F the firing is complete and the kiln heaters will turn off.
Segment
Rate °F/hour
Temperature
Hold
Segment: 1
Rate: 100°F/Hour
Temperature: 200°F
Hold: 0
Segment: 2
Rate: 500°F/hour
Temperature: 1575°F
Hold: 1 hour (01.00)
Segment: 3
Rate: 143°F/hour
Temperature: 1000°F
Hold: 0
VARY-FIRE Example
The following steps are used to enter a program under USER1 for the firing profile in the above example.
Programming Vary-Fire Programs

See https://www.youtube.com/video/mUp3rdc2dDU?si=2bByV7whOd_0ldaA
Recalling a Vary-Fire Program

See https://www.youtube.com/video/fDJC-nMn3KA?si=s9gK-TawAJUE4oKd
NOTE: You can change the program’s name (the USER number), change the number of segments, and change the ramping rates, segment setpoints and hold times within each of the segments. You can even add a DELAY time to ensure that you will be around for the end of the firing, all to fit the program to your own specific needs.
Press
Display
Comment
Press: Enter Prog
Display: Alternately flashing:
USER and #
Comment: The display alternates between USER and the last selected firing profile number.
Press: 1
Display: 1
Comment: Selects user (USER) profile number 1. Only choose USER 1 if you wish to program over the program that is already there.
Press: ENTER
Display: Alternately flashing:
SEGS and #
Comment: The displays flashes between SEGS and the number of segments previously selected for this profile.
Press: 3
Display: 3
Comment: This is the number of segments needed for our example profile.
Press: ENTER
Display: Alternately flashing:
RA 1 and #
Comment: The display flashes between RA1 and the heating rate per hour previously selected for this profile.
Press: 100
Display: 100
Comment: Displays the selected rate/hour.
Press: ENTER
Display: Alternately flashing:
°F and b
Comment: The display flashes between °F1 and the temperature previously selected for this profile.
Press: 200
Display: 200
Comment: Displays the selected temperature.
Press: ENTER
Display: Alternately flashing:
HLd1 and #
Comment: The display flashes between HLd1 and the hours/minutes previously selected for this profile.
Press: 0
Display: 00.00
Comment: No hold time.
Press: ENTER
Display: Alternately flashing:
RA 2 and b
Comment: The display flashes between RA2 & the heating rate previously selected for this profile.
Press: 500
Display: 500
Comment: Displays the selected rate/hour.
Press: ENTER
Display: Alternately flashing:
°F and #
Comment: The display flashes between °F2 & the temperature previously selected for this profile.
Press: 1575
Display: 1575
Comment: Displays the selected temperature.
Press: ENTER
Display: Alternately flashing:
HLd2 and #
Comment: The display flashes between HLd2 & the previously selected hold time.
Press: 0100
Display: 1.00
Comment: One Hour hold time at 1575°F. Holding at top temperature can add extra heat work (2-3 cones). Enter 0000 for no hold.
Press: ENTER
Display: Alternately flashing:
RA 3 & #
Comment: The display flashes between RA3 and the heating rate previously selected for this profile.
Press: 143
Display: 143
Comment: Displays the selected rate/hour.
Press: ENTER
Display: Alternately flashing:
°F & b
Comment: The display flashes between °F3 and the temperature previously selected for this profile.
Press: 1000
Display: 1000
Comment: Displays the selected temperature.
Press: ENTER
Display: Alternately flashing:
HLd3 & #
Comment: The display flashes between HLd3 and the previously selected hold time.
Press: 0
Display: 00.00
Comment: No hold time.
Press: ENTER
Display: Alternately flashing: ALRM & #
Comment: The display alternates between ALRM and the previously used alarm setting.
Press: 9999
Display: 9999
Comment: Enters the temperature at which the alarm will sound. 9999 = alarm off.
Press: ENTER
Display: CPL flashes then IdLE, TC(#), current temperature
Comment: CPL flashes indicating the program is done. IdLE then the current temperature flash in the display. If only one thermocouple is enabled, you won’t see TC(#).
Preheating (Candling) with VARY-FIRE
There is no actual Preheat option in the VARY-FIRE mode. You must include another segment in your program in order to “Preheat”. To preheat in the VARY-FIRE mode you would make your first segment as follows:
rA1 = 60 , °F = 200 and HLD1 (time you wish to preheat for)
Down-ramping, or Controlled Cooling with VARY-FIRE
To have the kiln cool at a prescribed rate, slower than its natural rate, within a program, or at the end of a firing, first consider the following.
- A kiln with a light load or a large firing chamber will cool more quickly than a kiln with a heavy, dense load or a small firing chamber assuming the same thickness of the insulation. So you may want to test your kiln to see how quickly it cools at high and low temperatures to see what type of cooling segment(s) you need.
- When using just VARY-FIRE programming, treat a cooling segment the same as a heating segment when programming the DynaTrol. While programming, you must initially add an extra segment. Then, when you input the RA number in this segment (ramp or rate of rise or fall in °F or °C per hour), this number will be the number of degrees per hour that you want the kiln to COOL. Next, input a number as the set point temperature in °F (or °C). This number will be the temperature to which the kiln will cool, at the rate you have just programmed. You can then program a hold (if you need one here) at this temperature. The program can then end (this was your last segment) or it can continue on cooling or go back to heating in the next segment.
- All that the DynaTrol knows is that to be a cooling segment, the set point must be LOWER than the previous segment’s set point. It will treat the ramp rate the same for either heating or cooling, just moving the temperature along at the prescribed rate. (See the previous example for the VARY-FIRE).
- NOTE: When programming a firing with a controlled cooling, be sure to put at least one heating segment before the cooling segment as the kiln cannot cool first. It must heat first before cooling.
Using VARY-FIRE to fire to a CONE number
You can use a VARY-FIRE Program to set a Cone Number as the hottest point instead of a specific temperature. This is particularly useful for firing glazes to a specific cone, like “cone 6”. The VARY-FIRE program will automatically adjust the final temperature in the segment where you set the cone number. Note: All subsequent set points in later segments must have a lower temperature than the Cone segment.
To do this:
- While programming a VARY-FIRE program, when you reach the point where you would normally enter the highest temperature, press "Other" instead.
- Enter the desired cone number, then press "ENTER".
- Continue with that segment’s hold time and any later cooling segments.
If you change your mind, pressing "Other" before entering a cone number will return you to the option to input a temperature instead.
For more details, refer to the "Programming Vary-Fire" video above and skip to 4:45.
Adding Two VARY-FIRE Programs Together
- The USER 6 program can be added to the end of USER 5 in an EASY-FIRE or VARY-FIRE program. USER 6 comes pre-programmed as a slow cooldown from a Cone 6 firing. It can be adapted to be a slow cooldown from a different cone number or temperature, or with a few adjustments, it can be its own program, or it can be the second half of a sophisticated 16-segment crystalline glaze program, for example.
- To add whatever is programmed in USER 6 to whatever you program in USER 5, you must first put USER 5 in active memory by recalling it. Then turn on the 16-S feature—located under the Other key—so the control knows to join those two programs together and run first USER 5, then immediately follow it with USER 6. Think of the first segment of USER 6 following right after the end of USER 5.
The UNDO/GO-BACK Button
- The Review Prog (Review Program) button acts as the Go-Back button during VARY-FIRE Programming only. If you are programming a segment of a VARY-FIRE program, you can go backward to change something by pressing Review Prog. Once you reach the ALRM, 9999 part of the programming, you can no longer go backward.
- If you cannot go back, just continue on and finish programming like nothing was wrong. Then, when you get back to IdLE, go back in and program it correctly.
- You cannot go backward in the EASY-FIRE programming at all. Just finish programming as if no mistake was made, then once you are back to IdLE, re-program it correctly.
The RECALL PROG (RECALL PROGRAM) Button
- This button is used to call up one of your six previously programmed USER firing profiles in order to use that program to fire the kiln.
- See the video above.
- Example: To recall USER profile #4, do the following. First enter your program into User Profile #4, then:
Press
Display
Comment
Press: Recall Prog
Display: Alternately flashing:
USER and 1
Comment: The controller is ready to accept the desired user number.
Press: 4
Display: 4
Comment: Indicates the user program selected.
Press: ENTER
Display: CPL flashes then IdLE, TC(#), current temperature
Comment: CPL flashes indicating the program has been completed. IdLE then the current temperature flashes in the display. Note: If you only have one thermocouple enabled then you will not see TC(#).
The SKIP-STEP Feature
- The Skip Step function uses the Review Seg (Review Segment) button. The Skip Step feature is only available in a VARY-FIRE firing profile. It is used when enough heat work has been done at the current segment, and you want to immediately go to the next segment. To skip to the next segment, press Review Seg, then within 2 seconds, press ENTER, and ENTER a second time. If you press View Seg and do not press ENTER within 2 seconds, the current segment (e.g., rA1) will continue to be displayed. Simply wait until the temperature is again displayed and press Review Seg, then ENTER within 2 seconds, and ENTER again. If you press Review Seg, then ENTER, then decide not to skip to the next ramp stage, simply do not press any key; after about 10 seconds, the display will return to the current temperature.
- If you are currently in the ramping part of the segment and you skip the step, you will jump over any hold time in that segment and go directly to the ramp in the next segment. If you are currently in the hold part of a segment and you skip a step, you will just go to the ramp in the next segment.
Full Power Ramp
- If a ramp rate of 9999 degrees per hour is programmed, a full power ramp will be enabled.
- At the start of a full power-up ramp, the elements will continuously be on until the soak temperature is reached.
- At temperatures 50 degrees less than the programmed soak temperature, the elements will begin to cycle to minimize overshoot.
- A full power ramp is the quickest way to reach a specified temperature.
- You can also use a full power ramp for troubleshooting purposes, forcing the elements on so that you can test them with a multimeter.
VIEW/ REVIEW AND SPECIAL OPTIONS
Review Prog (Review Prog)
- This feature is useful for ensuring that the program you have just selected to fire, either one of the preprogrammed EASY-FIRE programs or one of your six USER programs, is the one you think it is.
- You can use the Review Prog. But button to verify that you have a delay, preheat, or any other option…It will also tell you how many firings have been completed on the kiln.
Review Program

See https://www.youtube.com/video/yau3zjmpiSE?si=3VUMTtf5Fb7kWmGa
Example - If you have selected a Slow Bisque “EASY-FIRE” profile to cone 04 with a 20 minute hold, the following will be displayed, each for about 1/2 second when Review Prog is pressed:
Display
Comment
Display: S-bC
Comment: Slow Bisque firing profile
Display: PRHT
Comment: Indicates the next value will be the preheat hold time
Display: 0.00
Comment: No preheat hold time is selected
Display: CONE
Comment: Next value will be the selected cone number
Display: 04
Comment: Selected cone number
Display: °F
Comment: Next number will be the cone temperature
Display: 1926
Comment: DynaTrol’s temperature for cone 04
Display: CNOS
Comment: Next value will be the amount of offset applied to that cone number
Display: 0
Comment: No offset—offset is degrees +/- you can add to a cone’s temp
Display: HOLd
Comment: Next number will be the hold or soak time at the end of the firing
Display: 0.20
Comment: 20 minutes hold selected
Display: dELA
Comment: Next number will be the delay time before start of firing
Display: 0.00
Comment: No delay—firing starts when START/STOP is pressed
Display: ALRM
Comment: Next number will be the high alarm limit setting
Display: 9999
Comment: Alarm is off (max number = alarm disabled)
Display: ERCd
Comment: Next message: error codes ON or OFF
Display: ON
Comment: Error codes are ON
Display: FIRE
Comment: Next number is how many times the kiln has been fired
Display: 25
Comment: Kiln has been fired 25 times (yours may differ)
Display: IdLE
Comment: End of firing profile—returns to IdLE
Review Seg (Review Segment)
Pressing the Review Seg key during a firing will display several different pieces of information about the status of the firing.
Once pressed, this is what the DynaTrol is displaying:
- First: The Current Segment
- Next: The Rate of Rise (in degrees Fahrenheit per hour)
- Next: The Traveling Temperature Set Point (This means that the set point temperature is moving with the program. The set point is the specific temperature the control tells the kiln to achieve).
- Last: The actual physical temperature of the DynaTrol’s circuit board.
Examples of Review Seg:
If you press Review Seg, the FIRST message is:
It Means:
If you press Review Seg, the FIRST message that is displayed is…
STOP
It Means: No firing is in progress; the controller is idling (IdLE, TC2, current temperature)
If you press Review Seg, the FIRST message that is displayed is…
rA 4, 500
It Means: Kiln firing ramp stage in segment 4 at 500°F/hour. Then you’ll see SETP and the traveling set point.
If you press Review Seg, the FIRST message that is displayed is…
rA 3, 50
It Means: Kiln firing ramp stage in segment 3 at 50°F/hour. Then SETP and traveling set point appear.
If you press Review Seg, the FIRST message that is displayed is…
HLd2
It Means: Kiln firing, hold stage in segment 2.
If you press Review Seg, the FIRST message that is displayed is…
HLd6
It Means: Kiln firing, hold stage in segment 6.
If you press Review Seg, the SECOND message that is displayed is…
Something like SETP and a number (e.g. 200)
It Means: The traveling set point changes constantly based on the program. The DynaTrol compares this set point to the actual thermocouple temperature to decide how to power the elements.
If you press Review Seg, the THIRD message that is displayed is…
The ambient temperature of the DynaTrol’s electronics, e.g. bd T 100
It Means: The board temperature is 100°F. If above 125°F, it may be detrimental to the DynaTrol. Check environment safety.
THE ‘OTHER’ BUTTON
- The Other button opens a menu which contains many of the different user-programmable settings.
- As you press Other again and again the menu will scroll by. You can press Review Seg to go backwards in the menu.
- NOTE: You can not access the Other menus while the control is firing a program.
The OTHER Options

See https://www.youtube.com/video/OVhSxuSRlhM?si=ghjE7Gxe4Y_mBFPy
The OTHER Menus Overview
Reset feature RSET
Cone Lookup Table CONE
Controller ID Id
16 step program 16-S (only comes up if you have VARY-FIRE Program #5 or an EASY-FIRE program in active memory)
Cone temperature offsets CNOS
Temperature scales °F or °C CHG°
Error codes ON or OFF ERCd
Thermocouple offset TCOS
Board temperature bd T
TO EXIT this menu without changing anything, press the START/STOP button.
Reset
RSET - Choosing this function will re-assign the default value (ON) to the Error codes only. Press Other until RSET is displayed. Then press ENTER. IdLE will be displayed indicating that the Error Checking is ON. This is also the screen where you can enter the “Hidden Other Menu” (See Section 10 for more information).
Cone Lookup Table
CONE - This option allows you to type in a cone number and see what the DynaTrol’s programmed temperature is for that cone number at a temperature climb of 108°F per hour. This function is provided as a handy reference table to use while you are programming. There is a more complete cone table here: hotkilns.com/orton-cone-chart. Remember, however, that there is no absolute equivalent between cones and temperature.
Cone Table Example:
Press
Display
Comment
Press: Other, Other
Display: CONE
Comment: The word CONE will appear on the display
Press: ENTER
Display: Alternately flashing: CONE and a cone number (e.g. 07)
Comment: The word CONE and a cone number will alternately flash on the display.
Press: 04
Display: 04
Comment: This is the cone we’re looking up in this example
Press: ENTER
Display: 1945
Comment: The cone temperature is displayed for 2 seconds, then IdLE and the flashing current temperature return
Identification
Id - Used by KISS (Kiln Interface Software System) to identify the kiln when hooked up to a personal computer. Normally this is set to 1. If you are not using the control in a KISS environment it doesn’t matter what it says.
Note: This software is no longer available so this is for legacy situations only.
Sixteen Segment Program
16 Segment Long Programs

See https://www.youtube.com/video/5DI3IbGP83g?si=UvDkxis6K0ayDLDC
16-S - This option allows VARY-FIRE profile #5 or any EASY-FIRE program to be combined with USER 6 to make one profile with up to 16 segments. It shows up in the Other menu only when VARY-FIRE #5 Profile or any EASY-FIRE program has been programmed . To use it, first, program VARY-FIRE Profile #5 or an EASY-FIRE program. Note that the beginning segment of Profile #6 should be entered as if it was to start directly after the ending segment of the EASY-FIRE program or of VARY-FIRE profile #5.
To take advantage of this feature do the following:
Press
Display
Comment
Press: (none)
Display: (none)
Comment: First, program VARY-FIRE Profile #6, then VARY-FIRE Profile #5. Then...
Press: RECALL PROGRAM
Display: USER and 1
Comment: This is asking which program to recall; you can press 5.
Press: 5
Display: 5
Comment: USER 5 containing at least the first half of your program is chosen, press ENTER.
Press: ENTER
Display: IdLE
Comment: The program USER 5 has been recalled.
Press: OTHER (4x)
Display: 16-S
Comment: Press Other until 16-S appears. Press ENTER to accept.
Press: ENTER
Display: OFF
Comment: This option is currently OFF. Use any number key to toggle ON/OFF.
Press: 1
Display: ON
Comment: This turns on the 16 segment programming—linking USER 5 & USER 6. Press ENTER.
Press: ENTER
Display: IdLE
Comment: This activates and confirms the programming.
Press: START
Display: (none)
Comment: The controller will fire VARY-FIRE Profile #5 until complete, then run VARY-FIRE Profile #6.
NOTE: If you just want USER 5 to fire without automatically being followed by whatever is programmed in USER 6, double-check that this option is set to OFF. It will show up in the Program Review. If you have activated the 16-S feature and you press Review Prog it w, it will only show you the first half of the program: 5 or the EASY-FIRE program. It will not show you the contents of USER 6 in the Review Program. It will show you 16-S as it scrolls through the Review Program. This is your clue that whatever is in USER 6 is going to follow your current program.
Cone Offset
Cone Offset

See https://www.youtube.com/video/5IZWQMHjxQM?si=a0nuc6-hD7K7BNhs
CNOS (Cone Offset) - Used to fine-tune what the DynaTrol thinks the final cone temperature should be in EASY-FIRE programs. The final cone temperature can be raised or lowered to a maximum of 99°F (or 55°C). When entering the offset temperature, the following code is used: the left two digits designate whether to raise (00) or lower (90) the cone temperature; that is, 00 means plus (+), and 90 means minus (-). The right two digits are the number of degrees the cone temperature will be raised or lowered. This offset will remain programmed only for the specific cone number until you reprogram the cone offset differently
Examples of Cone Offset:
Number
Meaning
Number: 0020
Meaning: Raise the final cone temperature by 20°F
Number: 0040
Meaning: Raise the final cone temperature by 40°F
Number: 0015
Meaning: Raise the final cone temperature by 15°F
Number: 9030
Meaning: Lower the final cone temperature by 30°F
Number: 9005
Meaning: Lower the final cone temperature by 5°F
Number: 9045
Meaning: Lower the final cone temperature by 45°F
NOTE: This option does not affect the VARY-FIRE (Ramp-Hold) mode but it will show up on the menu.
NOTE ABOUT PREPROGRAMMED CONE OFFSETS: The Cone Offsets come preprogrammed. From cone 022 to cone 017 the cone offsets are set at 9020. All other cones are preset at 0000. (Note on Blue DynaTrols made before Oct 1 2004 the cone offset was 9030 for cones 022 to 017 and 9020 for other cones. The offsets were changed when we switched to a more responsive thermocouple protection tube). You can always change this. The RESET option in Other menu will NOT reset these settings. This is part of the compensation necessary for the mullite thermocouple protection tubes.
See the video on Cone Offset
Cone Offset Example: Adjust cone 07 to shut off the kiln at 20°F below Orton’s prescribed cone temperature.
Press
Display
Comment
Press: OTHER (several times until you see…)
Display: CNOS
Comment: If CNOS does not show, keep pressing OTHER until it does.
Press: ENTER
Display: Alternately flashing:
CONE and #
Comment: Cone Offset selected. Now enter the cone number to adjust (e.g. 07).
Press: 07
Display: Alternately flashing:
CONE and 07
Comment: If you type a wrong number, press 0 three times, ENTER, then type correct number.
Press: ENTER
Display: Alternately flashing:
°F0S and 0
Comment: Shows the previous offset setting. Enter new offset (in this example 9020).
Press: 9020
Display: 9020
Comment: If wrong, press 0 four times, then type correct offset.
Press: ENTER
Display: IdLE, TC(#), current temperature
Comment: IdLE & current temperature flash. If only one thermocouple is enabled, TC(#) will not appear.
Change from Deg F to Deg C
CHG° - Used to select degrees Fahrenheit (°F) or degrees Celsius (°C).
Changing from Deg F to Deg C

See https://www.youtube.com/video/m-elmu-B9lI?si=lMQbdvMurTRYKzPP
Example: Change from °F to °C.
Press
Display
Comment
Press: OTHER (several times until you see…)
Display: CHG°
Comment: If CHG° is not shown, keep pressing OTHER until it displays.
Press: ENTER
Display: °F
Comment: Indicates Fahrenheit is in use. Press 1 to toggle between °F and °C.
Press: 1
Display: °C
Comment: Displays °C. A decimal point in lower right corner means Celsius scale is selected.
Press: ENTER
Display: IdLE, TC(#), current temperature
Comment: IdLE indicates the scale change. The kiln’s current temperature in °C flashes, with a decimal in the corner.
Error Codes (On/Off)
ERCd - Used to turn ON or turn OFF the error codes. When you receive your DynaTrol the error codes are turned on. In most cases, you will want the error codes on. They can be turned off if you are doing special firings, such as jewelry or glass firing where the kiln is opened while hot. Turning the error codes off turns off the dynamic zone control feature that keeps the temperature in the kiln even top to bottom. It eliminates nuisance shut downs but side also eliminates built in fail-safe measures that help prevent mistakes. See Appendix E for details on error codes.
Turning Off Error Codes

See https://www.youtube.com/video/xohgXtp-2VA?si=0bOH8ldpSDe_aDmL
Example: Turn the error codes off.
Press
Display
Comment
Press: OTHER
several times until you see:
Display: ERCd
Comment: If ERCd does not show, press OTHER until it displays.
Press: ENTER
Display: ON
Comment: Indicates error codes are ON. Toggle ON/OFF by pressing 1.
Press: 1
Display: OFF
Comment: Displays OFF, meaning error codes are turned off.
Press: ENTER
Display: IdLE flashes, indicating error codes are off.
Comment: IdLE means programming is complete. Then IdLE, TC2, and current temperature cycle.
More on how and why to turn error codes on or off
Thermocouple Offsets
Thermocouple Offsets

See https://www.youtube.com/video/65uAZwkZxno?si=gJuJ4VBLyGQo_68g
TCOS - This is used to raise or lower the temperature indicated by any of the thermocouples.
- The maximum offset is 99°F (or 55°C).
- The format is the same as the cone offset: the left two digits designate whether to raise (00) or lower (90) the offset temperature; 00 means plus (+) and 90 means minus (-).
- When TCOS is displayed, press ENTER and TC1 will be displayed.
- Press ENTER and the current offset for the top thermocouple will be displayed.
- Press ENTER when the correct offset for the top thermocouples is displayed and then TC2 will be displayed.
- Repeat the process for TC2 and TC3, only inputting the offset on the thermocouples that need it. Raising the indicated temperature LOWERS the actual temperature in the kiln and, thus, the amount of heat work.
- Lowering the indicated temperature RAISES the actual temperature in the kiln and, therefore, the amount of heat work.
Thermocouple Offset Example
Entering this sequence of steps will make the TOP zone of the kiln fire cooler by 15°F than the rest of the kiln. To do this, the offset is performed on the top (#1) thermocouple only; however, the rest of the thermocouples must be programmed as well. The other one or two thermocouples (depending on model of kiln) would be programmed for a zero offset.
Reminder: IdLE and TC(#), and the current temperature must be cycling before you begin programming. Note: If you only have one thermocouple enabled then you will not see TC(#)
Press
Display
Comment
Press: OTHER
several times until you see:
Display: TCOS
Comment: Represents thermocouple offset, press ENTER
Press: ENTER
Display: TC1
Comment: Thermocouple #1 (top). Press ENTER.
Press: ENTER
Display: °FOS / 18
Comment: The DynaTrol asks how many degrees to add/subtract from thermocouple #1’s reading. Possibly preprogrammed as 18. Press 0000 to remove offset, or enter new offset (e.g. 33 for +15°F). Then press ENTER.
Press: 33
Display: 33
Comment: Now top thermocouple reads 15°F hotter, so it fires 15°F cooler if others remain 0 offset. Press ENTER.
Press: ENTER
Display: TC2
Comment: We must enter offsets for TC2 and TC3 as well. If zero, press ENTER to accept 0 offset.
Press: ENTER
Display: °FOS / 0050
Comment: Possibly shows 0018 or some other default. Press ENTER to keep, or 0000 for no offset.
Press: ENTER
Display: TC3
Comment: Press ENTER to check or set offset for thermocouple #3.
Press: ENTER
Display: °FOS / 0050
Comment: Possibly 0018 as well. Press ENTER to keep or set to 0000 for no offset.
Press: ENTER
Display: CPL or StOP
Comment: Thermocouple offset programming is complete.
- NOTE: The thermocouple offset will affect the final temperature in that zone for all EASY-FIRE and VARY-FIRE profiles. It remains programmed until changed.
- NOTE: On older kilns (before Sept 2020) The Thermocouple Offset was 0018 by default (room temp shows 18°F higher). The RESET option in Other does NOT reset these offsets.
- If you do not use the thermocouple protection tubes or have the newer open-end tube, set Thermocouple Offset to 0000.
- DynaTrols before Oct 1, 2004 had thermocouple offset 0050.
Board Temperature
bd t - You may press ENTER here to see the ambient temperature of the DynaTrol’s electronics. This can also be seen while firing by pressing Review Seg three times. (125°F is acceptable ambient operating temp)
HIDDEN OTHER MENU
This menu contains the programmable settings for the rest of the features in the DynaTrol. To find this menu, first IdLE and tC(#), and the current temperature must be cycling in the display. Note: If you only have one thermocouple enabled, then you will not see TC(#).
Press
Display
Comment
Press: OTHER
Display: RSET
Comment: (this is the first option in the Hidden Other Menu)
Press: 4, 4, 3
Display: NOTC
Comment: First hidden menu item. Press ENTER to change, or OTHER to go to the next item.
Press: OTHER
Display: Various options
Comment: Press Other to scroll through them.
Press: START/STOP
Display: (none)
Comment: Exits the Hidden Menu
NOTC: Number of Thermocouples
Changing to Single Zone

See https://www.youtube.com/video/N_pN_36AZrM?si=rSaN8fL_IH8Ul5Hj
NOTC is used to change the number of zones in your kiln (essentially, the number of thermocouples used).
- To run the kiln using only one thermocouple: When you see NOTC , press ENTER, then 1, then ENTER. If you choose to do this, you must use only thermocouple number 2 in the kiln, and we recommend putting it in the middle zone’s thermocouple hole. When you program the DynaTrol to use only one thermocouple, all the zones of the kiln will turn on and off simultaneously.
- To run the kiln using two thermocouples: When you see NOTC, press ENTER, then 2, then ENTER. If you choose to do this you must have thermocouple #1 in the top zone of the kiln and thermocouple #2 in the middle zone or in the bottom zone. When you program the DynaTrol to run using only two thermocouples, the bottom zone and the middle zone, go on and off simultaneously.
- To run the kiln using three thermocouples: When you see NOTC, press ENTER, then 3, then ENTER. If you choose to do this, thermocouple #1 must be in the top zone, thermocouple #2 in the middle, and #3 in the bottom. All three zones will operate independently and be tied to their respective thermocouples.
NOTE: Kilns with only one thermocouple can be programmed to run with two or three thermocouples, but because they physically only have one thermocouple, the FAIL message will be displayed referring to the non-existent thermocouple. You must then re-program for just one thermocouple. Likewise, two-section L&L kilns come with only two thermocouples. If you physically add a section to a two-section kiln, you will be able to add a third thermocouple. But if you program a two-section kiln for three thermocouples, you will receive the FAIL message referencing the non-existent thermocouple. You must then re-program for two thermocouples.
OP A: Option A
- Used to control a vent (or other device using output 4). Output 4 can be programmed to be on or off during each segment of a VARY-FIRE program.
- During an EASY-FIRE program, output 4 comes on at the beginning of the firing and turns off after the kiln has cooled to 150°F.
OP B: Option B
- Used to control a vent (or other device using output 4).
- Output 4 can be programmed to be on or off during each segment of a VARY-FIRE program.
- Output 4 comes on at the beginning of an EASY-FIRE program, off at 1450°F, back on after the firing is complete and the kiln has cooled to 1000°F, and finally off again when the temperature is below 150°F.
OP C: Option C
- For Vent Control: Output 4 can be programmed to be on or off during each segment of a Vary-Fire program. Output 4 is off during Easy-Fire programs.
- For Powered Bottoms or other uses: This option can be used to enable a powered bottom, if installed.
- When you press ENTER here, all you will see is CPL (meaning ‘Complete’). Now, when you program in VARY-FIRE mode, however, you will see an extra prompt in each segment called FAN1, FAN2,…FAN8. This will appear right before you see the rA1, rA2,…rA8 prompt. FAN, in this refers to the device being controlled (i.e. powered bottom or vent) and the number refers to the program segment. You can set the device to be either ON or OFF in each segment of programming in a VARY-FIRE program only by toggling between ON and OFF using a number key.
PCT: Percent
This option is used to turn on a powered bottom for a percentage of time relative to that of the bottom zone. To set, enter a number from 0% to 150% using the number pad. i.e. Entering 100 here would turn the powered bottom on whenever the bottom zone came on. Entering 50 here would turn the powered bottom on for about eight seconds, then off for about eight seconds if the bottom zone of the kiln was on all the time. 150 is the maximum you can enter. This pretty much ensures the power bottom is on all the time. The bottom zone would have to be on less than about 66% of the time to have the power bottom cycle if PCT was set to 150.
NOTE: Setting the PCt setting to 0000 will turn off all powered bottom options.
PId: PID Setting
This setting is not part of the powered bottom settings, It is always “on”. Pressing ENTER here allows you to set another percent setting that can help a slow, heavily loaded kiln fire faster. This setting comes pre-programmed at the factory for 65%.
Basically, you are determining how much help the middle zone of the kiln gives the bottom zone of the kiln when the bottom zone is lagging behind during heating. This function automatically activates your pre-programmed setting when the bottom zone is on 100% of the time. Without this feature, heat from the bottom zone will rise up and help to heat the other zones, so generally, the bottom of the kiln is on more than the other zones to compensate for this. Sometimes, the slow bottom zone will slow the whole kiln down. With this feature, the middle zone of the kiln will come on the programmed percent of the time that the TOP zone comes on if the bottom zone is on all the time. What was found during tests was that if the bottom was on 100% of the time, the top zone was generally on 90% of the time, but the middle zone was on only about 40% of the time. By programming a higher percentage, you can greatly speed up your firings. (You will have to experiment, try the factory setting at 65%, then try maybe 85%, and compare your results).
dIAG: Diagnostics
This is handy to use when your kiln is first delivered and set up to make sure it was done properly. It can also be useful in seeing if an element has burned out. Press ENTER when you see dIAG and open the lid of your kiln. When you are ready, press ENTER again and each zone of the kiln will turn on for 10 seconds starting with zone #1, the top zone. If you have a powered bottom, it will be on last; when it says OUT4. CAREFUL it can get hot and there is LIVE electricity – DO NOT TOUCH THE ELEMENTS! This will tell you if all the power circuits are hooked up right and working; , or if kiln sections are plugged in to the wrong receptacles on the control panel (Jupiter kilns only). If this is the case the zones will not turn on in the proper 1, 2, 3, order.
ShTO: Shut-Off Averaging
This option is used to shut off the automatic feature in the DynaTrol that holds the hottest part of the kiln at each segment’s set point until the average of the three (or two) thermocouples reaches that set point. Pressing 1 here allows you to toggle between ON and OFF.
- ON means that as soon as the hottest zone gets to the segment’s set point, the entire kiln switches to either the “hold time” or the next segment.
- OFF means that the DynaTrol will not let the hottest zone’s temperature rise until the average temperature of the three zones reaches that segment’s set point, then the kiln can begin the “hold time” or the next segment.
- You may want to turn this setting to ON if you fire with the “Lag” set for say 15 and the “Autolag” OFF. ON can also help to speed up a slow firing as well.
ALR4: Alarm For…
This option controls “output 4.” This feature is activated by pressing ENTER when ALR4 is displayed. It energizes output #4 on the DynaTrol electronics board when the Alarm goes off. Since the alarm is a temperature alarm and can be set to go off at a specific temp, output 4 can be connected (for example) to a relay that governs the power for an auto-dialer to call your cell phone so you know it is time to come check the kiln. Or it could be connected to a really loud buzzer or light for the kiln room door. Contact the factory if you want to learn more.
NOTE: On kilns with powered bottoms, DO NOT CHOOSE THIS OPTION. Your Powered Bottom is connected to output #4 and is best controlled by the ‘PCT’ option in the Hidden Other Menu. If this option is chosen, and you have a powered bottom, and you set the alarm, when the alarm goes off, the powered bottom will come on- even if the program is off. The bottom of your kiln could get a bit hot if this happens. Just another reason why it is good to never leave a firing unattended.
CYCL: Cycle Time
- The cycle time is the length of time between an element turning on two consecutive times.
- Using a short cycle time may improve temperature control, while using a long cycle time may improve relay life. Cycle time can be programmed anywhere from 10 to 60 seconds.
- The default setting from the factory is 25 seconds
Changing Cycle Time

See https://www.youtube.com/video/WOyEjNmcPAA?si=vHvfXPZmT40_LfrD
MAX: Maximum Temperature Setting
Maximum Temperature Setting controls how hoFt the kiln can be programmed to fire. This can be used to restrict firings to a certain cone, for example in a school. It can be set as high as 2400°F, although on any L&L the max temp in the warranty literature is “2350°F or Cone 10”. This is already set in the factory.
TYPE: Type of Thermocouple
The type of thermocouple can be either Type K or Type S. You must have the appropriate thermocouples and lead wire to switch from one to the other. In addition you must switch the software setting from “K-TH” to “S-TH”, or vice versa. Pressing any number key toggles you back and forth from K-TH to S-TH. For precaution, a small jumper must be moved on the circuit board when going from K to S. This jumper is located approximately in the center of the board under the marking “R97”. If the jumper is on only one of the prongs, the control is set for Type K. If the jumper is on both of the two prongs, the control is set for Type S. This precaution keeps you from accidentally having it set for K with S thermocouples or vise-versa. If there is a mismatch between the jumper setting and the software setting you will get an error code: ERR9.
(CAUTION: A SEVERE OVERFIRING CAN OCCUR IF YOU HAVE THE CONTROL PROGRAMMED FOR A TYPE S THERMOCOUPLE AND YOU ARE USING A TYPE K THERMOCOUPLE).
2KEY: Two- Key Start
Two-Key Start is a safety feature that makes you press ENTER after pressing START/STOP to begin a program. It keeps you from turning the kiln on by accident. If Two-Key Start is activated, when you press START/STOP you will see ----. Pressing ENTER now starts the program. By default we do not have this feature turned on.
E-bd: Error Board Temperature
This allows you to set how hot the room can be that the kiln is in before the DynaTrol shuts the elements off. A temp sensor right on the electronic board inside the control box senses temperature and can be used to trigger a power-off to the elements if the kiln room gets too hot. 250°F is the max. Remember it is a whole lot hotter that close to the kiln than it is in the rest of the room. Default setting is 200°F (93°C)
REST: Restore Default USER Programs
- The DynaTrol comes preloaded with 6 special programs in the VARY-FIRE USER memory slots. VARY-FIRE has 6 memory slots for you to create and store your own custom programs. You may decide to keep these original programs or write over them with your own programs.
- If you ever want to get all of the original programs back again, you can go to REST in the Hidden Other Menu and press ENTER. If you do this however, any custom programs you made up and saved in the VARY-FIRE USER memory slots will be irretrievable. If you want to just get some of the original programs but not others, you will have to manually enter them in. VARY-FIRE TEMPERATURE PROFILES section in the Appendixes H contains the actual segment-by-segment program for each of the preset programs.
ERTF: Stores the Temp, Hours Past, and Rate of Rise when an Error Code occurs.
- This feature stores the temp, number of hours that have passed in the program, and the rate of rise of the kiln when an error code occurs.
- If you come in to your kiln and see E-1 for example, it has shut off because it cannot climb faster than the slowest allowable temp:12 degrees per hour.
- You can press ENTER and then go to ERTF in the Hidden Other Menu, press ENTER there and see, the temperature at which the error code happened, then the number of hours and minutes that have passed since the program began, then the actual rate of rise in degrees F/ hour (or degrees C/ hour if yours is set for Celsius) when the error code occurred.
This is a great diagnostic tool.
COOL: Cone-Fire Cooling Segment
- This feature allows the user to toggle ON or OFF a cooling segment for any EASY-FIRE Program. OFF means that the EASY-FIRE Program will fire to it’s maximum temperature, then shut off and cool naturally. ON means that once the max temp is reached, the cooling segment will kick in. If ON is set, when a EASY-FIRE Program is chosen, like Slow Bisque, the control will prompt you to enter the cool down segment you want after you are done programming the EASY-FIRE Program.
- With this feature turned on, the prompt while you are programming an EASY-FIRE program will be B. When you see this enter a ramp rate. Then you will see °F ٨ (or °C ٨). Enter a final set point temperature that you want the controlled cooldown to stop at. Then you will see HLd8 for a hold time (typically not used). An example of a good cool-down segment would be: Rate: 150 degF/hr, to: 1200F, hold: 0. See section 6.4 for more info on EASY-FIRE controlled cooling.
VOLT: Voltage Measurement
This feature allows the line voltage to be tested by the DynaTrol safely. This will help diagnose firing problems where the kiln cannot reach temperature.
- When you see VOLT in the Hidden Other Menu, press ENTER and the display will flash NOLd; meaning that the next number displayed will be the “No Load Voltage”.
- Press ENTER again and FLLd will flash meaning the next number to appear will be the “Full Load Voltage”.
- The kiln’s heating elements will be turned on for about 4 seconds while the full load voltage is displayed. After that, it will return to IdLE
- To display voltage using the kiln controller a calibration must be done. Before calibration make sure the relays and elements are connected.
Press / Action
Display / Result
Press: Other key one time.
Display: The message RSET will be displayed.
Press: Type in key sequence 4, 4, 3
Display: NOTC will be displayed.
Press: OTHER
Display: until VOLT is displayed.
Press: ENTER key.
Display: NOLD for no load will be displayed for two seconds. After NOLD, a number will be displayed until either ENTER is pressed or the 443 calibration code is entered. This number is the no load voltage. However, until after calibration this number is meaningless.
Press: Type in key sequence 4, 4, 3
Display: CAL1 will be displayed. Measure the line voltage and enter this number now using the keypad. This number will be used to calculate no load voltage
Press: ENTER key
Display: CAL2 will be displayed. Measure the line voltage and enter this number now using the keypad. This number will be used to calculate full load voltage.
Press: ENTER key
Display: The voltage calibration routine is now complete. The controller will return to IdLE.
DTCT: Amperage Measurement Setting
This feature can only be used if your DynaTrol came with the optional current sensor. If equipped and properly installed, this sensor allows the DynaTrol to read the amperage of the kiln in real time. This setting here only controls the maximum amount that the current sensor will measure. It is set in the factory for the proper amount and should not have to be changed. The amperage reading requires a current sensor that clips around one of the power cord’s hot wires. The default range for the calibrated sensor is 50A. For larger kilns the controller can be adjusted for a higher range sensor.
Installing an optional current sensor:
The current sensor has two wires that need to be connected to the circuit board. One wire is black. One wire is white. On the top left corner of the circuit board is a terminal with inputs marked black and white.
- Insert the white wire in the terminal that has been marked white.
- Insert the black wire in the terminal that has been marked black.
- Use a screwdriver to tighten the two screws on the terminals so that the wires will not come loose.
- The circuit sensor clips around one of the power cord’s hot wires.
- The control is now able to measure the amperage draw using the controller’s diagnostic routines.
Amperage Measurement
Amperage measurement can only be done if your kiln is equipped with a current sensor. If there is no sensor (or no amperage), your amp readings will be 0 when you run try this feature.
To run this feature first enter the Hidden Other Menu, then scroll through it until you come to dIAG. Press ENTER and see it say OUTS. Press “1”, see it say AMPS. Press ENTER and see it say AMP1 -meaning the next number displayed will be the amps of Zone 1. Then AMP2 will be displayed- meaning the next number to appear will be the amps of Zone 2, and so on for Zone 3 if you have three zones.
APPENDIX A: OVERVIEW OF FEATURES
Dynamic Zone Control
- The DYNATROL features Dynamic Zone Control. It measures temperatures in the bottom, middle and top of the kiln and automatically adjusts the heat output of three separate heating zones even as the kiln is heating up and during the final approach to maturing temperatures.
- Kiln temperatures are automatically evened out to within 1/2 cone or better top to bottom!
- There is no manual intervention with input switches to even out temperatures.
- There are separate thermocouples (heat sensors) and contactors (power controls) for each of the three zones.
- Dynamic Zone Control suspends firing on one or more zones if the other zones are lagging behind the faster zone(s).
- TC1 (as displayed on the kiln) is the Top Zone, TC2 is the Middle Zone, TC3 is the Bottom Zone.
- NOTE: It is absolutely necessary to match the proper section with the proper control box outlet and proper thermocouple (Thermocouples, cords and receptacles are all marked for identification. If these are mismatched the kiln will not operate properly and you will get the Ed display showing that one of the zones is way off set point.
Programmable Number of Zones
The latest version of the DynaTrol allows you to program the number of zones. Typically there are three zones in a kiln. However, on our two section kilns the control will come programmed to operate as a two zone control. On GS1714 kilns we have the control programmed to be a single zone control. If you change the number of sections in a kiln (for instance, if you take one section off a three section kiln) you can reprogram the control to suit your needs. Another benefit of this new feature is that you can program the control to be a single zone control and avoid the complications of three zone control (i.e. LAG issues). When the control is programmed to be a single zone control outputs 1, 2 and 3 all work together. When programmed as a two zone control outputs 2 and 3 work together and output 1 is separate.
Four Easy Preset Programs
- There are four preset EASY-FIRE programs that have been designed to do most typical ceramic firing cycles. They are Fast Bisque, Slow Bisque, Fast Glaze and Slow Glaze. These preset programs have specific ramps and speeds built into them (see Appendix A for details of what these ramps are). You can enter any cone number up to cone 10 (*see note below) as a final temperature, a hold time, a delay time and even a time as options. This allows a great deal of customization while still keeping the programming simple and easy. We recommend you start with these programs until you get some experience with the control and your kiln.
- The EASY-FIRE mode uses Orton’s patented method to achieve correct heat work so it is ideal for firing ceramics. The advantage of using the EASY-FIRE method is that a very complicated firing profile may be chosen with just a few key strokes. The EASY-FIRE method helps protect against over and under firing by carefully tracking and controlling the temperature at the end of the firing as the cone temperature is approached. The program is based on a 108°F temperature rise for a large self-self-supportingsupporting cone (rather than the small Orton cones or regular large cones).
- *Note: Some L&L Kilns are not designed to go to cone 10. Consult your kiln’s label for the maximum operating temperature.
Six User Defined Programs
If your needs are more sophisticated or involved there is a separate VARY-FIRE programmer mode. This allows you to have 6 separate, repeatable, storable programs with up to 8 segments. There is one cooling or heating ramp, a temperature setpoint and an optional hold time per segment. The programs are stored in non-volatile memory which means that they will stay in memory even when all power is turned off. The DYNATROL allows you to soak at a low temperature for a long time (i.e. you can have an automatic drying period) and then automatically ramp up to your high fire at different rates. You can ramp slowly through critical periods or soak at end point temperatures for more consistent maturing of work. It also allows a controlled cool down to avoid heat shock. Of course many of these valuable uses are available in the preset EASY-FIRE programs. However, with the VARY-FIRE programs you have complete control over ramp times and rates and so you can adjust the kiln performance to your exact needs. It also allows the control to be used for non-ceramic applications such as glass, enameling, heat treating and other industrial uses.
Note: VARY-FIRE programs fire the kiln to your specifically programmed temperature. EASY-FIRE programs will fire the kiln to your specifically programmed cone number.
Linkable Programs
You can link VARY-FIRE Program #5 and #6 to get a 16 segment program. You can also use this system to link VARY-FIRE Program #6 to the end of an EASY-FIRE Program.
Delay Start
You can delay the start of the program by up to 99 hours, 99 minutes. This allows you to plan end of firing conveniently. This is also very useful for saving energy costs by firing kiln with night electric rates. If you want the kiln to mature at 2:00 PM the next day and you know your program will take 12 hours and you are starting your program at 4:00 PM today you would program in an 8 hour delay. NOTE: The delay start remains on or set for all programs (both VARY-FIRE and EASY-FIRE) until you turn it off.
Preheat (Candling)
You can “candle” the kiln for up to 99 hours, 99 minutes to dry ware thoroughly. “Candling” is a specific hold at 200°F which boils off the water in the clay slowly so that your work does not explode as the water expands rapidly to steam. This is highly recommended to do for most ceramics. We recommend overnight or for at least several hours depending on how dry your work is. NOTE: This is available as an optional step in the EASY-FIRE mode only. You can do the same thing with an added first segment in the VARY-FIRE mode.
Soak
The control will soak at Final Set Point for up to 99 hours, 99 minutes, and can be programmed to hold a temperature as long as 66 days before needing to be reset. This is a very useful feature and one of the great advantages of an automatic control. Most ceramics achieve their characteristics not so much by what temperature they reach but by how much “heat-work” is put into them. A long soak at a lower cone can often develop the bisque or glaze better. In addition a soak period almost always will improve the uniformity of the firing throughout the kiln. A soak period gives the entire load of ware time to absorb the radiant heat that is projected from the elements. If you simply rise to a certain temperature and then shut the kiln off (as is typical of a manual kiln sitter operation) then the center or the bottom of the kiln may not have had a chance to absorb as much heat as the ware around the perimeter. You may have experienced the fact that an older kiln with slow firing elements may in fact have given you better results. This is because the entire kiln has had a chance to even itself out as it approached final cone. We suggest experimenting with this feature. Try a soak of 10 to 20 minutes. The DynaTrol will automatically adjust the final temperature to compensate for the programmed Hold Time in the EASY-FIRE mode only. Be warned that element life is lessened by the amount of time the elements spend up at a higher temperature.
Audible Temperature Alarm
There is an easily settable audible temperature alarm. This can alert you at any point in program. For instance the control can alert you that the kiln is close to maturity so you can watch it reach final set point. You can use it to alert you when to close the lid if you are manually venting the kiln. You can disable this alarm by programming in 9999. Press ENTER to turn off alarm when it is sounding.
Program Review
Press this button to see the entire program before or while running it. It will scroll through the programmed steps. We suggest hitting Review Prog at the beginning of your firing to see if the control is set up to do what you want it to. If the control shows error codes OFF when they should be On or no Hold where one should be, you must first stop the program that is running in order to change anything. Most settings cannot be changed while running a program.
Segment Review
Press Review Seg once while you are firing to see which segment’s ramp or hold you are currently in, what the current set point is, and what the actual temperature of the DynaTrol’s electronics are.
Skip Segment
In the VARY-FIRE mode you can skip a segment to advance to a higher segment and speed the program along.
Set Point Indication
- If you press Review Seg twice while the kiln is firing, the control will show you what your current set point is during the program as it is changing.
- This is useful to confirm that the temperatures of the thermocouples are where they are supposed to be.
Change of Program During Firing
When firing you can alter the program at any time.
- You must press START/STOP, then reprogram, then press START/STOP.
- The DynaTrol will automatically take the current temperature into consideration and start back up at that point in the program.
- If you attempt to do this right at the end of a firing, the amount of time it takes to reprogram is not accounted for by the DynaTrol. If more than a few minutes go by, the temperature displayed may not accurately represent the amount of heat work taking place in the kiln.
- Another reason to fire with witness cones.
Cone Offset
- This is one tool you have to help you match the control to your real firing experience.
- It is important to fire the kiln with witness cones to find out what is really happening inside the kiln. Using these, you can fine-tune the overall performance of the kiln to match what is really happening to your ware.
- The cone offset is just one of the ways you have of making this adjustment.
- Keep in mind however that your firing speed and soak time will also have an effect on how the witness cones and ware perform. When you are making an adjustment try changing one variable at a time.
- For instance if you are firing to Cone 05 and your witness cones don’t mature you could do a number of things. One is to use the cone offset to raise what the DynaTrol thinks is the temperature of cone 05 in an EASY-FIRE program.
- Another thing you could do is put in a soak/hold time at the end of the program in a VARY-FIRE program.
- Another thing would be to slow the kiln down towards the end of its firing cycle with a slower, longer final segment in a VARY-FIRE program.
- Try one thing at a time to find out what works best for you. The cone table that the DynaTrol uses are based on a 108°F temperature rise for a large self-supporting cone (not the small Orton cones or the regular large cones).
Thermocouple Offset
- This allows you to individually change what the DynaTrol thinks the thermocouples are reading.
- Use this to adjust for thermocouple drift or kiln uniformity adjustments. It allows you to influence how the kiln “sees” the temperature in the kiln.
- For instance, if the center zone is consistently firing higher (as measured by witness cones) then you would change that thermocouple to read higher. This would trick the control into thinking that the center zone was hotter and it would keep the temperatures down.
- The difference between Cone Offset and Thermocouple Offset is that Cone Offset works in EASY-FIRE programs only and changes a specific cone’s temperature for the whole kiln.
- Thermocouple Offset will affect temperatures in both VARY-FIRE programs and in EASY-FIRE programs.
- Basically it changes just that particular thermocouple’s reading up or down to even out temperatures in an unevenly heating kiln no matter what cone number or temperature you are firing to.
- NOTE: Thermocouples drift in their accuracy over time. The hotter you fire the quicker this will occur. This is another reason why it is important to check each firing (or at least every 5 or 10 firings) with witness cones. This is particularly important if you are firing at high temperatures like cone 6 or cone 10.
Last Temperature Reached Indication
- When an EASY-FIRE program is complete it will tell you what the last temperature reached was. You press Review Prog at the end of the cycle to see this temperature.
- This is useful for logging and comparing to what happened with your ware. Compare this temperature to witness cones and make adjustments in your firing cycle or cone offsets to adjust the performance of the kiln.
Cone/Temperature Equivalent Look Up Table
- Convert cone numbers to temperatures in degrees.
- The look up table is based on a ramp rate of 108°F.
- This table is provided as a handy reference table to use while you are programming.
- There is a more complete table in the Appendix J.
Dust Sealed Keypad
The keypad is dust tight so you don’t need to worry if you have dirty hands that might get dust into the electronics.
Easy to Follow Graphic Design
It is graphically designed to be user friendly. EASY-FIRE, VARY-FIRE, OPTIONS and VIEW functions are grouped separately. The numeric keypad makes entering parameters like temperatures and cone numbers easy.
Error Checking Can Be Turned Off
There are various error codes in the control. These can be important diagnostic tools. They can also be somewhat confusing and alarming if you don’t understand then. One of the most common ones is E-1 which will stop the program if the kiln’s temperature is rising too slowly. ErrP flashing or PF indicates a power outage to the control. E d indicates that one zone is 100°F off set point. All these and more are explained in greater detail in Appendix E.
Reset Defaults Function
This function (available under Options, Other - see Section 9) resets most settings back to factory defaults. It does not affect the thermocouple or cone offsets. Turns Error Checking On.
Reads Control Board Temperature
This is a diagnostic tool. The control should not be operated when it is above 125°F ( 52°C) or below 32°F (0°C). This should not normally be a problem with the way L&L mounts these controls away from the heat. However, if you do get a reading that is higher than this temperature (for instance if you are operating in a particularly hot room) we recommend that you direct some cooling air at the control. This board temperature is displayed as follows: When you press the View Segment Button while firing, first the current segment is displayed, then the set point temperature and then the DynaTrol’s board temperature. Ambient temperatures that are out of the suggested range can lead to either control failure or control inaccuracy.
Automatic Restart after Brief Power Interruption with Flashing Alert
This is the ErrP indication. If the power outage was brief the program will continue to fire and the ErrP message will flash with the temperature indication. By hitting the “1” button you can clear this alarm message.
PID Tuning Control
- PID stands for Proportional - Integral - Derivative. It is a sophisticated calculus algorithm that minimizes temperature overshoot.
- The control is able to anticipate the temperature set point and start to cut back power before it reaches actual setpoint.
- In standard On/Off control the power does not turn off until the actual set point is reached. Because of the inertia of the kiln this could result in temperature overshoot without the PID control. The values for the PID are hard programmed into the control and can not be changed.
- They are optimized for ceramics. If you are using the control for another application and you find that the control gives you some overshoot try a step in your VARY-FIRE program that is a very slow ramp for the last few degrees of the program.
- For instance if you wanted to get to 1800°F without overshoot, have the program go to 1775°F and then take 15 minutes to ramp to 1800°F.
- NOTE: As of April 2000 a second set of PID settings was added for temperatures below 500°F. This improved overshoot in the lower temperature range.
Thermocouple Burnout Protection
The kiln will shut down automatically if all thermocouples burn out. The kiln continues to fire if only one or two thermocouples burn out. This protects your firing in the event of failed thermocouples. Of course, if all three thermocouples FAIL then the control stops firing.
Digital Indication of Temperature in either Degrees F or C
You can switch between temperature readings in degrees Fahrenheit or degrees Centigrade.
See All the Zone Temperatures
You can scroll through all three thermocouple readings by pressing 1 to see TC1 (top zone), 2 to see TC2 (middle zone) and 3 to see TC3 (bottom zone). The default view is of TC2. You must specifically hit 1 or 3 to see the top and bottom zone temperatures. The reading will stay on the thermocouple that you last pressed.
See Which Zones are Firing
- Press Number Key 8 while the kiln is firing. This toggles the LED display to show you which zones are firing.
- See the section under DESCRIPTION OF KEY FUNCTIONS AND DISPLAY, Appendix C for details. This is a great diagnostic tool to allow you to see which zones are firing. For instance if one zone is firing constantly and the other zones are not then you know that the constantly firing zone is the slow zone.
See the current rate of rise in degrees per hour:
- Press Number Key 5.
- See the section under DESCRIPTION OF KEY FUNCTIONS AND DISPLAY, Appendix C for details
See the elapsed time since the firing began
- Press Number Key 0.
- See the section under DESCRIPTION OF KEY FUNCTIONS AND DISPLAY, Appendix C for details
Cold Junction Compensation
- The control automatically compensates for varying ambient temperatures.
- It can operate in ambient temperatures of 32°F to 125°F (0°C to 50°C).
- The Review Seg button lets you see ambient board temperature (press Review Seg three times).
- This is an electronic compensation.
Matches Pyrometric Cone Performance in EASY-FIRE Mode
This feature is licensed from Orton. (Patent #4,461,616 and 4,730,101). This feature is not controlled by the user. Basically it adjusts how the firing takes place towards the end so that the control approximates how cones work. The control sees how fast the kiln is rising and adjusts the final end point temperature higher or lower to achieve the proper amount of “heat-work”. For instance, to mature your ware at the same cone number, a the kiln rising at 100°F per hour will require a lower set point temperature than a kiln rising at 200°F per hour. This feature is only used in the EASY-FIRE mode. Note: The control emulates the self supporting cones.
PID algorithm
- The PID algorithm (in industrial, mathematical terms this is the proportional, integral, and derivative functions of the control) is how the controller decides what percentage of the kiln’s total power is required to keep the temperature at the desired set point. The DynaTrol 700 board has a cycle time of 14 seconds (as the default setting) and will turn the relays on for a calculated number seconds to give the correct percent of power needed to keep the temperature near the traveling set point. For example, if the controller calculates that 25% of the power is required, the relays will be on for 3.5 seconds and off for 10.5 seconds.
- Each part of the P (Proportional band), I (Integral) and D (Derivative) are calculated separately and added together to determine the correct percentage (control value) of power required. The proportional part of the control value is based on how far the temperature is away from the desired set point. It is the difference between the set point and the current temperature (also called the error) multiplied by the proportional gain.
- The integral part of the control value is based on how long the temperature is taking to get to the set point. It is calculated by multiplying the error by the integral gain and summing this value over time. The integral value compensates for any long term error not taken care of by the proportional part.
- The derivative part of the control value is based on how fast the temperature is moving towards or away from the set point. If the temperature is moving quickly towards the set point the derivative portion reduces the control value to prevent overshoot. If the temperature is moving away from the set point then the derivative portion increases the control value to get the temperature to start moving back towards the set point.
- The constants for calculating the control value are fixed within the controller and can not be changed by the user. They do vary throughout the firing depending on the current temperature in the kiln. To prevent over and undershoot, the controller also has “approach control” to smooth the transition from a fast ramp to a hold.
Automatic Lag Function
- With a zone control kiln there is always a trade off between speed and tightness of control.
- The series 700 automatic control LAG feature uses the programmed ramp rate to automatically set its “LAG” temperature setting to balance these two opposing needs.
- Sometimes the temperature of one or more kiln’s sections “lags” behind one or more of the other sections. This is because the traveling set point of the control (based on the programmed ramp rate) is faster than one or more of those sections’ can rise and have the temperature in the sections stay even. To effectively deal with this the 700 DynaTrol will automatically slow the ramp rate when a section of the kiln lags.
- The amount of “lagging” that is allowed before the firing rate will slow is determined by the ramp rate. Fast ramp rates (greater than 500 °F/hour) will allow the greatest temperature difference between sections. Slow ramp rates (below 70 °F/hour) will have the smallest temperature difference between sections. Therefore, when the controller is programmed to go fast it will sacrifice evenness to obtain speed. Likewise, when the controller is programmed to go slow, the controller will maintain tighter control. The controller will try to balance speed and tight control when a medium speed is programmed.
Here is the actual algorithm for those who are interested in knowing what is taking place (note that this is all transparent to the user and is included in here to let you know how this works):
1) If the programmed rate of rise is between 1˚F/hour and 70˚F/hour and -
- All thermocouple readings are less than 3 degrees behind the traveling set point, the traveling set point moves at the programmed rate.
- The lowest thermocouple reading is between 3 and 6 °F behind, the traveling set point moves at 75% of the programmed rate.
- The lowest thermocouple reading is between 6 and 9 °F behind, the traveling set point moves at 50% of the programmed rate.
- The lowest thermocouple reading is between 9 and 12 °F behind, the traveling set point moves at 25% of the programmed rate.
- The lowest thermocouple reading is more than 12 °F behind, the traveling set point moves at 1 degree F per hour.
2) If the rate of rise is between 71˚F/hour and 500˚F/hour and -
- All thermocouple readings are less than 7 degrees behind the traveling set point, the traveling set point moves at the programmed rate.
- The lowest thermocouple reading is between 7 and 14 °F behind, the traveling set point moves at 75% of the programmed rate.
- The lowest thermocouple reading is between 14 and 21 °F behind, the traveling set point moves at 50% of the programmed rate.
- The lowest thermocouple reading is between 21 and 28 °F behind, the traveling set point moves at 25% of the programmed rate.
- The lowest thermocouple reading is more than 28 °F behind, the traveling set point moves at 1 degree F per hour.
3) If the rate of rise is greater than 500˚F/hour and -
- All thermocouple readings are less than 10 degrees behind the traveling set point, the traveling set point moves at the programmed rate.
- Lowest thermocouple reading is between 10 and 20 °F behind, the traveling set point moves at 75% of the programmed rate.
- The lowest thermocouple reading is between 20 and 30 °F behind, the traveling set point moves at 50% of the programmed rate.
- The lowest thermocouple reading is between 40 and 50 °F behind, the traveling set point moves at 25% of the programmed rate.
- The lowest thermocouple reading is more than 50 °F behind, the traveling set point moves at 1 degree F per hour.
APPENDIX B: TERMS AND ABBREVIATIONS
Celsius - a temperature scale in which 0° is the freezing point and 100° the boiling point of water. Also called centigrade.
Centigrade - a temperature scale in which 0° is the freezing point and 100° the boiling point of water. Also called Celsius.
Cone - a pyramid shaped ceramic composite which bends and melts in the kiln to indicate the amount of heat work which has taken place in the kiln. Also called a witness cone.
Default – (or default settings) These are the settings that the DynaTrol comes programmed with from the factory. Using the Reset feature will return the DynaTrol to it’s default settings.
Final set point – in an all heating program with no cooling segments this would be the maximum temperature the kiln was programmed to reach. If there are programmed cooling or holding segments then the last segment’s programmed set point is the final set point.
Profile - A series of segments which define how the kiln temperature is to proceed through the firing. This is sometimes referred to as a program.
Ramp-hold - A firing profile in which the temperature is programmed to increase to a specific temperature, hold for a period of time then repeat this sequence until a final temperature is reached.
Segment - One unit of programming. Each segment on this control has a ramp (Deg per hour), a final set point temperature and a hold time.
Set point – the target temperature within a programmed segment.
T/C or t/c - Abbreviation for thermocouple.
Thermocouple (abbreviated T/C or t/c) - Temperature measurement sensor made of two dissimilar metals which are joined at one end; the end where they are joined is the temperature measuring end.
APPENDIX C: DISPLAY MESSAGES (in alphabetical order)
ALRM - Alarm. When ALRM flashes in the display, an alarm temperature between 0° and 9999° may be entered. When the alarm is set to 9999°, it is turned off.
bd T - Board Temperature. Indicates the temperature of the DynaTrol’s electronics (see Control Precautions).
°C1, °C2, °C3, through °C 8, Degrees Celsius temperature. In the VARY-FIRE Mode with the Celsius temperature scale selected, the controller is waiting for an end temperature to be entered for the segment. The numbers stand for the segment which is being programmed.
CHG° - Change degrees - When CHG° is displayed, press ENTER to select the temperature scale you would like to use, either Fahrenheit (°F) or Celsius (°C). The 1 key will toggle between °F and °C. When the scale you want to use is displayed, press ENTER.
CNOS - Cone offset. Press ENTER to adjust an individual cone shut off temperature of plus or minus 50°F maximum.
CONE - Cone number. When CONE is displayed, a cone number between 022 and 10 must be entered. This will be found in the Cone Table or the EASY-FIRE Mode.
°COS - Degrees Centigrade offset – seen when a Cone Offset or a Thermocouple offset is being programmed.
CPL - Complete. Indicates programming or some programming function is complete.
CPLT - Complete. Indicates a firing has been completed.
Decimal Point displayed in lower right-hand corner of display The temperature is displayed in degrees Celsius (°C).
Decimal Point displayed in center of display between 10’s and 100’s. A time in hours and minutes is being displayed.
dELA - Delay. Indicates the time in hours and minutes before the start of firing.
DIAG - Diagnostic s. Located in the Hidden Other Menu. Pressing ENTER here turns zone 1’s elements on for a few seconds followed by zone 2’s elements, then zone 3’s elements. A powered bottom will stay on during all three zone’s test. If the kiln is improperly put together it will become apparent now.
ERCd. Error Codes. When ERCd is displayed, press enter to turn the Error Code function on or off. This function is located by pressing Other in the OPTIONS Section.
E A Error. Indicates a software error has occurred. The error codes are listed in APPENDIX E.
E E. Software Error. Indicates a software error has occurred. Contact L&L Service. The error codes are listed in APPENDIX.
E 0, E 1, E 2 through E 8 means Error. An error has occurred; the error codes are listed in APPENDIX E.
ErrP (flashing) - Power Outage Error. This is displayed during a firing if power to the kiln has been interrupted for less than a couple minutes, depending how far along in the firing you are. The error codes are listed in APPENDIX E.
°F1, °F2, °F3 through °F8 In the VARY-FIRE Mode with the Fahrenheit temperature scale selected, the controller is waiting for an end temperature to be entered for the segment. The numbers stand for the segment which is being programmed.
°FOS - Degrees Fahrenheit Offset – seen when a Cone Offset or a Thermocouple offset is being programmed.
FAIL - Thermocouple Failure. The thermocouple is not connected to the controller or there may be a break in one of the thermocouple lead wires. If the thermocouple wire is broken, it must be replaced. When connecting the thermocouple, SEE THE COLOR CODING INFORMATION in Section 1.0 (Control Cautions).
FAN1, FAN2, FAN3, through FAN8. This message will appear during programming in the VARY-FIRE mode only after OP C (option C in the Hidden Other Menu) has been chosen. FAN refers to your powered bottom (if you have one), and the number is the number of the segment you are currently programming. The powered bottom (FAN) can be programmed to be ON or OFF in each segment of the VARY-FIRE program.
F-bC Fast Bisque, One of the EASY-FIRE programs
F-GL Fast Glaze, One of the EASY-FIRE programs
HOLd or HLd - Hold. Indicates the holding time in hours and minutes at the end of a “ EASY-FIRE” program. OR it may mean that you have just chosen the Preheat option and now the DynaTrol is asking how much hold time in the preheat setting you want to have.
HLd1, HLd2, HLd3 through HLd8 In the VARY-FIRE Mode the controller is waiting for a soak or hold time in hours and minutes to be entered for the segment. The numbers stand for the segment which is being programmed.
Id – Identification. Allows you to identify a particular control for use with KISS computer software.
IdLE and Temperature – Flashing The kiln is off, and the current temperature in the kiln is displayed. The DynaTrol is programmed to run using only one thermocouple.
IdLE, TC2, and the current temperature flashing - The kiln is off, and the current temperature in the kiln at thermocouple #2 is displayed. The DynaTrol is programmed to run using either two or three thermocouples.
NOTC - Number of thermocouples. Located in the Hidden Other Menu. Pressing ENTER here allows you to choose how many thermocouples (essentially how many zones) are in the kiln.
OFF. Press ENTER when displayed to turn the Error Codes, the Autolag, a Powered Bottom, or the “shut off” feature Off. Pressing the 1 key toggles between On and OFF.
ON (no dashes). Press ENTER when displayed to turn the function you are programming on. Pressing the 1 key toggles between On and OFF.
-On- (displayed with dashes). Displayed for about 10 to 15 seconds when the START/STOP button is pressed to begin a firing. The heating elements of the kiln will not begin heating until -On- disappears and the current kiln temperature is displayed. NOTE: Pressing any key besides START/STOP while -On- is displayed, will stop the firing. Pressing START/STOP after –ON- goes away will stop the firing.
OPA. Option A. Located in the Hidden Other Menu. Used for vent control. (See Section 10.2)
OPB. Option B. Located in the Hidden Other Menu. Used for vent control. (See Section 10.3)
OPC. Option C. Located in the Hidden Other Menu. used for Vent Control or Powered Bottom (See Section 10.4)
PCT. Percent. Located in the Hidden Other Menu. You can set how often your powered bottom comes on based on a percent of when the bottom zone comes on.
PF. Power Failure. PF indicates the power to the kiln has been interrupted for a long enough time to effect the current firing. The kiln has shut down and the firing must be restarted.
PId. Located in the Hidden Other Menu. Pressing ENTER when you see this allows you to program a setting to help a heavily or unevenly loaded kiln fire faster.
RA1, RA2, RA3 through rA8 In the VARY-FIRE Mode the controller is waiting for an ramp temperature rise per hour to be entered for the segment. The numbers stand for the segment which is being programmed. The temperature is in °F/hr or °C/hr whichever has been selected. If °C has been selected, there will be a decimal point in the lower right-hand corner of the display.
RSET Reset. Press Other until RSET is displayed. Then press ENTER. IdLE will be displayed indicating that the Error Checking is ON. This is the Default settings.
16-S. Sixteen step program option. VARY-FIRE profile #5 must have been chosen, and now the DynaTrol must be told whether to automatically fire VARY-FIRE profile #6 immediately after the ending of #5 (16-S set to ON) or not (16-S set to OFF).
SAFT. Safety option. DO NOT PRESS ENTER HERE. This option is not used with L&L’s kiln systems
S-bC Slow Bisque. One of the EASY-FIRE programs
S-GL Slow Glaze, One of the EASY-FIRE programs
SEG. Segment. When SEG is displayed, the number of desired segments for a VARY-FIRE program should be entered.
SHTO. Located In the Hidden Other Menu. Set to either ON or OFF. Lets you choose between firing styles where:ON means that as soon as the hottest zone gets to the segment’s set point the entire kiln switches to either the “hold time” or the next segment. OFF means that the DynaTrol will not let the hottest zone’s temperature rise until the average temperature of the three zones reaches that segment’s set point. Then the kiln can begin the “hold time” or the next segment.
STOP - Stop. Indicates firing has been stopped. Also may be displayed when the controller is first turned on. Also used like CPL with some functions.
USER. When USEr is displayed, one of the 6 user programs may be selected or programmed.
SSTP. Skip Step. Press Review Seg, ENTER, ENTER to skip to the next ramp segment in a VARY-FIRE program. Skip Step is not available with a EASY-FIRE program.
TCOS Thermocouple offsets. This is used to raise or lower the temperature indicated by any of the thermocouples. The maximum offset is 50°F. A positive offset is entered with 00 preceding the amount of offset and a negative offset is preceded with 90. This is the same as is done for entering cone offsets. When TCOS is displayed, press ENTER and TC1 will be displayed. Press enter and the current offset for the top thermocouple will be displayed. Press ENTER when the correct offset for the top thermocouples is displayed and then TC2 will be displayed. Repeat the process for TC2 and TC3.
Temperature - Continuously displayed The kiln is on (in either a VARY-FIRE or a EASY-FIRE program), and the current temperature in the kiln is displayed. The DynaTrol is programmed to run using only one thermocouple.
TC2 and the current temperature flashing - The kiln is on (in either a VARY-FIRE or a “ EASY-FIRE” program), and the current temperature in the kiln at thermocouple #2 is displayed. The DynaTrol is programmed to run using either two or three thermocouples.
Time - Decreasing A delay start is in effect for a VARY-FIRE or a EASY-FIRE program. The time remaining before the kiln starts to heat is displayed.
Time - Temperature alternately flashing. The kiln is in either a hold phase of a VARY-FIRE segment or a hold phase at the end of an EASY-FIRE Profile. The numbers displayed are the remaining time and the current kiln temperature.
APPENDIX D EASY-FIRE TEMPERATURE PROFILES
- These charts tell what the EASY-FIRE programs do to your kiln when you choose one of them. These charts will also be good reference points for writing your own programs in the VARY-FIRE mode. These charts are for cones 07 through 04 and cones 5, 6, 7, and 10. Other cone numbers will work as well in your own programs.
- NOTE: No delays, preheats. or final soaks are shown. When these programs are fired the actual final temperatures will vary as the DynaTrol adjusts itself based on how quickly it is climbing to that final temperature. This would not be the case for VARY-FIRE programs that you develop and input yourself. Also note that all these programs end on segment 7 rather than start on segment 1. This is due to the way the Orton feature works in the EASY-FIRE mode and is not relevant to your own programming in the VARY-FIRE mode. (Segment #7 in the EASY-FIRE mode is a special segment that incorporates the Orton software and so it must be the last segment of every “ EASY-FIRE” profile). Start your VARY-FIRE profiles on segment 1.
- NOTE: All the programs shown are written to accommodate the fastest possible empty kilns. THE NUMBERS DO NOT REPRESENT TYPICAL KILN FIRING TIMES WITH A LOAD. Your kiln can take considerably longer (as much as 4 times) to fire than the times shown here.
- This final set point temperatures are based on the specific rate of rise programmed for the last segment. If the rate of rise changes (for instance if the kiln goes slower than the programmed rate of rise because of a heavy load or aging elements) then the final set point temperature will be recalculated by the control. This maintains the “heat-work”. The faster the rate of rise in the final segment, the higher the set-point temperature needs to be to get the same “heat-work”. Inversely, the slower the rate of rise the lower the set-point temperature needs to be.
CONE 07
Slow Bisque Firing Profile for cone 07 (1787°F)
Segment: 3
Rate°F /hr: 80
Temp °F: 250
Hold: (none)
Time in Hours: 2.25
Segment: 4
Rate°F /hr: 200
Temp °F: 1000
Hold: (none)
Time in Hours: 3.75
Segment: 5
Rate°F /hr: 100
Temp °F: 1100
Hold: (none)
Time in Hours: 1
Segment: 6
Rate°F /hr: 180
Temp °F: 1537
Hold: (none)
Time in Hours: 2.43
Segment: 7
Rate°F /hr: 80
Temp °F: 1787*
Hold: 0
Time in Hours: 3.13
Total Time: 12.55
Slow Glaze Firing Profile for cone 07 (1787°F)
Segment: 5
Rate°F /hr: 150
Temp °F: 250
Hold: (none)
Time Hours: 1.20
Segment: 6
Rate°F /hr: 400
Temp °F: 1537
Hold: (none)
Time Hours: 3.22
Segment: 7
Rate°F /hr: 120
Temp °F: 1787*
Hold: (none)
Time Hours: 2.08
Total Time: 6.50
Fast Bisque Firing Profile for cone 07 (1787°F)
Segment: 3
Rate°F /hr: 120
Temp °F: 250
Hold: (none)
Time in Hours: 1.50
Segment: 4
Rate°F /hr: 300
Temp °F: 1000
Hold: (none)
Time in Hours: 2.50
Segment: 5
Rate°F /hr: 150
Temp °F: 1100
Hold: (none)
Time in Hours: 0.67
Segment: 6
Rate°F /hr: 180
Temp °F: 1537
Hold: (none)
Time in Hours: 2.43
Segment: 7
Rate°F /hr: 108
Temp °F: 1787*
Hold: 0
Time in Hours: 2.31
Total Time: 9.41
Fast Glaze Firing Profile for cone 07 (1787°F)
Segment: 6
Rate°F /hr: 570
Temp °F: 1537
Hold: (none)
Time Hours: 2.57
Segment: 7
Rate°F /hr: 200
Temp °F: 1787*
Hold: (none)
Time Hours: 1.25
Total Time: 3.82
CONE 06
Slow Bisque Firing Profile for cone 06 (1819°F)
Segment: 3
Rate°F /hr: 80
Temp °F: 250
Hold: (none)
Time in Hours: 2.25
Segment: 4
Rate°F /hr: 200
Temp °F: 1000
Hold: (none)
Time in Hours: 3.75
Segment: 5
Rate°F /hr: 100
Temp °F: 1100
Hold: (none)
Time in Hours: 1
Segment: 6
Rate°F /hr: 180
Temp °F: 1569
Hold: (none)
Time in Hours: 2.61
Segment: 7
Rate°F /hr: 80
Temp °F: 1819*
Hold: 0
Time in Hours: 3.13
Total Time: 12.73
Slow Glaze Firing Profile for cone 06 (1819°F)
Segment: 5
Rate°F /hr: 150
Temp °F: 250
Hold: (none)
Time Hours: 1.20
Segment: 6
Rate°F /hr: 400
Temp °F: 1569
Hold: (none)
Time Hours: 3.30
Segment: 7
Rate°F /hr: 120
Temp °F: 1819*
Hold: (none)
Time Hours: 2.08
Total Time: 6.58
Fast Bisque Firing Profile for cone 06 (1819°F)
Segment: 3
Rate°F /hr: 120
Temp °F: 250
Hold: (none)
Time in Hours: 1.50
Segment: 4
Rate°F /hr: 300
Temp °F: 1000
Hold: (none)
Time in Hours: 2.50
Segment: 5
Rate°F /hr: 150
Temp °F: 1100
Hold: (none)
Time in Hours: 0.67
Segment: 6
Rate°F /hr: 180
Temp °F: 1569
Hold: (none)
Time in Hours: 2.43
Segment: 7
Rate°F /hr: 108
Temp °F: 1819*
Hold: 0
Time in Hours: 2.31
Total Time: 9.59
Fast Glaze Firing Profile for cone 06 (1819°F)
Segment: 6
Rate°F /hr: 570
Temp °F: 1537
Hold: (none)
Time Hours: 2.57
Segment: 7
Rate°F /hr: 200
Temp °F: 1819*
Hold: (none)
Time Hours: 1.25
Total Time: 3.82
CONE 05
Slow Bisque Firing Profile for cone 05 (1891°F)
Segment: 3
Rate°F /hr: 80
Temp °F: 250
Hold: (none)
Time in Hours: 2.25
Segment: 4
Rate°F /hr: 200
Temp °F: 1000
Hold: (none)
Time in Hours: 3.75
Segment: 5
Rate°F /hr: 100
Temp °F: 1100
Hold: (none)
Time in Hours: 1
Segment: 6
Rate°F /hr: 180
Temp °F: 1641
Hold: (none)
Time in Hours: 3.01
Segment: 7
Rate°F /hr: 80
Temp °F: 1891*
Hold: 0
Time in Hours: 3.13
Total Time: 13.13
Slow Glaze Firing Profile for cone 05 (1891°F)
Segment: 5
Rate°F /hr: 150
Temp °F: 250
Hold: (none)
Time Hours: 1.20
Segment: 6
Rate°F /hr: 400
Temp °F: 1641
Hold: (none)
Time Hours: 3.48
Segment: 7
Rate°F /hr: 120
Temp °F: 1891*
Hold: (none)
Time Hours: 2.08
Total Time: 6.76
Fast Bisque Firing Profile for cone 05 (1891°F)
Segment: 3
Rate°F /hr: 120
Temp °F: 250
Hold: (none)
Time in Hours: 1.50
Segment: 4
Rate°F /hr: 300
Temp °F: 1000
Hold: (none)
Time in Hours: 2.50
Segment: 5
Rate°F /hr: 150
Temp °F: 1100
Hold: (none)
Time in Hours: 0.67
Segment: 6
Rate°F /hr: 180
Temp °F: 1641
Hold: (none)
Time in Hours: 3.01
Segment: 7
Rate°F /hr: 108
Temp °F: 1891*
Hold: 0
Time in Hours: 3.13
Total Time: 10.81
Fast Glaze Firing Profile for cone 05 (1891°F)
Segment: 6
Rate°F /hr: 570
Temp °F: 1641
Hold: (none)
Time Hours: 2.75
Segment: 7
Rate°F /hr: 200
Temp °F: 1891*
Hold: (none)
Time Hours: 1.25
Total Time: 4
CONE 04
Slow Bisque Firing Profile for cone 04 (1926°F)
Segment: 3
Rate°F /hr: 80
Temp °F: 250
Hold: (none)
Time in Hours: 2
Segment: 4
Rate°F /hr: 200
Temp °F: 1000
Hold: (none)
Time in Hours: 4
Segment: 5
Rate°F /hr: 100
Temp °F: 1100
Hold: (none)
Time in Hours: 1
Segment: 6
Rate°F /hr: 180
Temp °F: 1676
Hold: (none)
Time in Hours: 3
Segment: 7
Rate°F /hr: 80
Temp °F: 1926*
Hold: 0
Time in Hours: 3
Total Time: 13
Slow Glaze Firing Profile for cone 04 (1926°F)
Segment: 5
Rate°F /hr: 150
Temp °F: 250
Hold: (none)
Time Hours: 1
Segment: 6
Rate°F /hr: 400
Temp °F: 1676
Hold: (none)
Time Hours: 4
Segment: 7
Rate°F /hr: 120
Temp °F: 1926*
Hold: (none)
Time Hours: 2
Total Time: 7
Fast Bisque Firing Profile for cone 04 (1926°F)
Segment: 3
Rate°F /hr: 120
Temp °F: 250
Hold: (none)
Time in Hours: 2
Segment: 4
Rate°F /hr: 300
Temp °F: 1000
Hold: (none)
Time in Hours: 3
Segment: 5
Rate°F /hr: 150
Temp °F: 1100
Hold: (none)
Time in Hours: 1
Segment: 6
Rate°F /hr: 180
Temp °F: 1676
Hold: (none)
Time in Hours: 3
Segment: 7
Rate°F /hr: 108
Temp °F: 1926*
Hold: 0
Time in Hours: 2
Total Time: 11.51
Fast Glaze Firing Profile for cone 04 (1926°F)
Segment: 6
Rate°F /hr: 570
Temp °F: 1676
Hold: (none)
Time Hours: 3
Segment: 7
Rate°F /hr: 200
Temp °F: 1926*
Hold: (none)
Time Hours: 1
Total Time: 4
CONE 10
Slow Bisque Firing Profile for cone 10 (2345°F)
Segment: 3
Rate°F /hr: 80
Temp °F: 250
Hold: (none)
Time in Hours: 2
Segment: 4
Rate°F /hr: 200
Temp °F: 1000
Hold: (none)
Time in Hours: 4
Segment: 5
Rate°F /hr: 100
Temp °F: 1100
Hold: (none)
Time in Hours: 1
Segment: 6
Rate°F /hr: 180
Temp °F: 2095
Hold: (none)
Time in Hours: 6
Segment: 7
Rate°F /hr: 80
Temp °F: 2345*
Hold: 0
Time in Hours: 3
Total Time: 16
Slow Glaze Firing Profile for cone 10 (2345°F)
Segment: 5
Rate°F /hr: 150
Temp °F: 250
Hold: (none)
Time Hours: 1
Segment: 6
Rate°F /hr: 400
Temp °F: 2095
Hold: (none)
Time Hours: 5
Segment: 7
Rate°F /hr: 120
Temp °F: 2345*
Hold: (none)
Time Hours: 2
Total Time: 8
Fast Bisque Firing Profile for cone 10 (2345°F)
Segment: 3
Rate°F /hr: 120
Temp °F: 250
Hold: (none)
Time in Hours: 2
Segment: 4
Rate°F /hr: 300
Temp °F: 1000
Hold: (none)
Time in Hours: 3
Segment: 5
Rate°F /hr: 150
Temp °F: 1100
Hold: (none)
Time in Hours: 1
Segment: 6
Rate°F /hr: 180
Temp °F: 2095
Hold: (none)
Time in Hours: 6
Segment: 7
Rate°F /hr: 108
Temp °F: 2345*
Hold: 0
Time in Hours: 2
Total Time: 13
Fast Glaze Firing Profile for cone 10 (2345°F)
Segment: 3
Rate°F /hr: 120
Temp °F: 250
Hold: (none)
Time Hours: 2
Segment: 4
Rate°F /hr: 300
Temp °F: 1000
Hold: (none)
Time Hours: 3
Segment: 5
Rate°F /hr: 150
Temp °F: 1100
Hold: (none)
Time Hours: 1
Segment: 6
Rate°F /hr: 180
Temp °F: 2095
Hold: (none)
Time Hours: 6
Segment: 7
Rate°F /hr: 108
Temp °F: 2345*
Hold: 0
Time Hours: 2
Total Time: 13
APPENDIX E: ERROR CODES
See this web page for a more complete description of all error codes with links to how to fix the underlying causes:
hotkilns.com/error-codes
Error Code: E 0 (RPCN)
Description: Software Error. Recheck the selected program and reprogram if necessary. You may need to contact L&L for new software.
Error Code: E 1
Description: The temperature is increasing less than 12°F per hour during a ramp segment where the temperature is programmed to increase. This slow rate must persist for 22.5 minutes before the error is displayed. Causes include low power to the kiln, aged elements, etc.
Quick View: Ramp segment | Temp increase < 12°F/hr | Persists > 22.5 min.
Error Code: E 2
Description: During a hold segment, the temperature rises more than 50°F above the set temperature. This condition must persist for 18 seconds before the error is displayed.
Quick View: Hold segment | Temp > 50°F above set point | Persists > 18 sec.
Error Code: E 3
Description: During a hold segment, the temperature falls more than 50°F below the set temperature. This condition must persist for 18 seconds before the error is displayed.
Quick View: Hold segment | Temp < 50°F below set point | Persists > 18 sec.
Error Code: E 4
Description: During a decreasing ramp segment, the temperature is more than 50°F above the last hold temperature. This condition must persist for 18 seconds before the error is displayed.
Quick View: Decreasing Ramp | Temp > 50°F above last hold temp | Persists > 18 sec.
Error Code: E 5
Description: During a decreasing ramp segment, the temperature is more than 50°F below the local setpoint temperature. This condition must persist for 18 seconds before the error is displayed.
Quick View: Decreasing Ramp | Temp < 50°F below local setpoint temp | Persists > 18 sec.
Error Code: E 6
Description: A negative temperature is displayed, indicating an incorrect thermocouple connection. Ensure the red and yellow wires are correctly connected at all junctions.
Quick View: (-) displayed | Check thermocouple wiring
Error Code: E 7
Description: During an increasing ramp segment, the temperature is more than 50°F above the local setpoint temperature. This condition must persist for 18 seconds before the error is displayed.
Quick View: Increasing Ramp | Temp > 50°F above local setpoint temp | Persists > 18 sec.
Error Code: PF
Description: A continuous "PF" display indicates a long-term power outage. The kiln has been shut down. Press 1 to clear the display.
Error Code: ERRP
Description: "ErrP" and the current temperature are flashing alternately. Press 1 to clear the display. If a firing was in progress, the kiln will continue to fire despite the flashing message.
Error Code: E d
Description: "Errd" (Error Difference) indicates that a difference of more than 100°F has been detected between any thermocouple and the setpoint. The firing will be terminated. Possible causes include thermocouples placed in the wrong sections, incorrect stacking order, bad elements, or wiring issues.
Error Code: E E
Description: A hardware error has been detected by the controller software. The controller must be returned for service.
Quick View: Hardware error
APPENDIX F: ZONE CONTROL SPECIAL CASES
ZONE CONTROL ON A 2, 4 & 5 SECTION KILN AND WITH A POWERED BOTTOM
On kilns with four heating sections the center two heating sections are tied together as one center zone. On kilns with five heating sections the center three heating sections are tied together as one center zone. Each section still has its own separate contactor, but the center zone control output controls one contactor on a three section kiln, two contactors on a four section kiln and three contactors on a five section kiln. We suggest placing the center zone thermocouple (TC2) in either of the two middle sections on a four section kiln and in the center section on a five section kiln. You can of course experiment to achieve optimal results.
Kilns with two zones typically use inputs (thermocouples) and outputs (receptacles) 1 and 2 even though we usually have a third unused circuit on the control. If you add a section you may want to enable the three zone control (see the section on programming) and possibly add a thermocouple. On kilns with powered bottoms the powered bottom is controlled off the bottom zone control output. This would be the case of a kiln with three or more sections. In the case of a two section kiln with a powered bottom the powered bottom is controlled off the center zone control (TC2). This acts as a two zone kiln.
APPENDIX G: FREQUENTLY ASKED QUESTIONS
During programming of a firing, I typed a wrong number. How do I correct this?
Before pressing ENTER, enter 0 until all zeros are displayed, then enter the correct number. If you have already pressed ENTER, you must continue to enter the rest of the program as you would have, then you must start over again to program properly, fixing your mistake this time around..
How do I clear the ErrP or PF from the display?
Press the “1” key. After several seconds the current temperature will be displayed. The amount of time the last firing took or STOP may be displayed before the current temperature. If the ErrP or PF message is flashing with the alternate display being the temperature then it means that the kiln is still firing after a brief power interruption.
I am getting the E d message. What is wrong?
More than likely the kiln was set up improperly. NOTE: It is absolutely necessary to match the proper ring with the proper control box outlet and proper thermocouple. If these are mismatched the kiln will not operate properly and you will get the E d display showing that one of the zones is way off set point. Thermocouples, cords and receptacles are all marked for identification. The top zone ring, outlet and thermocouple are all marked #1. In three ring kilns the middle zone is #2 and the bottom is #3. In four ring kilns the middle zone is #2 and #3; the bottom is #4. In five ring kilns the middle is #2, #3 and #4 and the bottom is #5. You can easily test to make sure the thermocouples are properly located by putting a match to one at a time and checking the temperature rise on the control for that thermocouple.
I am getting the E-1 message. What is wrong?
This is the most common error message. It means the kiln is rising in temperature too slowly and can be caused by a variety of things. In older kilns it is probably a result of elements being aged or one or more elements not firing for some reason. The first thing to check is element resistance and continuity. See our troubleshooting guide for details. If this happens in a newer kiln it is still a good idea to check the elements. One problem we have found is that the thermocouple lead wire was pinched and was creating a short circuit (meaning that the controls was reading whatever temperature was at the pinched point and so, as far as the control was concerned, the kiln wasn’t heating up. The way to test for such a condition is first of all to observe that the control is showing a temperature that is greatly different than what you can tell is in the kiln. The other better way is to disconnect the thermocouple and see if the display says FAIL . If it does then it means there is no short circuit in the thermocouple circuit. This could also happen with a burned thermocouple connection wire (say if the yellow wire touched the kiln case and the wire insulation burned off). Note that Err1 is only a possibility during a ramp. A common problem is that one of the sections is lagging. Try to find out which section is lagging. If it is the bottom (fairly typical) you could try a 2” layer of calcium silicate under the kiln bottom (this is very inexpensive insulation that is quite hard and non-compressible) or even another brick bottom. If you are using a vent try turning it off towards the high end of the firing cycle. (NOTE: This is OK to do on an L&L Vent-Sure but with some bottom mounted vents you are not supposed to do this or you will burn up the motor). Make sure your peepholes are closed at high fire.. Make sure kiln is loaded evenly, more in the bottom of the kiln than the top will make it fire very slowly also. One last thing to consider is the voltage available to the kiln when it is on and running. Get an electrician to check this at the kiln and be sure it comes pretty close to the kiln’s label. Low voltage can cause slow heat ups and voltage lower than 208VAC can also cause problems with the microprocessor in the DynaTrol as well.
My kiln takes longer to fire than I think it should.
See suggestions above in E-1 troubleshooting.
My program takes longer to complete than I expected. What is happening?
The controller actually accomplishes the temperature rise by establishing what’s called a traveling set point. The traveling set point is set by the controller at the initial kiln temperature, and it is increased (or decreased) at a rate equal to the ramp rate you have chosen. Anytime the kiln temperature is below this traveling set point the heating elements of the kiln are turned on. If the temperature is above the traveling set point the heating elements are turned off. When both the traveling set point and the average of the measured temperatures reach the first soak temperature, the hold phase begins or the next ramp rate begins. (That is called a guaranteed soak). It means that a program might take longer than the theoretical time you have programmed into it.
My kiln seems to be much hotter than the thermocouples indicate. Or the kiln seems to be going to slow (by the readings on the controller).
This could be serious. Check to see that the thermocouples are inserted at least 1 to 1-1/2” into the kiln. If the tips of the thermocouples are buried in the kiln wall insulation they will obviously read at a lower temperature than the inside of the kiln. THIS COULD LEAD TO AN OVERFIRING OF THE KILN! Another possibility is that there is a short circuit in the thermocouple lead wire. See the above Err1 question to check the thermocouple circuit.
Is there a guaranteed soak?
Yes. This means that if the kiln does not reach temperature in the time you assign in a ramp it will not start the hold portion of that segment until the kiln reaches the set point temperature. This also means that the actual time to fire may take longer than you have programmed into the kiln (if it takes longer to get to a particular temperature than you think it ought to take).
I turned on the controller and FAIL is displayed. What does this mean?
One or more of the thermocouples are not connected to the controller. When connecting the thermocouple, connect the negative wire (on Type K in non-European kilns this is RED) to the connector with the negative (minus) sign under it. Connect the positive wire (on Type K non-European kilns this is Yellow) to the connector with the positive (plus) sign under it. (See Section 1.0 for information on Type S and European kilns). Also there may be a break in one of the thermocouple lead wires, if so, the thermocouple lead wire must be replaced. Make sure all thermocouple connections are very secure and tight and that there is a direct touching of the thermocouple lead wire with the actual wire inside the thermocouple.
I keep burning out thermocouples. What is wrong?
Thermocouples, like elements are a consumable item. They will burn out over time. If you are firing to high temperatures (Cone 5 and above) you should consider either an 8 gauge thermocouple with a ceramic protection tube or Type S thermocouples. A reduction atmosphere (the lack of enough oxygen in the kiln to thoroughly burn off all impurities) attacks elements and thermocouples. Speedy firings especially as the kiln climbs to 1100°F, will not give enough time to burn out these impurities. This is made worse if there is no ventilation to the kiln. An open peephole or three may be enough, or a downdraft venting system like L&L’s Vent Sure system may be what you need for a good, clean, oxidizing atmosphere.
How can I find out the final temperature which was reached during a cone firing?
At the end of an EASY-FIRE firing, the current kiln temperature and CPLT will be alternately flashing in the display. Press ENTER or START/STOP. Then press Review Prog, the final temperature will display. This final temperature will be retained until the next firing or until the controller is reprogrammed. In a VARY-FIRE program the DynaTrol will fire to the temperature programmed.
My kiln underfires, turns off before the DynaTrol reaches its set point .
If you have a Dawson Kiln Sitter as a back up safety device be sure that the cone in it is at least two to three cones higher than your final set point temperature. Remember that, when using the DynaTrol control, the optional kiln sitter is only safety back up controls. You do not want it to actually actuate. If you have a Dawson Kiln Sitter/Timer, be sure the time is set higher than the expected length of your program. See above answer about the kiln sitter safety control. Also you may need to calibrate; to adjust the cone settings with the cone offset. Note that it is common for thermocouples to “drift” in their readings. As this happens the cone offset or the thermocouple offset can compensate for this. Sometimes fire with witness cones so you can compare what the control did to the actual performance of cones.
Why use a soak time or make the kiln go slow?
Most ceramics achieves its characteristics not so much by what temperature it reaches but by how much “heat-work” is put into it. A long soak at a lower cone can often develop the bisque or glaze better. In addition a soak period almost always will improve the uniformity of the firing throughout the kiln. A soak period gives the entire load of ware time to absorb the radiant heat that is projected from the elements. If you simply rise to a certain temperature and then shut the kiln off (as is typical of a manual kiln sitter operation) then the center of the kiln may not have had a chance to absorb as much heat as the ware around the perimeter. The same would be true for a thick piece of pottery if it was just heated to a temperature and then cooled. The middle of the piece would never get to the same temperature as the outside of the piece, and in extreme situations, if it was heated very quickly, could cause the piece to explode. You may have experienced the fact that an older kiln, with slow firing elements may in fact have given you better results. This is because the entire kiln has had a chance to even itself out as it approached final cone. A slow heat up will result in “cleaner” bisque. It will give the kiln time to burn out impurities like sulfur and carbon out of the clay. These impurities can cause pitting and other problems when you subsequently glaze the ware if they have not been given sufficient time to burn off during the bisque.
Can you change a program segment while running a program?
No. You must first Stop the program by hitting START/STOP. Then change the program. Then re-start the program. The control will automatically start from where you were previously. For instance if the kiln temperature is at 1200°F and this is segment No 2 it will restart from that point in the program. You can advance to the next segment (in a VARY-FIRE Program). See the directions in under Skip Step in the View Section.
When the control flashes TC2 alternating with a temperature does it read that until you toggle to a different thermocouple?
The control is continually reading the temperatures in all three zones. However it only displays one temperature at a time. It does not scroll automatically. To manually scroll to the different thermocouples hit either 1, 2 or 3. The default display is thermocouple #2.
Is there a lead zone?
No. Each zone is controlled independently with a separate input (each thermocouple), and a separate output (the signal from the DynaTrol to one of the contactors to send or not to send power to the elements. The output of the zones can be quite different. For instance the top zone (#1) may be calling for 75% output while the middle zone (#2) is calling for 35% output while the bottom zone (#3) is calling for 90% output. This percentage is the percent of time that a zone is on, out of the total time elapsed. This is a time proportioning control.
Is this a time proportioning control?
Yes. The control determines what the percent of output (0-100%) is required to properly heat the kiln. It then converts this into amount of time or and time off that the contactor should be firing. This is different than current proportioning which would send a proportional current to adjust an continually adjustable SCR power control for instance.
What happens when I turn off the Error Codes?
It is O.K. to do this. However, you will not get certain operator protections which might prevent you from getting a poorly fired kiln. They can be turned off if you are doing special firings, such as jewelry or glass firing where the kiln is left open. This will also turn off the Dynamic Zone Control, and the E d function when the Error Codes are turned off. This turns off most error functions so that kiln is not affected by these built in checks. It eliminates nuisance shut downs but side steps built in “fool proofing”. The only Error codes that this does not turn off are E 6, FAIL, and ErrP or PF in both the EASY-FIRE and VARY-FIRE modes. In addition E 1 (indicating slow temperature rise) and E 8 (temperature falling) is not turned off in the last segment of an EASY-FIRE program. This is because the built in calculations would make no sense if the kiln were firing too slowly.
What happens when a thermocouple fails?
If the top (TC1) thermocouple fails then the top (TC1) and middle (TC2) work together from the TC2 thermocouple. If the bottom (TC3) Fails then the bottom (TC3) and middle (TC2) work together from the TC2 thermocouple. If the middle (TC2) Fails then the top (TC1) and middle (TC2) work together from the TC1 thermocouple.
One or more of the thermocouples reads FAIL. What is wrong?
One or more of the thermocouple circuits has failed. Chances are this is a bad thermocouple. Even if the thermocouple looks OK there might be a microscopic crack that could FAIL intermittently. A simple test to see if the problem is in the thermocouple itself or in the thermocouple wire is to do the following: Disconnect the thermocouple from the yellow lead/extension wire that attaches at the cold end of the thermocouple. Touch together the red and yellow leads coming out of the yellow lead/extension wire (note: this is very low milli-voltage and is not dangerous). This will complete the thermocouple circuit and eliminate the actual thermocouple from consideration. Now press the #1 button, If the FAIL message goes away then you know it is a bad thermocouple. If the FAIL message does not go away then the next thing to check is make sure that the thermocouple is properly attached to the connection board on the control. If this looks OK then the yellow extension wire should be replaced or the DynaTrol might have a problem.
What is PID and can the PID settings be changed?
PID stands for “Proportional, Integral, Derivative” This is a mathematical calculus function built into the control that proportions the amount of power going to the output device (contactor) as the kiln approaches set point temperature. It is used to prevent overshoot which you would get if the control did not turn off until it reached the set point. The values are fixed and based on average kiln conditions. Because most kiln conditions are fairly similar and the ramps are very slow by most industrial standards not much flexibility needs to be built into the PID constants. There is no “adaptive tuning.” The values for the PID are hard programmed into the control and can not be changed. They are optimized for ceramics. If you are using the control for another application and you find that the control gives you some overshoot try a step in your program that is a very slow ramp for the last few degrees of the program. For instance if you wanted to get to 1800°F without overshoot have the program go to 1775°F and then take 15 minutes to ramp to 1800°F .
NOTE: Do not confuse the PID talked about here with the “PID” setting in the Hidden Other Menu.
Is there any way to know what the set point actually is?
Yes. Press Review Seg twice while the kiln is firing and the set point will appear.
What happens if there is a power outage?
If the power outage lasts for less than ½ hour the control should pick up where it left off unless the kiln temperature has dropped more than 250°F or, if it is within 100°F of the end of the firing then only a 100°F drop off is allowed. If the program automatically aborts based on the above logic then it must be manually restarted. If you restart the program, the control will find out where the temperature is and will start from there. If you get a power outage you will see an ErrP or PF error code. This must be reset by hitting any button on the key pad.
The display is jumpy. What about Thermocouple noise?
- The negative lead of the thermocouples are automatically grounded to the safety ground.
- This typically is able to remove thermocouple noise from the system.
- Thermocouple noise is typically caused by stray electrical currents induced into the low voltage thermocouple circuits by the kiln elements.
- It shows up as “jumpy” temperature readings on the control.
- A little of this is OK but if the readings are very jumpy it can confuse the control. If you see this sort of “jumpiness” check all ground connections involved for tightness and continuity.
- If the ground is OK and the thermocouples are in the factory provided holes, in your kiln about one and one half inches, then contact L&L or a certified repairman for assistance. NOTE: thermocouples in homemade holes that may be positioned too close to the elements, could receive more of the inductive current generated by the elements, therefore receive more noise (NOTE: In extreme cases L&L can retrofit your control box with a noise suppressor and even wire the box so that the control voltage is feed through a separate 120 volt cord).
- (See this web page for a more detailed description with potential solutions: hotkilns.com/noise-fix)
Do thermocouples need to be grounded or ungrounded?
They must be ungrounded thermocouples. Grounded thermocouples will cause problems with this control. The negative leads of the thermocouples are connected to the kiln ground. (See above section about electrical noise). Be sure there is only one ground to your kiln. This is normally through the plug or main power connection all the way to the “earth ground”. The control is grounded and RF (radio frequency) noise generated in the thermocouples (from the element power and other sources) is drawn into the sheath ground and into the negative lead of the thermocouple and then ultimately out to earth ground.
Can I override the end of a firing to gain temperature?
Lets say you just fired a load and you can see through your peephole (looking at a witness cone) that your load did not fire to full maturity.
- Restart the program with a higher cone value and then manually shut off kiln when the witness cone starts to mature.
- Use the cone offset feature next time to eliminate this problem before it happens again.
I hear the contactors clicking on and off when the kiln is at a low temperature and even though my set point is way above the temperature readings. Why?
The control only allows power for about 1/3 of the time when the kiln temperature is below 500°F. This is because kilns are generally overpowered for these low temperatures and the control would constantly be overshooting any lower temperature set points without this feature.
What does it mean when the display flashes?
- The DynaTrol is trying to give more information than can fit on just one displayed message.
- Either the message cycles over and over again, like IdLE and TC2, current temperature, or the messages continue to flash by quickly, as in the case of what happens when you press the Review Prog button.
What does CPL mean?
“CPL” means that programming an option or a sequence of steps has been completed.
How do you turn off the audible alarm?
The alarm is an audible signal. You can turn it off (after it turns on) by pressing ENTER. Set it for 9999 to disable it.
How do I get information about my firing?
- When the program has completed it will flash CPLT and the time it took to get to temperature.
- After pressing STOP you can press Review Prog to get more information about the firing.
- The display will scroll through the following: the Cone you set it at, the actual temperature that the kiln achieved, what speed you had it set for, and hold time etc.
- This only works in the EASY-FIRE mode.
- In the VARY-FIRE mode, if you press Review Prog you see what you programmed only. This information will be retained in memory until the control is reprogrammed.
What ambient temperature conditions do I need for the control?
Do not operate the controller in temperatures above 125°F or below 0°F or 0°C. Actually a little hotter or colder will still be within tolerance of the components. The real component rating is near 160°F . If you are using the Celsius temperature scale 0°C is the lowest operating temperature possible as the DynaTrol thinks a negative temperature displayed is because of a thermocouple installed backwards, not because it could be cold outside. (NOTE: The board components are rated for 50°C below zero so the control (and kiln) can be stored outside in a covered area).
The kiln did not begin soaking when it should have.
The fact that the kiln did not start to soak when its seems like it should could be due to the fact that an average of all the process variables (TC readings) and the traveling set point have to reach set point temperature before the hold begins. Or the DynaTrol has computed a higher temp (than you expected it to) to equate to the cone # fired to and the rate of climb… Once it gets to where it determines the cone is , it will begin the hold.
The thermocouples seem to be off according to the cones.
If you had an ErrP or PF message while firing, and the kiln temperature went down briefly, the cones may have misrepresented actual temperature for the following reason: If the temperature decreases in the kiln temporarily after the cone begins to form a glass (starts to mature even though it may not be visible) the decrease in temperature could “freeze” the cone and prevent it from operating properly. Cone temperatures also vary according to how quickly the kiln climbs in temperature. Thermocouples do age, sometimes rapidly, and may not read like they used to. Try a cone offset to raise or lower the entire kiln’s final temperature for the cone you have programmed. Or try a thermocouple offset if it is just one or two zones that are consistently hotter or cooler than they should be.
How do I ramp down?
You must use the VARY-FIRE Mode. The control will change the path of the firing profile in the direction of the next segment’s set point. In other words if the current segment has a set point of 500°F and the following segment has a set point of 1000°F then the control will ramp the set point in the “up” direction. Conversely if the current segment has a set point of 1000°F and the next segment has a setpoint of 500°F then the control will ramp the set point in the ”down” direction. See the specific instructions in the Programming section under VARY-FIRE.
Does the control work on 50 HZ?
Yes. The control will work on either 50 Hz or 60 Hz. The electrical cycle does not affect any timing circuits in the control.
TEMPERATURE READINGS VS CONES
Automatic controls are great tools. They are not complete tools, however. They base what they do on electrical signals generated by the thermocouples that get interpreted by the electronic control as specific temperatures. There are four inherent problems with this. First, the thermocouples are only measuring temperature at the very tip of the thermocouple. Typically this is placed an inch or two in from the inside surface of the kiln. The thermocouple is usually not measuring the temperature in the middle of the kiln. Second, there is an inherent error in the thermocouple of a few degrees either way. Third, thermocouples drift in their accuracy over time. Fourth, and perhaps most important, thermocouples only measure temperature. For ceramics you are really interested in “heat-work” or the amount of heat that is absorbed by your ware over time. It is like baking a cake. Absolute temperature is only one factor in the successful baking. For all these reasons we highly recommend the use of witness cones in every firing. These will tell you what really happened in the kiln. We suggest using a set of three witness cones in each zone for the kiln. At the absolute minimum use one witness cone per firing to check basic performance of the kiln and control. Then using this accurate information you can use the many features of the DynaTrol to conform the performance of the control to your exact needs. You may want to try firing the kiln with all the preset programs with witness cones to see just how the type of program affects the cones you will be using. Keep good records and get to know your kiln, the DynaTrol and how the combination of these two things with the kind of ware that you fire all work together. There is no substitute for experimentation and personal individualized documentation. See the following for more helpful information:
Helpful Links
hotkilns.com/hold-times-and-heatwork
Firing with Witness Cones

See https://www.youtube.com/video/-8E-YkZ45EA?si=DxlwhESmv5sppBXV
APPENDIX H: VARY-FIRE DEFAULT PROGRAM’S
USER 1: Medium Speed Glass Slumping Profile
|
Segment |
Rate |
degF |
Hold |
|
1 |
500 |
250 |
00:12 |
|
2 |
500 |
500 |
00:12 |
|
3 |
500 |
750 |
00:12 |
|
4 |
600 |
1100 |
00:05 |
|
5 |
600 |
1220 |
00:05 |
|
6 |
9999 |
1000 |
01:00 |
|
7 |
90 |
970 |
01:00 |
|
8 |
120 |
750 |
00:01 |
USER 2: Medium Speed Glass Tack Fuse Profile
|
Segment |
Rate |
degF |
Hold |
|
1 |
500 |
250 |
00:12 |
|
2 |
500 |
500 |
00:12 |
|
3 |
500 |
750 |
00:12 |
|
4 |
600 |
1250 |
00:20 |
|
5 |
600 |
1350 |
00:10 |
|
6 |
9999 |
1000 |
01:00 |
|
7 |
90 |
970 |
01:00 |
|
8 |
120 |
750 |
00:01 |
USER 3: Medium Speed Full Fuse Profile
|
Segment |
Rate |
degF |
Hold |
|
1 |
500 |
250 |
00:12 |
|
2 |
500 |
500 |
00:12 |
|
3 |
500 |
750 |
00:12 |
|
4 |
600 |
1250 |
00:20 |
|
5 |
600 |
1480 |
00:15 |
|
6 |
9999 |
1000 |
01:00 |
|
7 |
90 |
970 |
01:00 |
|
8 |
120 |
750 |
00:01 |
USER 4: Glass Bead Annealing Profile
|
Segment |
Rate |
degF |
Hold |
|
1 |
9999 |
960 |
08:00 |
|
2 |
9999 |
960 |
00:40 |
USER 5: Lost Wax Burnout Profile
|
Segment |
Rate |
degF |
Hold |
|
1 |
9999 |
300 |
01:00 |
|
2 |
100 |
350 |
00:30 |
|
3 |
350 |
1350 |
01:30 |
|
4 |
300 |
900 |
99:99 |
USER 6: Slow Cooling Cycle for Cone 6 Glazes
|
Segment |
Rate |
degF |
Hold |
|
1 |
9999 |
2232 |
00:00 |
|
2 |
9999 |
1900 |
00:00 |
|
3 |
150 |
1500 |
00:00 |
APPENDIX I: HOOKUP DIAGRAM
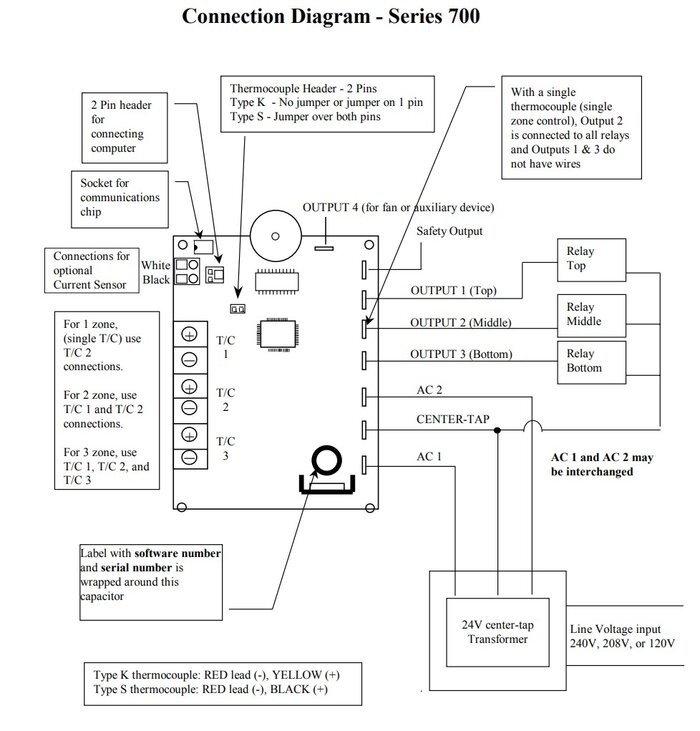
APPENDIX J: PHOTOGRAPHS
Back of the DynaTrol:
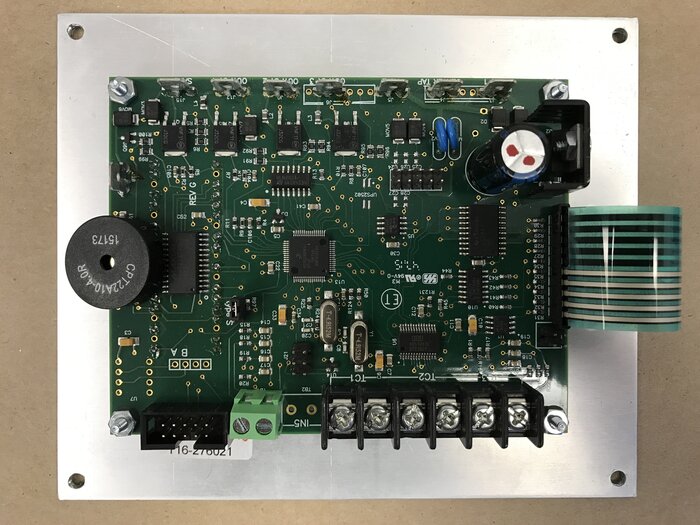
APPENDIX K: HELPFUL WEB LINKS
First Firing
Advanced Programming and Configuration
- How to add soak to or reprogram a DynaTrol during a firing (hotkilns.com/add-soak-while-firing)
- How do I enter a really slow program? (hotkilns.com/really-slow-program)
- How do I fire with fewer kiln sections on my Jupiter Kiln? (hotkilns.com/fire-fewer-sections-jupiter)
- How do you find out how many firings the DynaTrol has performed? (hotkilns.com/number-firings-dynatrol)
- Can the DynaTrol count the number of firings of the kiln? (hotkilns.com/how-many-firings)
- How do I find out what the final temperature reached in a program on a DynaTrol? (hotkilns.com/final-temperature-reached)
- Changing to Single Zone on a DynaTrol (Video) (hotkilns.com/change-single-zone)
- Turning Off Error Codes on a DynaTrol control (Video) (hotkilns.com/turn-off-error-codes-video)
- Changing contactor Cycle Time on a DynaTrol control (Video) (hotkilns.com/changing-cycle-time-dynatrol)
Process Questions
- How do hold times and heatwork affect my work? (hotkilns.com/hold-times-and-heatwork)
- What can I do to promote even kiln firings? (hotkilns.com/promote-even-firing)
- Should I use the Fast Glaze or Slow Glaze or Fast Bisque or Slow Bisque? (hotkilns.com/fast-vs-slow-firing)
- Why use slow bisque over fast bisque? Is it just a moisture issue? (hotkilns.com/slow-bisque-vs-fast-bisque)
- How do I program a slump or tack or full fuse glass program into DynaTrol? (hotkilns.com/program-slump-tack-fuse-glass)
Error Codes
- Kiln DynaTrol Control Error Codes (hotkilns.com/error-codes)
- Error D (hotkilns.com/e-d)
- How to fix E-1 or Err1 (hotkilns.com/e1)
- How to fix PF, E- P, E-P, ErrP Error (hotkilns.com/fix-errp)
- What to do when you see “FAIL”? (hotkilns.com/error-fail)
- What’s the Worst thing that can Happen from Restarting After an Error Code? (hotkilns.com/restarting-after-error-code)
- Can I Restart the Kiln after Getting an Error Message? (hotkilns.com/restart-after-error-message)
- How and Why to Turn Off Error Codes (hotkilns.com/support/pottery-kiln-knowledgebase/how-and-why-turn-error-codes)
Troubleshooting Control
- Why does my kiln jump over the Preheat without holding at the Preheat temp? (hotkilns.com/jump-over-preheat)
- Some of the buttons on the DynaTrol do not work. How do I fix this? (hotkilns.com/buttons-do-not-work)
- The DynaTrol shows cone 05 after I program it for 5 or 06 after I program it for 6 (hotkilns.com/program-different)
- How can the thermocouple wires get reversed on a Jupiter or DaVinci Automatic Kiln?
- (hotkilns.com/thermocouple-wires-reversed-jupiter-davinci)
- What to do if there is no display on the DynaTrol (hotkilns.com/no-display-dynatrol)
- How to interpret a garbled message on the DynaTrol (hotkilns.com/interpret-display)
- Display Reads 2400 or CPLt When it Starts Up (hotkilns.com/display-startup)
- Why does the temperature read-out on my hand-held pyrometer differ from the temperature shown on the DynaTrol? (hotkilns.com/temperature-pyrometer-dynatrol-differ)
- My contactors / relays are wearing out too quickly - what can I do? (hotkilns.com/contactors-wear-out-quickly)
- The controlled cooling on an Easy-Fire keeps changing. Why? (hotkilns.com/controlled-cooling-easy-fire-keeps-changing)
- Control reads higher temperature than my studio. No error code. What is wrong? (hotkilns.com/control-reads-high)
Troubleshooting Process & Firing Issues
- Change the cycle time of the DynaTrol Control (hotkilns.com/change-cycle-time-dynatrol)
- Changing contactor Cycle Time on a DynaTrol control (Video) (hotkilns.com/changing-cycle-time-dynatrol)
- What to do if the kiln fires slowly? (hotkilns.com/slow-kiln)
- Electrical Supply Problems and slow kiln performance (hotkilns.com/electrical-supply-problems)
- Why does my kiln seem like it overfires the pottery? (hotkilns.com/overfire-pottery)
- The center of my kiln gets too hot compared to the top and bottom. (hotkilns.com/center-kiln-hot)
- How do I fix pinholes and blistering in glazing? (hotkilns.com/fix-pinholes-blistering)
- Why does my kiln stall or stop heating with lots of clicking (relays) and no error code? (hotkilns.com/kiln-stall-no-error-code)
Calibrating Control and Kiln
- Changing Cone Offset on a DynaTrol on an L&L kiln (Video) (hotkilns.com/change-cone-offset)
- Thermocouple Offset Setting and Cone Offset Setting (hotkilns.com/thermocouple-cone-offset)
- Changing Thermocouple Offset on a DynaTrol control (Video) (hotkilns.com/change-thermocouple-offset)
- Adjusting and Calibrating the DynaTrol or One-Touch for More Accurate Firing (hotkilns.com/calibrating-kiln)
- Fire Kiln with Cones (hotkilns.com/fire-kiln-cones)
- How to fire very precisely using witness cones (hotkilns.com/fire-precisely-witness-cones)
- What are Thermocouples? (hotkilns.com/what-are-thermocouples)
Fixing and Changing Control
- WHEN REPLACING A DYNATROL: CHECK THE CONFIGURATION OF THIS REPLACEMENT CONTROL TO MAKE SURE YOU DON’T MELT YOUR KILN! (hotkilns.com/cautions-for-replacing-dynatrol)
- How to Change Thermocouple Type (Type S or Type K) on a DynaTrol (hotkilns.com/change-thermocouple-type)
- Replacing a DynaTrol (Video) (hotkilns.com/replace-dynatrol)
- Replacing Control (Text and photos) (hotkilns.com/replacing-control)
- Checking Switches on the DynaTrol Control Board (Video) (hotkilns.com/check-switches-dynatrol-board)
Specifications Sheet
Inputs:
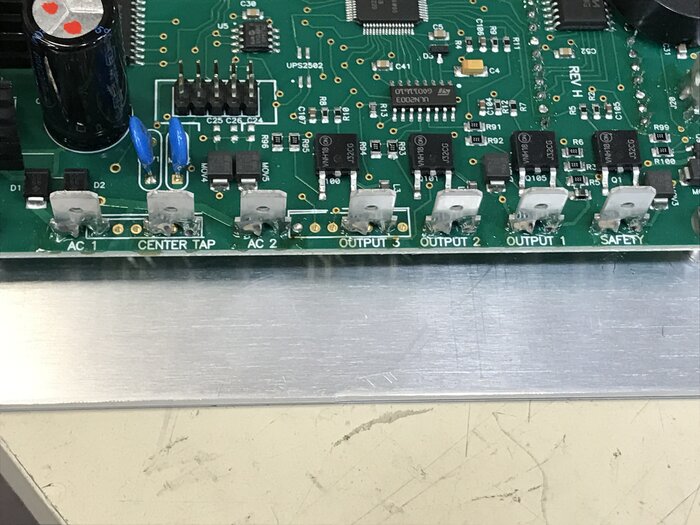

Output #4 is on the side

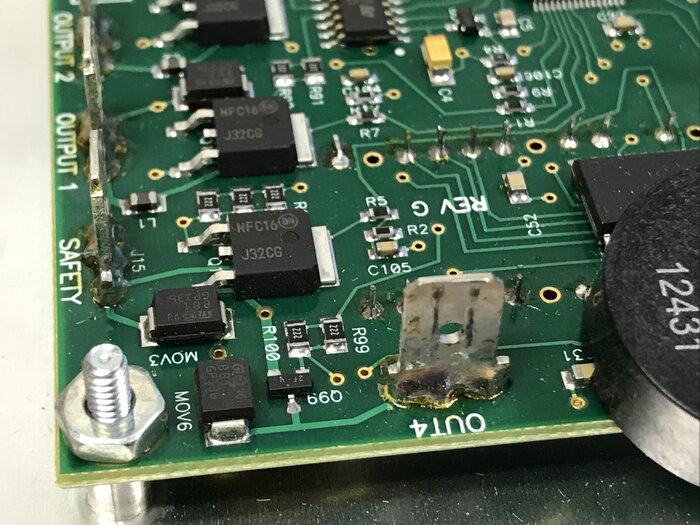
Software Version (on top) and Serial Number (on bottom):

Where Ribbon Connector connects board with panel:

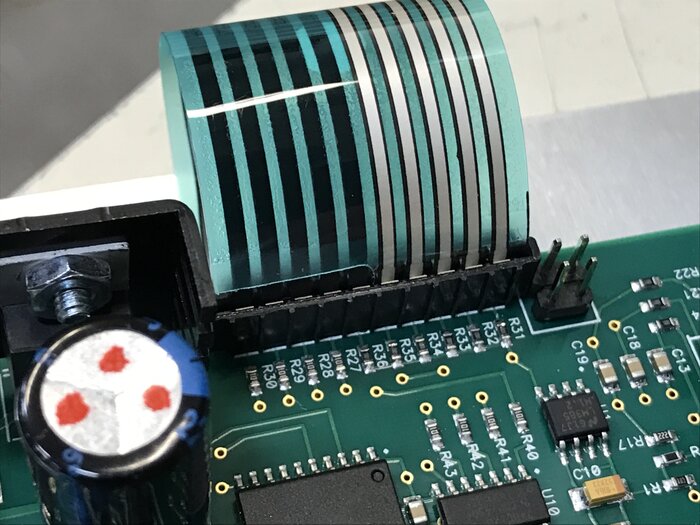
Jumper for Type S Thermocouple. It is Type S when the jumper connects to the two prongs (bottom photo):

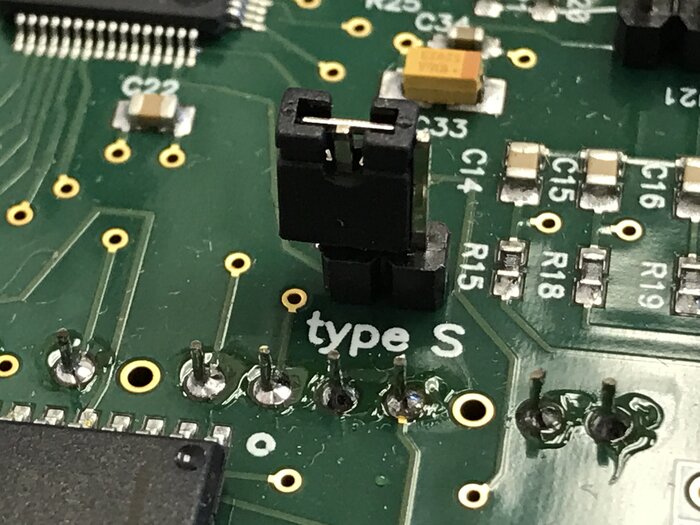
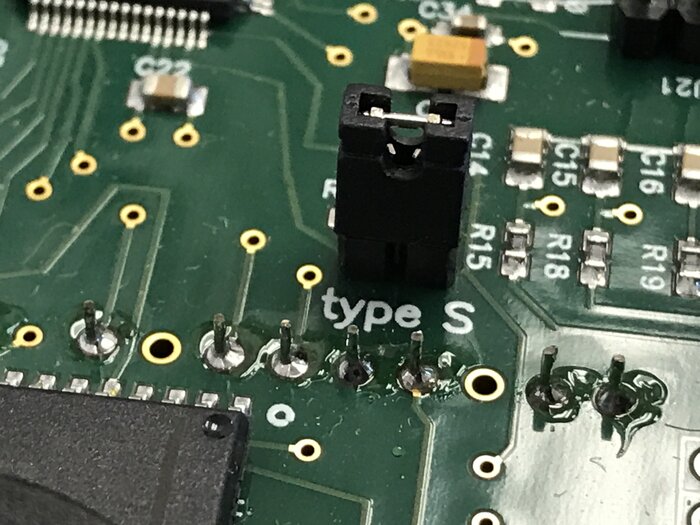

DYNATROL SPECIFICATIONS
- Thermocouple Input: Type K or Type S (software/jumper switchable)
- Accuracy: +/- 10°F
- Cold Junction Compensation: Electronic
- Power Input: 24 Volt Center Tap Transformer / 50 Hz or 60 Hz
- Outputs 1 & 3: 150mA at 12 VDC, one 12 volt relay with 80 ohm coil per output
- Output 2: 600mA at 12 VDC, one to three 12 volt relays with 80 ohm coil per output
- Output 4: 150mA at 12 VDC, one optional 12 VDC relay with 80 ohm coil per output
- Output 5: 150mA at 12 VDC, one optional 12 VDC relay with 80 ohm coil per output
- Operating Temperature Range: 0°F to 125°F, 0°C to 52°C (See FAQ Section concerning “What Ambient Temperature Conditions do I need for control?”)
- High Side Switching: High side switching which allows the relay’s return wire to be connected to ground (if the return wire shorts to ground it will have no effect).
- Safety Transistor: A safety transistor powers the other output transistors giving multiple ways to turn off the output for increase safety.
- Capacitor-Couple Output: The microprocessor is connected to the output transistor through a capacitor so that the output turns off if the microprocessor latches up.