
First Firing Instructions
REV: 2/1/2025
The Basics of First Firing
Preparation for First Firing
Firing Process and Time
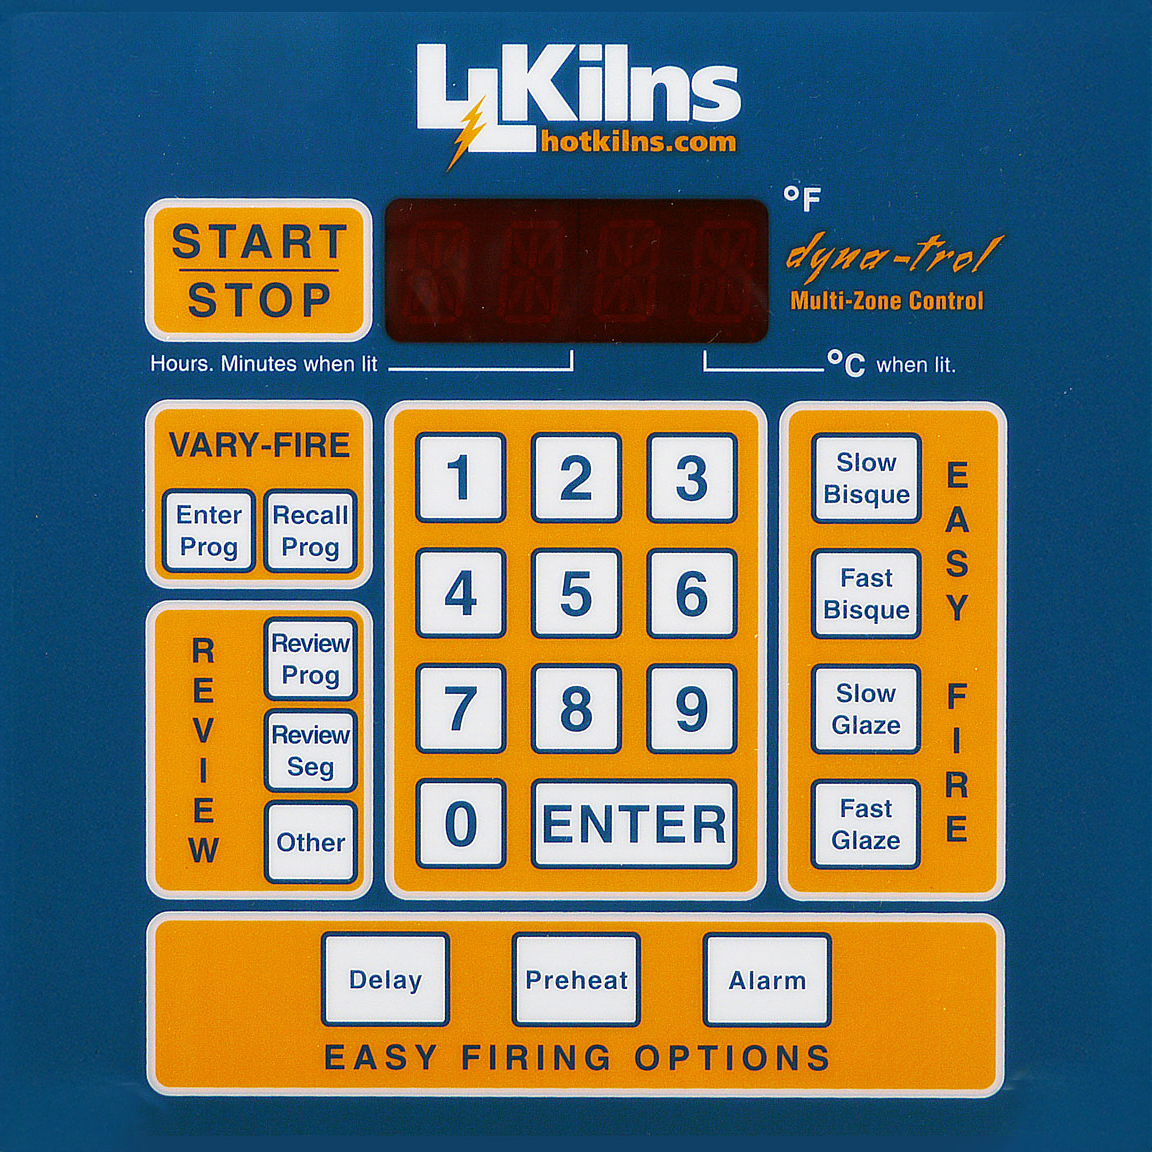
- For DynaTrol: Use Slow Glaze to Cone 04.
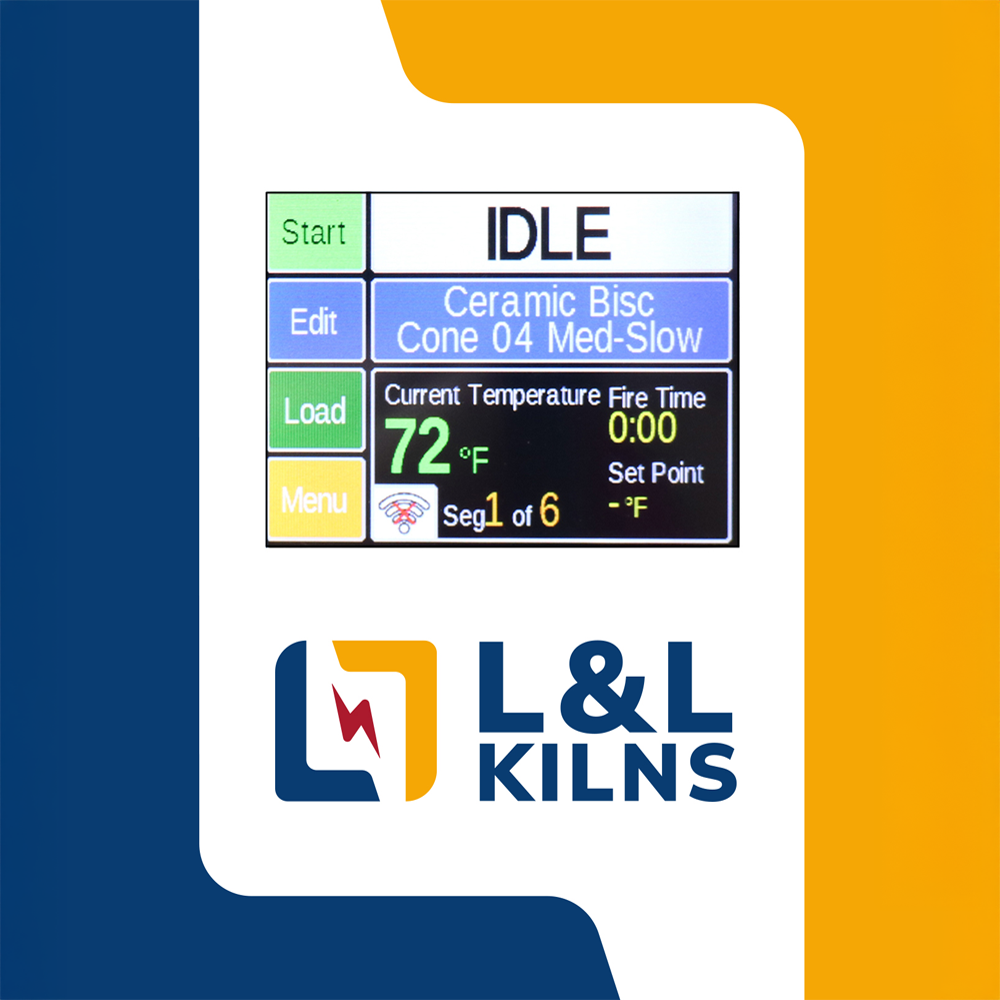
- For Genesis: Use Medium Glaze to Cone 04.
- The kiln firing typically lasts about 8 hours.
- Monitor closely, especially between 1200°F and the end, to ensure proper heating and shutdown.
- You can delay the start if needed. Follow the instructions.
Reasons for Test Firing
- Removes moisture absorbed by firebrick during construction, shipping, and storage.
- Sets the brick coating.
- Forms a protective "aluminum oxide" layer on the elements’ surface.
- Detects potential electrical service issues (e.g., incorrect voltage or wire supply).
- Helps elements settle in ceramic holders and reduces initial springiness, though thicker elements may need a few firings to relax fully.
A Word of Caution
- To ensure safe operation and validate proper function, L&L strongly recommends that all customers supervise the full first firing of any new kiln. This firing should be run empty (except for shelves and posts), with appropriately placed witness cones, and monitored to confirm normal operation.
- Controllers, including the Genesis and DynaTrol, are not safety devices. Like any electronic system, they can be affected by miswiring, thermocouple errors, or setup issues. Leaving a kiln completely unattended, especially during the first firing, may allow undetected faults to cause overfiring and permanent damage.
- While L&L supports its products under warranty against defects in materials and workmanship, the warranty does not cover damage due to misuse or failure to follow installation and operational guidelines. Supervising the first firing is a critical step in commissioning your kiln and protecting your investment.
Before You Start
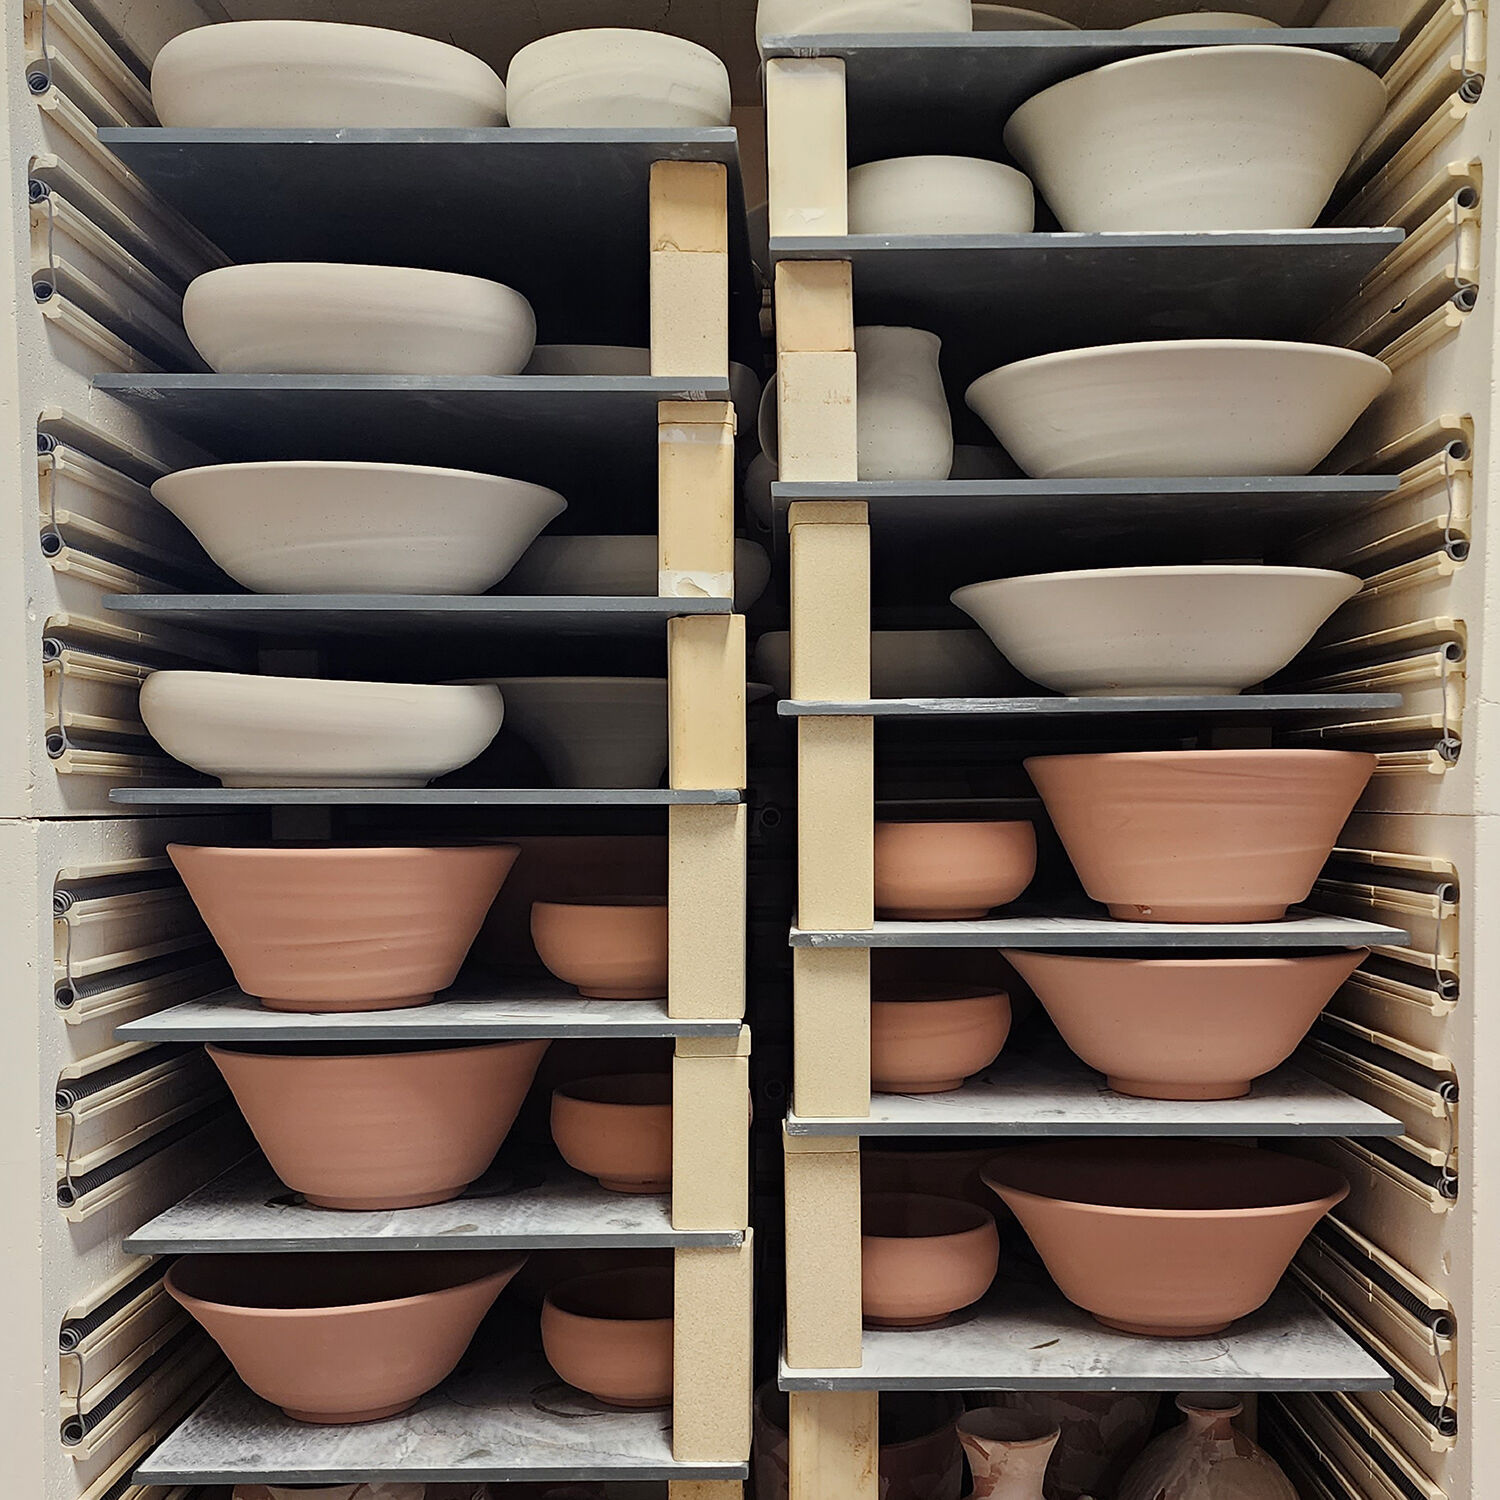
Fire with Kiln Furniture
- Fire with the evenly spaced kiln furniture to help prevent getting an error code (E-D). If the kiln is empty, the heat does not circulate evenly and can cause the kiln to cool extremely fast, resulting in an error code. You may take this opportunity to put kiln wash on your shelves.
- Insert elements in channels. Ensure no segment of the elements is hanging out of the holders. Coils should be seated as much as possible in the holders. Stretch slightly if needed, as the coils can shrink due to vibrations from moving and shipping.
- (If your kiln includes ceramic washers, use them to wedge the element into the holder at the corner.)
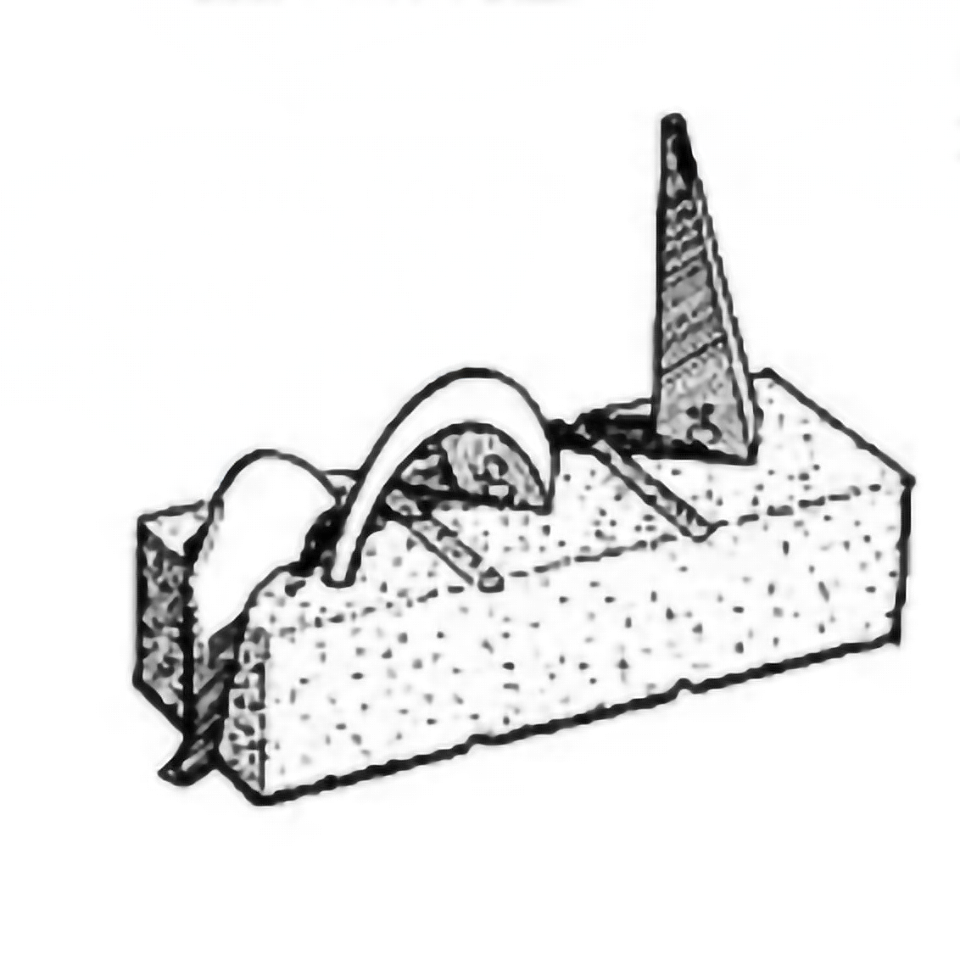
Fire with Cones
- If available, place 04 cones on the shelves near the top and bottom thermocouples (no closer than 2” away from the tips of the thermocouples).
VENTING
- If you have a Vent-Sure vent leave it on while the kiln is heating and cooling. Keep the peephole plugs in and the lid closed.
- If the kiln does not have a vent system, leave the top peephole plug out during the first test firing.
- NOTE: Removing the peephole is not ideal but can be done if no vent system is installed. Opening the top peepholes promotes air circulation, which helps the longevity of the elements and thermocouples and creates improved glaze and clay colors.
- Note: Removing peepholes can affect thermocouple readings or cause uneven/slow firings.
FREQUENTLY ASKED QUESTIONS
- Ceramic washers are between the elements and the element holders in the corners of my kiln. What is their purpose?
- This is done on some kilns, particularly DaVinci and front-loading kilns. The discs are placed in the element holders to prevent the elements from escaping during the first firing.
- It is an excellent idea to keep the ceramic discs in place during at least the first firing.
- Once the elements heat up, they generally seat themselves in the element holders, and the washers can be removed (no harm in leaving them in place)
- Can you fire to a higher cone than cone 04 on the first firing?
- There is no problem firing to a higher cone on the first test firing. Just monitor the kiln and don’t fire beyond its rated temperature.
What to expect for your first firing
- Brand new elements will smoke a little initially the first time they are heated.
- Periodically, clicking noises will occur as the relays work to turn the elements on and off throughout the firing.
- Humming or vibration can sometimes be heard from the electricity within the elements.
- Hairline cracks can naturally form in the walls, lid, and floor as the kiln parts heat up and expand. These tiny cracks are expected and harmless to the firing process. Tightening the stainless steel bands surrounding the floor, lid, and walls of the kiln every so often helps to close and tighten gaps.
- “Red Heat” can be expected to be visible through the seams between the kiln sections. Redness begins around 1000°F, and the gap can be slightly larger at the top section of the kiln. If you see too much of a gap in the top, stop the firing and check the hinge adjustment. (hotkilns.com/cautions/adjusting-hinge) NOTE: Ensuring your lid has an even gap around the entire opening is important. If the lid gap is larger in the front, too much weight will be placed on the back upper bricks, damaging your lid and bricks.
- The kiln’s interior will appear white hot at its highest temperatures.
Do you need a delayed start?
- The first firing will take approximately 8 hours.
- You only need a delayed start if you will not be present when the kiln is finished firing.
How to calculate the delayed start
Think of 8 hours past the time that you press start. If you are not present with the kiln, you will need a delayed start for the firing. The number of “hours later” is what you will enter into the kiln’s control.
Example:
- You will be available after 3 PM.
- You want to check on the firing for the last 3 hours of the 8-hour firing.
- You want to start the kiln 5 hours before 3 PM at 10 AM.
- Let’s say it is 7 AM.
- Set a DELAY of 3 hours.
CAUTIONS DURING YOUR FIRST FIRING
- The outer metal and brick surfaces can reach up to 500°F and will burn skin or fabric.
- Always use rated dark safety glasses when looking through peepholes to protect your eyes. (NOTE: #1.7 to #3.0 shade welding glasses work well.)
- See Kiln Cautions for complete details.
First Firing with a Genesis

See https://www.youtube.com/video/TMpWNf1tGjY?si=zOsnX4BfcmNL2POi
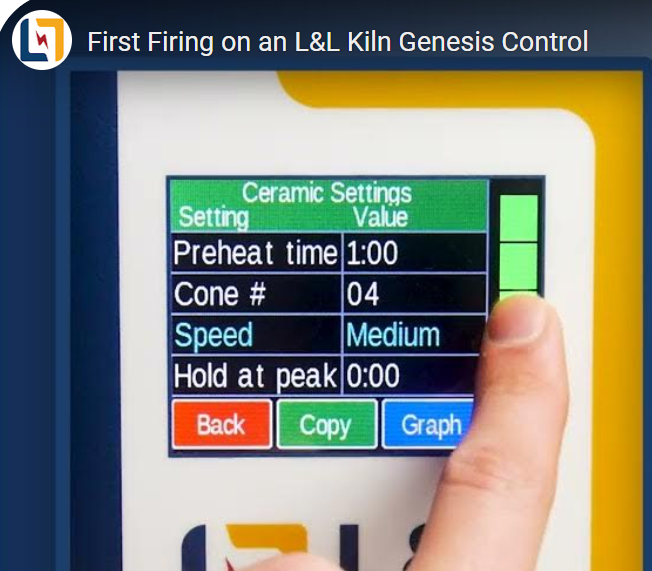
GENESIS CONTROL - FIRST FIRING
Program Cone 04 Medium Glaze
- Turn on the power to the kiln with the toggle switch.
- Press LOAD
- Press GLAZE
- The screen will show what the current glaze setting is. Press OK
- Press EDIT
- Press CONE#
- Scroll until CONE 04 is visible
- Press SAVE
- Press SPEED. Select MEDIUM
- Hold will remain at 0.00
- Press BACK, bringing you to the Main Menu.
ADDING A DELAYED START - GENESIS
- Press START
- Press #2-START LATER (only if needed)
- Enter the number of hours/minutes needed for the delay.
- Example A: 2 hour delay - Enter 200
- Example B: 2 hours, 30 minutes - Enter 230
- Press SAVE
- If you want to review the program you entered, press VIEW
- The kiln will begin firing when the timer runs out.
STARTING KILN WITHOUT DELAY - GENESIS
- After the CONE 04 MEDIUM GLAZE has been programmed, Press the START button on the control.
Error Codes?
- NOTE: If the first firing ended in an error code, please note which one it was. See this first: hotkilns.com/support/error-codes
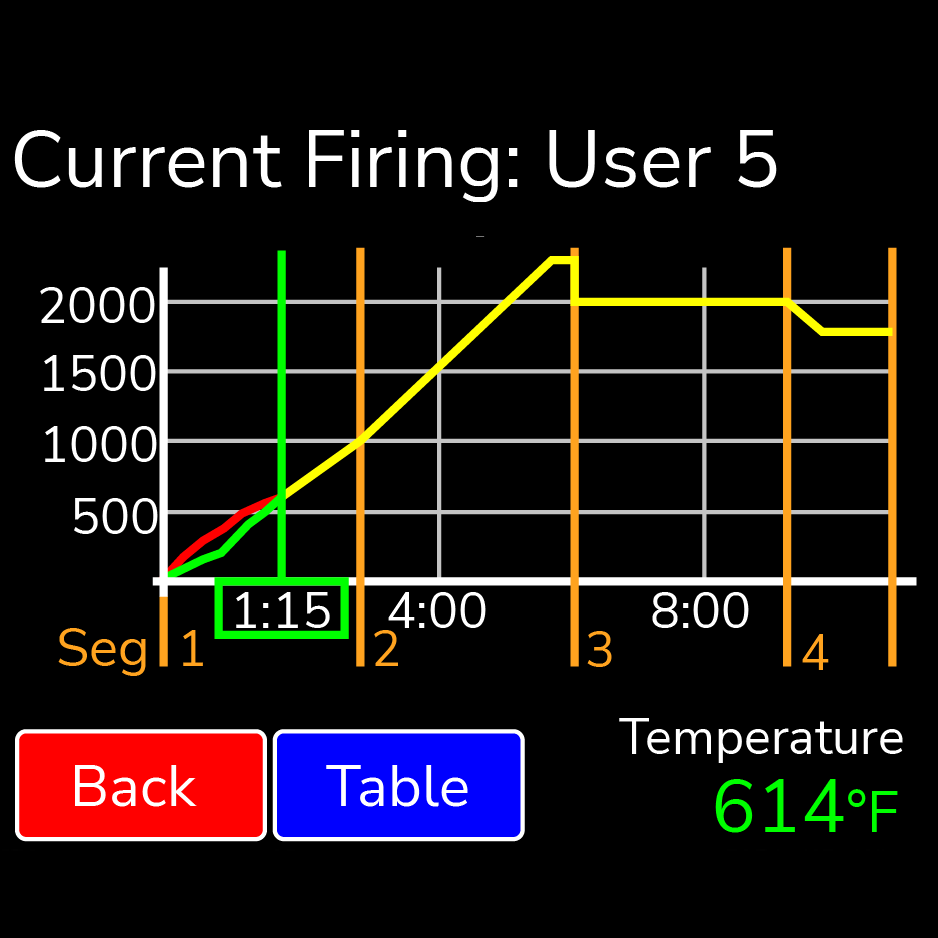
What to expect - General Firing Profile
- Temperature climbs 150°F until it reaches 250°F
- Temp will rise 400°F per hour until 1695°F
- Temp will rise 120°F per hour until 1945°F
FIRST FIRING WITH A DYNATROL

See https://www.youtube.com/video/egreppThLTA?si=9F-BLABLiQtqB_kK
DYNATROL CONTROL - FIRST FIRING
Program CONE 04 SLOW GLAZE
- Turn on power to the kiln with the toggle switch. Display reads WAIT, then IDLE flashing with TC2, TC3, or TC1.
- You may need to press ENTER and wait until you repeatedly see IDLE, TC2, and the current temperature cycling.
- Press SLOW GLAZE and see S-GL.
- Press ENTER and see CONE, and a number (which represents the cone number currently programmed in the control) flashing back and forth.
- Press 04, and see the number 04 in the display.
- Press ENTER and see IDLE flashing with TC2, T3, or TC1.
STARTING FIRING WITHOUT DELAY-DynaTrol
- If no delay is needed, after the CONE 04 SLOW GLAZE has been programmed, Press the START/STOP button on the control.
ADDING A DELAYED START - DynaTrol
- Press DELAY and see dELA, 0.00 flashing over and over.
- Enter the hours/minutes needed for the delay.
- Example A: 2-hour delay - Enter 200
- Example B: 2 hours, 30 minutes - Enter 230
- When the correct number of hours and minutes have been keyed in, press ENTER, see IDLE.
STARTING THE FIRING WITH DELAY
- When the correct time to begin firing arrives, press START/STOP. If you programmed a delayed start, the hours/minutes timer and the TC2—current temperature message will be displayed until the timer runs out.
STARTING FIRING WITHOUT DELAY-DynaTrol
- After the CONE 04 SLOW GLAZE has been programmed, Press the START/STOP button on the control.
Error Codes?
- NOTE: If the first firing ended in an error code, please note which one it was (i.e., E-1 or E-d, etc.). See this first: hotkilns.com/support/error-codes
WHAT TO EXPECT- FIRING PROFILE
- Temperature climbs 80°F per hour until it reaches 250°F
- Temp. Will rise 200°F per hour until 1000°F
- Temp. Will rise 100°F per hour until 1100°F
- Temp. Will rise 180°F per hour until 1675°F
- Temp. Will rise 80°F per hour until 1925°F
- CPLT means the firing is complete. We recommend shutting all power to the kiln off.