

Kiln Calibration
REV: 4/15/2025
Cone Offset Calculator

This simple calculator is a quick and easy way to estimate the cone offsets needed to calibrate your kiln.
Download the Orton Cone Chart Here
Calibration Basics
Cones, Temperature, and Firing
-
Cones measure "heat work," a combination of time and temperature, making them a good indicator of the ceramic firing process. While they can guide you toward successful ceramic firing, your work determines success.
-
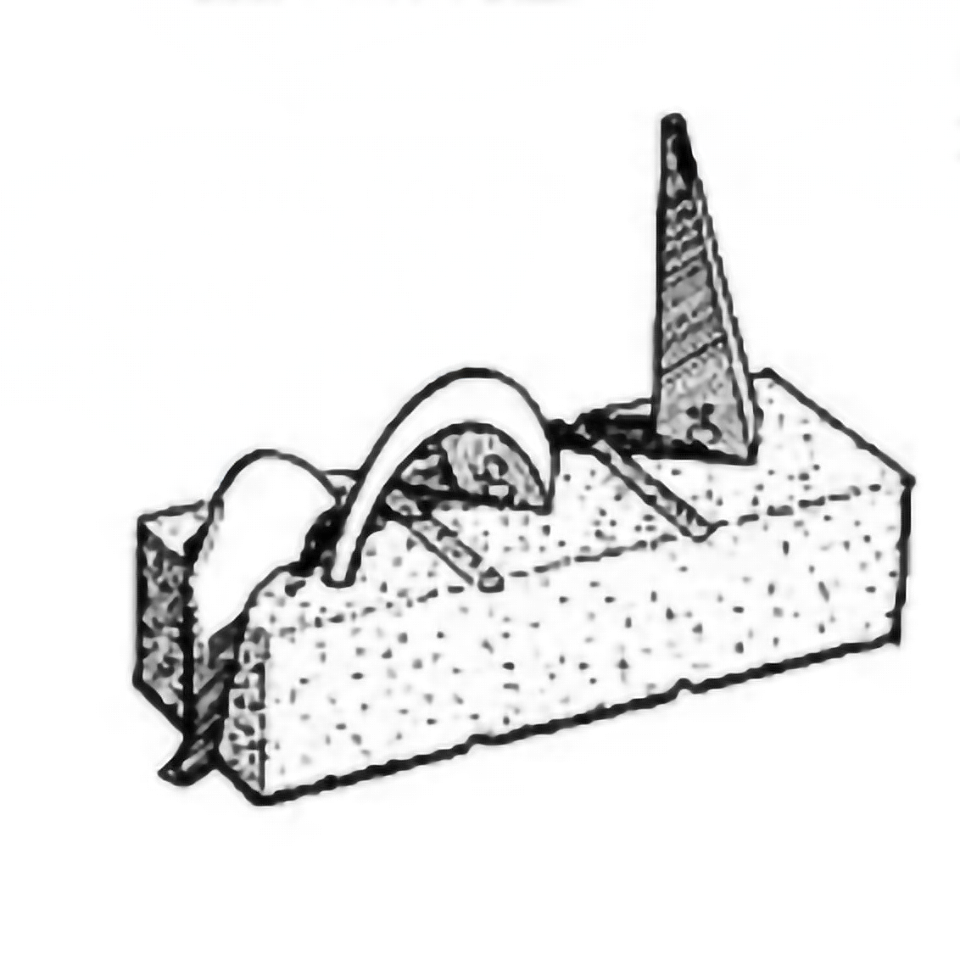
Use self-supporting cones for accurate measurements.
-
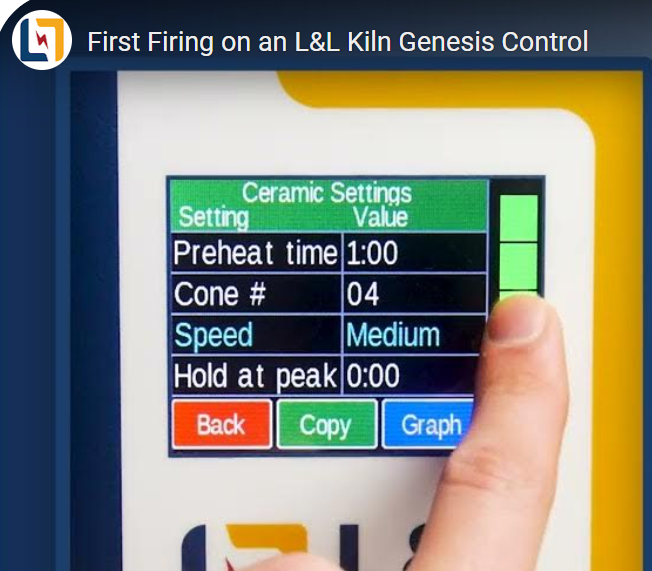
One suggestion is to perform a test firing at the same cone temperature you plan to use for glazing. This approach can save time by helping you understand how to proceed with the next firing. (Note: Although our First Firing Guide suggests firing to cone 04, it’s perfectly fine to fire hotter during your initial test firing.)
-
The kiln’s control system includes a cone table but doesn't account for every factor when calculating. It primarily monitors firing speed and the temperature at the thermocouple tips. The temperature at the tip of the thermocouple can be influenced by how far the tip is from the kiln wall or how close it is to your work.
-
The cone tables were developed many years ago and don’t fully reflect newer kiln designs (e.g., 3" thick bricks versus 2.5").
-
In many regions, such as Europe, kilns are fired based only on temperature, ramp speed, and final results. This method can be used with the Vary-Fire (DynaTrol) or Custom (Genesis) programs.
-
We recommend avoiding FAST Glaze or Bisque programs. Firing at SLOW or MEDIUM speeds produces more consistent results, considering variables such as element life, load size, and load shape and density.
-
Because of thermocouple drift, different loading conditions, and kiln conditions, your changes may have to be revisited over time.
-
Favor incremental changes.
-
When troubleshooting or adjusting the kiln, eliminate as many variables as possible.
First question: Is this a new kiln or a change in an older kiln?
For instance, you would immediately suspect aged elements and/or thermocouples on an older kiln, but you most likely waste time doing that on a new kiln. Also, new kiln users might not be loading correctly, which probably has not changed for an experienced user.
Try the easy steps first. They are listed in order of complexity.
Firing too hot (or too cold)
Easy
- If firing hot, set the control for a lower cone than you are trying to achieve.
- If firing cold (rare), set the control for a higher cone than you are trying to achieve.
- For instance, say you are firing to Cone 6, but your cone results show that the kiln is firing to Cone 7. Set the control to Cone 5.
Advanced (in order of preferred technique)
- Use Cone Offset (see how to do it). Do this separately for your bisque and glaze temperature.
- Use Thermocouple Offset (see how to do it) to closely align the thermocouple reading with what you think is happening in the kiln. For instance, with closed-tube thermocouple protection tubes, there is a known thermocouple offset of +18 Deg F (on older kilns from 2002 to 2020).
- Set the thermocouple tips to 1" from the brick wall and 1/2" from the end of the protection tube.
- Get a Downdraft Vent
Kiln Fires Unevenly
Easy
- Load your kiln to maximize uniformity (See the heading below about Loading Your Kiln).
- Do a paper test if you are getting very uneven results. (This will tell you if an element or section is not working).
- Get a Downdraft Vent (This can make a big difference in uniformity).
Advanced
- Use Thermocouple Offset (see how to do it) to adjust temperatures from top to bottom.
- Adjust how you load the kiln. For instance, do not load the kiln too heavily on the bottom.
- Check element resistance: How to test element resistance.
- Check relays: How to test relays.
- Switch to single-zone.
- Look for uneven heat leakage.
- Uneven kiln loading (heavy in the bottom) is cause for uneven firing, especially at lower temperatures. That said, uneven loading vertically OR horizontally (tall wares on one side of the kiln chamber, stack of 1/2 shelves on the other side) is also uneven. Think of even loading as front to back, side to side, and top to bottom... Multiple thermocouples only address the most common form of uneven loading (top to bottom).
Clay and Glazes
Consult your clay and glaze suppliers for their firing recommendations. Some glazes can be very particular about heatwork, while others are more forgiving. The main objective is to tune your kiln to the precision you need.
Don’t overdo it—if you are satisfied with your glaze results, tuning may not be necessary. Additionally, be aware that clay and glaze can vary between different batches due to differences in manufacturing.
Know Your Kiln
Each kiln is unique
Kilns can vary in brand, size, and even between identical models. Multiple factors can affect how a kiln fires, including:
- The health or age of the electrical components (elements, thermocouples, relays)
- Closed-end thermocouple protection tubes (on older kilns) affect thermocouple readings
- Insulation thickness
- Tightness of kiln
- The distance from the elements to the center of the kiln
- How the kiln is loaded
- Quad elements can fire more uniformly across the load
- External conditions like voltage, temperature, and humidity in the room
- Whether the kiln is vented or not
It's important to understand that while the controls used in most kilns are perfectly acceptable for ceramics, they are not precision instruments.
Controls & Thermocouples
- The controls in ceramic kilns are typically accurate to about 1% of scale (+/- 25 F on a typical kiln.)
- The thermocouples can read +/- 10°F from the actual temperature even when brand new. Even though L&L uses the "Special Limit of Error" wire, there are still all kinds of variations in the thermocouples, the thermocouple circuit, and the cold compensation on the control. See Wikipedia for more information on thermocouples.
- In addition, the most common Type K thermocouples will drift over time, primarily when used over 2000°F.
- Type S platinum thermocouples do not drift at pottery kiln temperatures. Type S thermocouples are an option for your kiln but are very expensive due to their materials.
- The temperature you see on the control will probably not be completely accurate. Even if the temperature reading is precise, it is only one piece of the puzzle. Remember that heat-work is determined by time and temperature.
- Over time, your kiln's firing will become more consistent (except when the thermocouple begins to drift). Calibrating your kiln helps the kiln to fire more accurately.
- Note from 2003-2020 that L&L kilns were made with thermocouples and a closed protection tube. This created an expected offset. Although this issue was adjusted in the preset kiln settings, the temperature reading can still vary meaning that the offset may need to be adjusted.
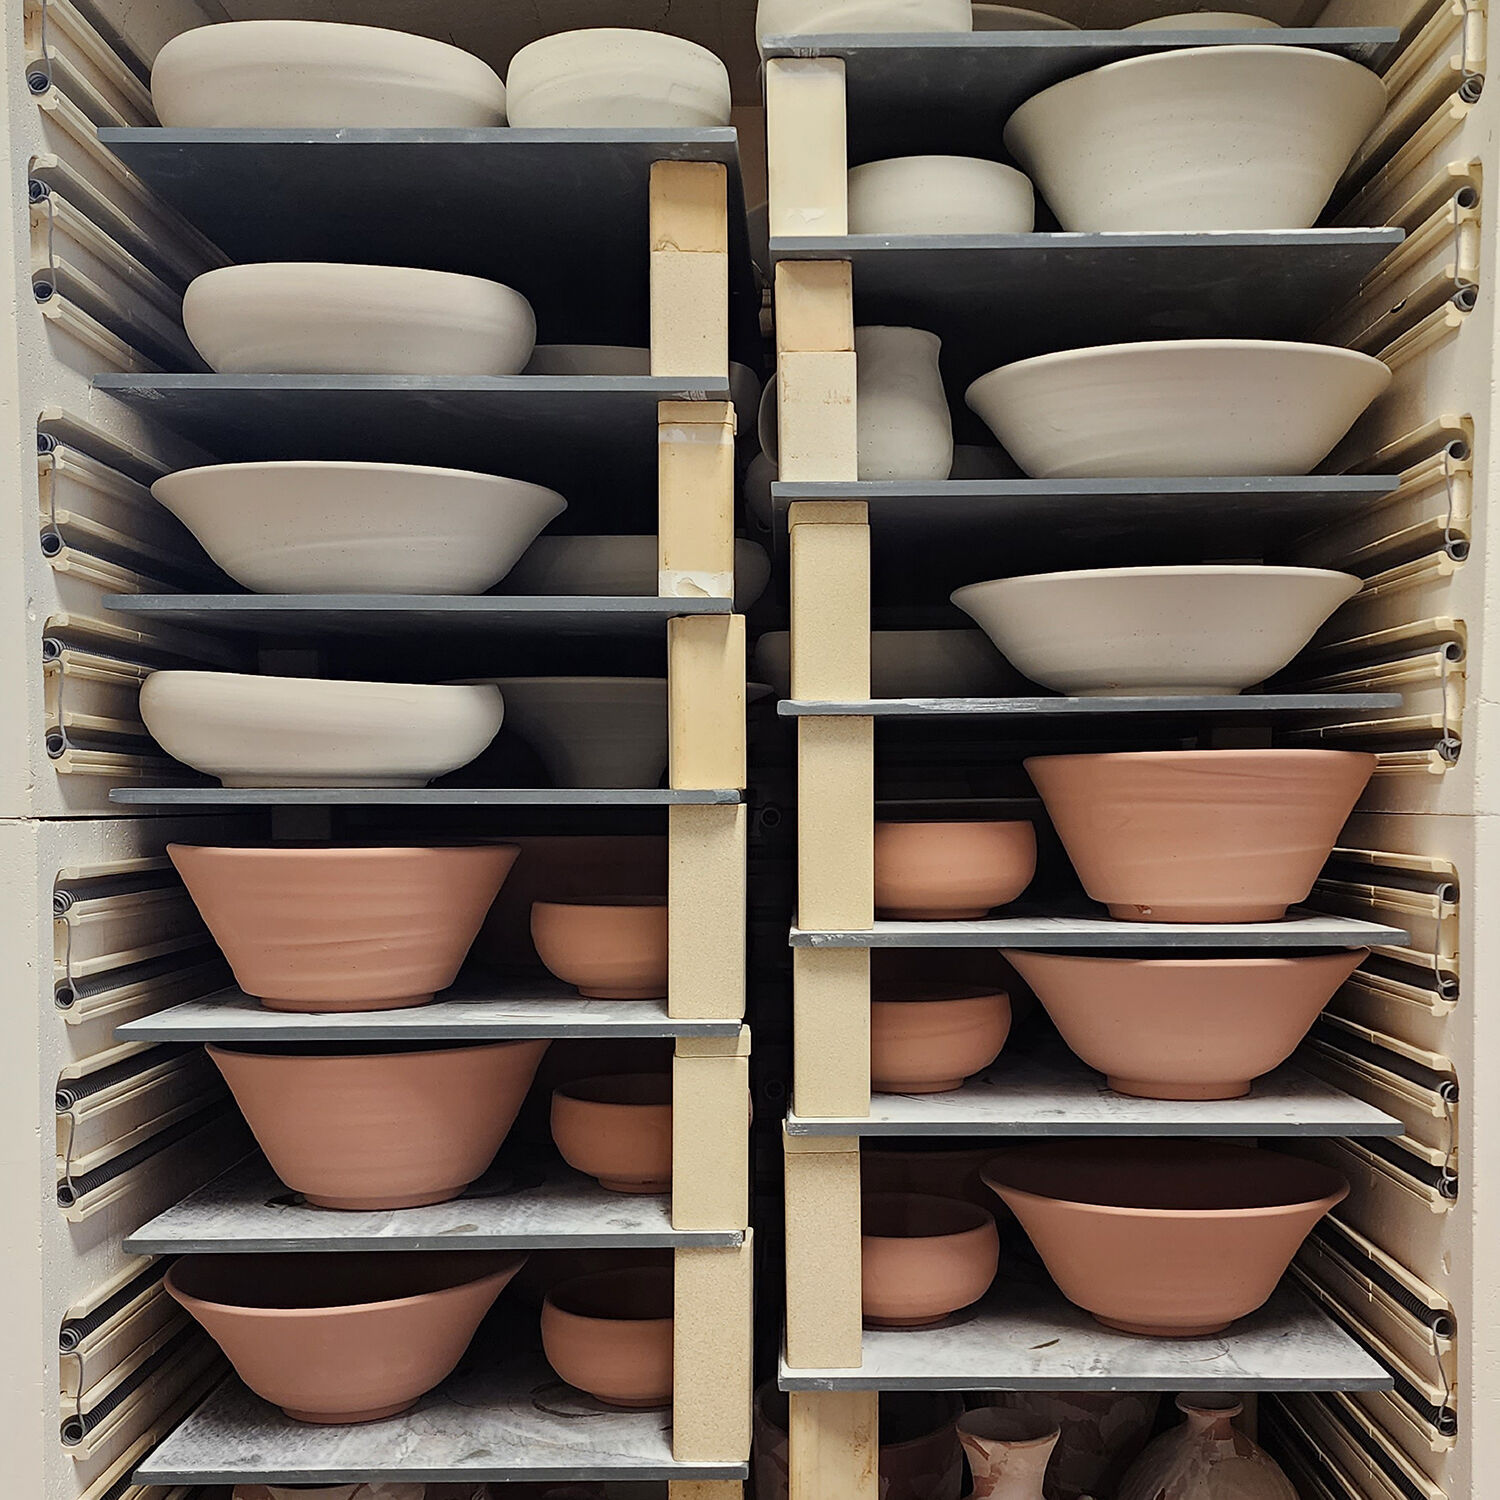
Loading Your Kiln
How you load your kiln significantly affects how heat reaches and impacts your work.
- Avoid Firing an Empty Kiln: This can prevent the kiln from reaching temperature and result in an error code.
- Don't Overload: Avoid loading too densely or heavily at the top or bottom, as this can also cause an error code.
- Balance the Load: Load the kiln with a reasonable amount of work, ensuring pieces are not too close to the elements and are distributed as evenly as possible.
- Allow Space for Heat Circulation: Don’t place a shelf next to an element. Most heating above 1200°F is radiant heat. Since not all work is exposed directly to the elements, make space for heat to circulate.
- Consider Heat Distribution: Allow time for the heat to move from the wall elements to the kiln's interior without overheating the work towards the outside.
- For more detail see How to Load Your Kiln Properly
There are guidelines for loading a kiln, but it often involves more art than science.
EMPTY KILN WILL NOT GET TO TEMPERATURE
- Sometimes, a new kiln does not get to temperature during the test firing due to the kiln being empty.
- Firing with your kiln furniture during the test firing will put some mass into the kiln and help it reach temperature.
DIFFERENCES IN AN EMPTY KILN VS. FULL KILN
- An empty kiln cools much quicker, quickly freezing the cone. The mass of the work inside the kiln greatly influences the heating and cooling speed, thus influencing the heat-work. In other words, this mass (the load in the kiln), which is also radiating its heat, will continue to melt the cone for a little longer after the kiln has been shut down.
- Once the kiln is fine-tuned, how you have loaded the kiln will account for many variations from firing to firing.
- Loading will affect the speed of firing - an empty kiln will fire differently than a full one. Although the control does compensate for this, the compensation is not perfect.
More on Cones
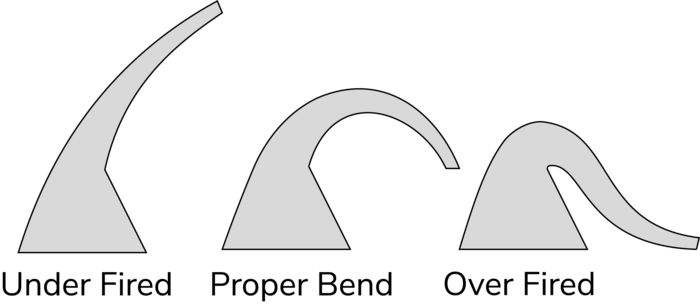
- Pyrometric cones are essential tools for measuring ceramic heat work. They are designed to bend at specific temperatures, indicating the amount of heat work the ware absorbs. Thus, they provide a more accurate representation of the ceramic process than the temperature reading on the digital controller.
- Pyrometric cones offer the most reliable insight into what is happening inside the kiln. Using cones in addition to the control board allows for fine-tuning of the firing process to achieve the desired temperature. The placement of the cones within the kiln is important, as it influences their readings.
- Calibrating the kiln with cones is the best method for achieving precise temperature control. However, remember that kiln calibration should align with the quality and appearance of your work, not just the cone readings.
TROUBLESHOOTING WITH CONES
See this: Using Cones to Fire Properly
FIRING A KILN WITH WITNESS CONES
Repeatable Results
- The only way to get entirely consistent results is to repeat the same process, with the same time-temperature cycle, with a kiln that changes as little as possible, and with the same materials as possible.
- This is how industrial ceramics is done, but with far higher precision, and with process engineers using statistics to process control.
- Most art ceramics have a much higher degree of variability.
- Achieving your exact desired results takes time and effort. You have to be able to test, record results, and adjust when needed. Some crystalline ceramic artists are good examples of people who understand how to accomplish this.
Hold Times and Heat Work
- Hold times add heat work to your firing.
How to Tune Your Kiln
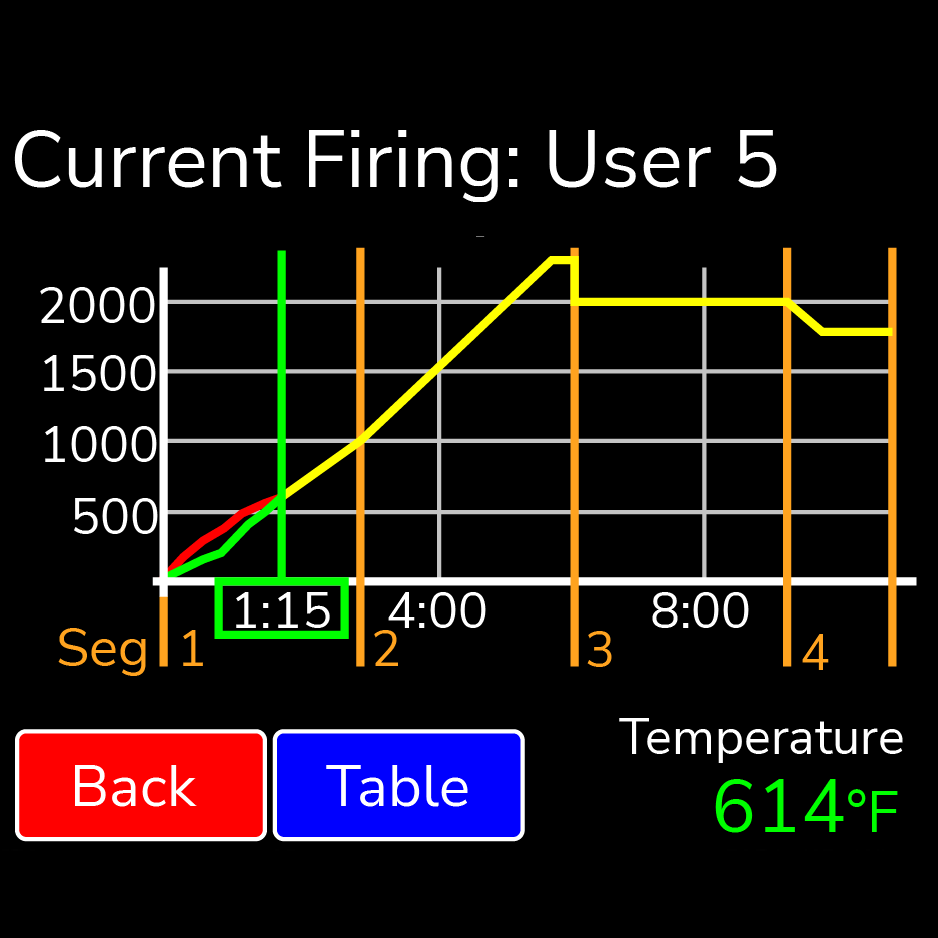
Before tuning the kiln, fire it to temperature with witness cones. This step allows you to accurately observe the kiln's temperature behavior, providing a solid starting point for calibration (note that kilns are not fired before shipping).
When firing the kiln, use witness cones and select your most typical or critical cone, typically your glaze temperature, as bisque temperatures are generally less critical.
Two basic methods for calibrating your kiln are Thermocouple Offsets and Cone Offsets.
CONE OFFSET (Click for details)
Cone Offset will only change the temperature for the specified cone. For example, creating a cone 6 offset for your glaze firing will not affect your cone 06 bisque firing.
You add or subtract temperature to the final set point temperature
THERMOCOUPLE OFFSET (Click for details)
Thermocouple Offset will uniformly change the temperature readings from room temperature to the kiln's maximum temperature.
A thermocouple offset adjusts the kiln’s perceived temperature to achieve the desired temperature. Here’s how it works:
- Positive Thermocouple Offset: This lowers the kiln's temperature relative to the control's reading. For example, if the control reads 2000°F and you add 10°F of thermocouple offset, the control thinks there is 10°F more in the kiln. Consequently, for a setpoint of 2000°F, the kiln will control to 1990°F.
- Negative Thermocouple Offset raises the kiln's temperature. For instance, if the control reads 2000°F and you subtract 10°F of thermocouple offset, the control thinks there is 10°F less in the kiln. Thus, for a setpoint of 2000°F, the kiln will control to 2010°F.
- Avoid having more than 25°F difference between offsets because you might get an E-4 error code.