

Orton Firing Tips
Orton Firing Tips are provided courtesy of Orton, Westerville, OH 43082, 614-895-2663
Loading a kiln for best results
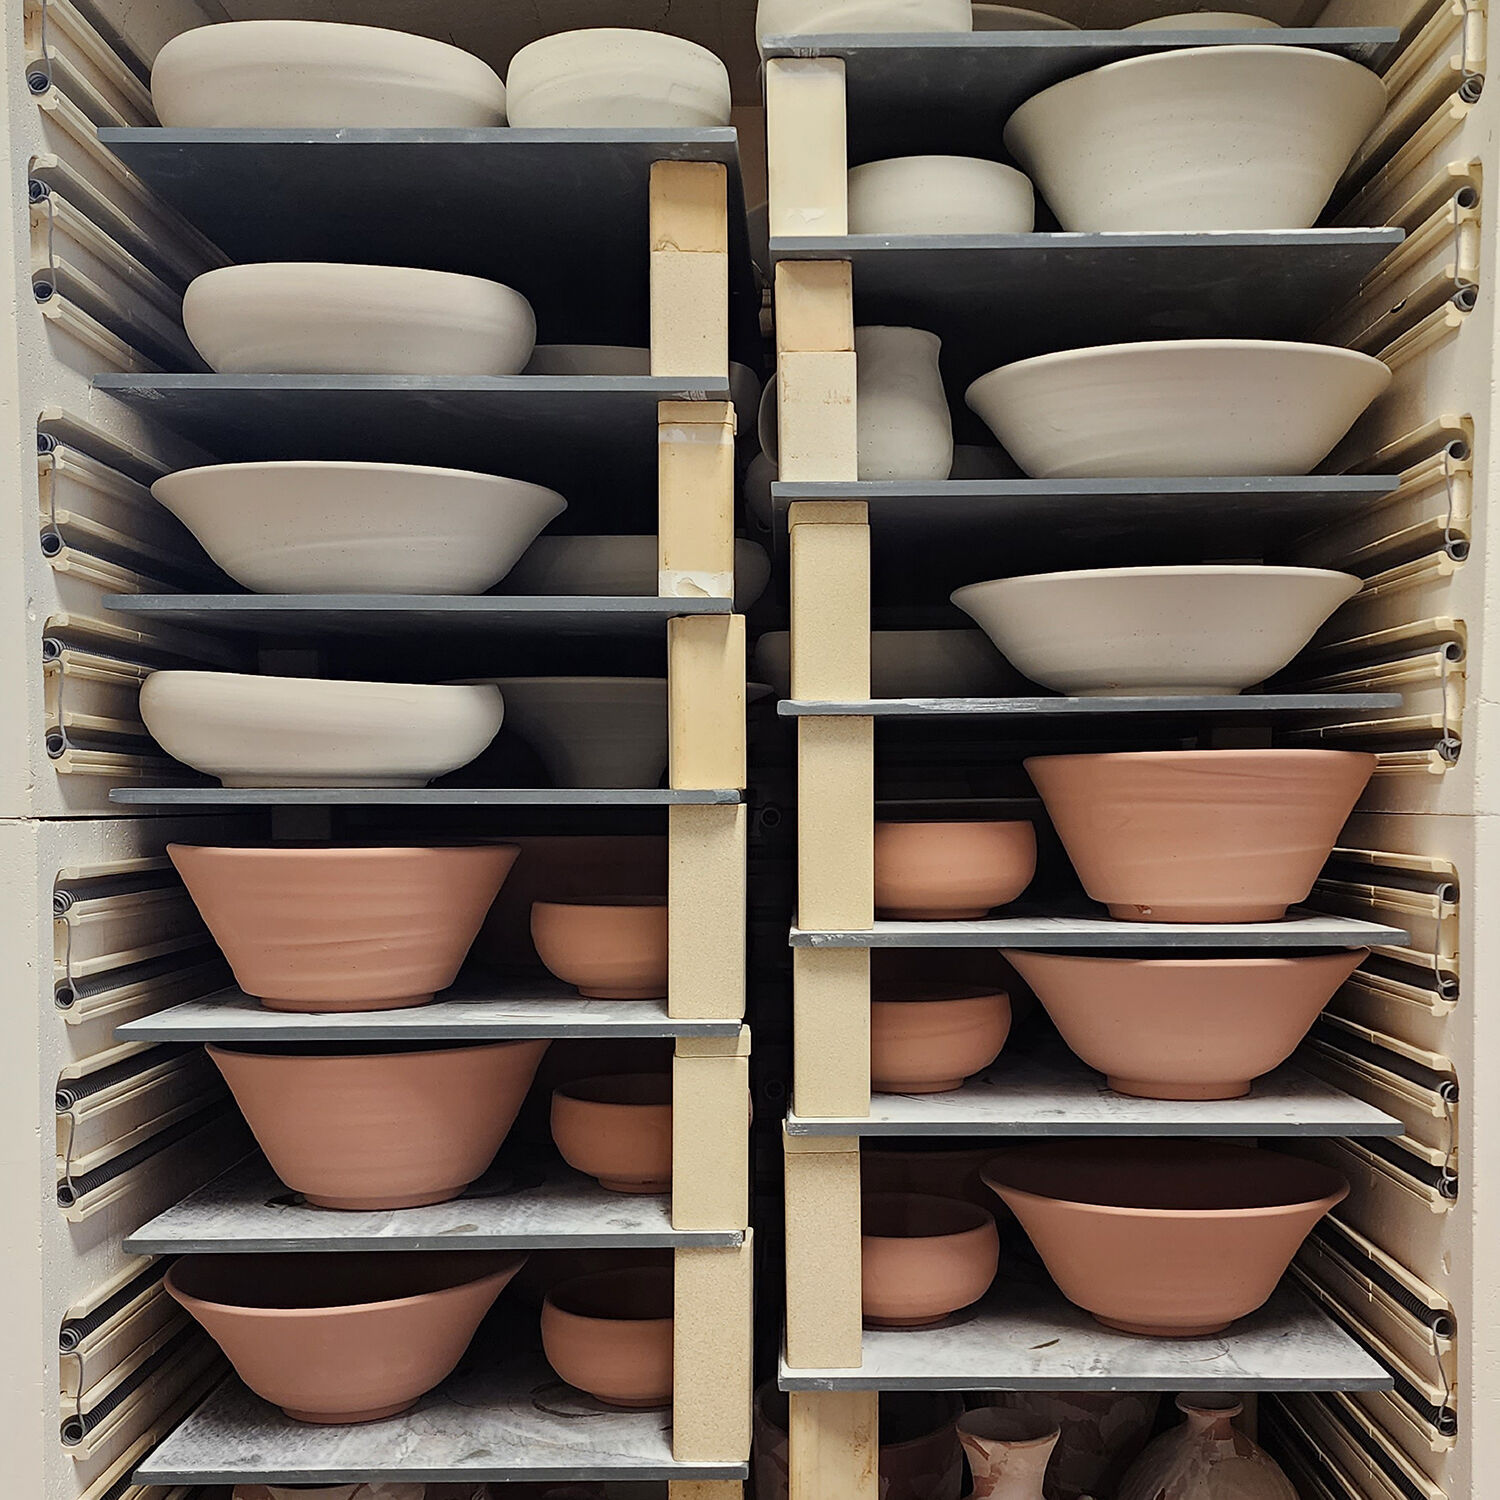
Loading a kiln for firing is not just a matter of placing shelves and stacking ware. The more thought and planning that goes into loading, the better the results. Factors such as ware and shelf placement, load size, kiln firing characteristics, and the type of ware being fired all play an important role.
Kiln Furniture
Kiln shelves come in various shapes and sizes. For optimal space usage, choose shelves that match the shape and size of your kiln chamber. For example, use round or multi-sided shelves in round or multi-sided kilns. Ensure the shelves are small enough to leave at least 1" of space between the shelf edge and the kiln wall or Kiln-Sitter®. Additionally, allow room between the top of your ware and the kiln lid, and leave space for witness cones.
Select kiln posts of appropriate heights to accommodate the ware being fired. Leave some space between shelves to allow for air circulation, heat transfer, and the removal of fumes.
Half shelves are particularly useful for improving air movement in the kiln. Placing two half shelves side by side with a 1½" gap between them maintains good stacking space while enhancing airflow. Some kiln manufacturers recommend placing shelves directly on the kiln floor, but most suggest using 1" posts to raise the bottom shelf slightly. This creates an insulating layer, much like a storm door.
Setters and Stilts
Air movement within the kiln is a crucial consideration when loading. Ceramics need to heat uniformly to prevent warping and stress in the ware. Proper airflow around shelves and individual pieces helps achieve even heating.
Plates and tiles benefit from tile and plate setters, which allow air to circulate beneath large flat objects, preventing uneven heating. Avoid placing large, flat objects directly on the cooler shelf surface. If firing decorated tiles or plates, vertical setters help conserve space, and multiple sets can be stacked to maximize kiln capacity.
Glazed ware must be stilted or dry-footed to prevent the melting glaze from sticking to the kiln shelf, which would damage both the shelf and the ware. Stilts also facilitate airflow around all sides of the piece. However, porcelain and stoneware should not be stilted, as the stilts will embed into the ware during firing. Instead, apply high-fire kiln wash or use silica sand on the shelf. Props can also help prevent sagging in porcelain pieces.
Heat Distribution Considerations
Evaluating heat flow in your kiln is essential for effective loading. Use pyrometric cones to assess the kiln’s heating characteristics and identify hot and cool spots. When loading, arrange different-sized pieces on the same shelf to promote better heat distribution.
Avoid Overfilling
One of the most important factors in achieving good firing results is allowing enough airflow for proper maturation of the ware. Sufficient airflow is necessary for burning out organic materials during bisque firing and for developing the best glaze colors. While proper shelf and ware placement, as well as the use of setters and stilts, can help, here are a few additional tips:
-
Stack bisque ware properly – Invert bowls and mugs so they are opening to opening instead of nesting. This ensures air circulation around all sides of each piece and prevents black rings and spots from forming on the bottoms.
-
Fire bisque lids and bottoms together – To achieve the best fit, fire lids on the matching piece. This allows both to shrink together, ensuring a tight fit. Glazed pieces should always be fired separately.
-
Leave space between pieces – Avoid overfilling the kiln. While it may be tempting to maximize the load to save on firing costs, overcrowding can lead to firing issues. If you must overfill, fire very slowly and ensure adequate ventilation.
-
Distribute thin and thick-walled pieces evenly – Avoid clustering pieces with similar thicknesses in one area, as they will compete for air and heat. Mixing thin and thick-walled pieces throughout the load promotes even firing.
-
Use downdraft venting – This helps move air through the kiln and removes fumes generated during firing.
understanding heat transfer
How Heat Is Transferred
Heat moves through the kiln from hotter to cooler zones by:
- Convection
- Conduction
- Radiation
Convection
Convection is the first step in the heating process inside the kiln. As air passes across the warming kiln elements, it heats up. The rising hot air and falling cool air create air currents that circulate heat throughout the kiln, transferring it to the ware, shelves, and other surfaces.
At this early stage of firing, the kiln’s temperature is not uniform unless the hot air is mechanically circulated. Low-temperature firings, such as cones 022 and 021, rely more heavily on convection for heat transfer.
A common example of convection in daily life is wind chill. Cool air moving across the skin pulls heat away from the body, lowering skin temperature.
Conduction
When heat moves through a solid material, it is transferred by conduction. A simple example is heat traveling through the handle of a saucepan. Although conduction is a slow process, the handle will eventually become hot.
In a kiln, conduction transfers heat from the inside to the outside of the kiln and from the outer surface to the inside of the ware. Conduction is the primary mechanism for achieving uniform heating in the kiln. However, if the firing is too rapid, the inside of the ware will not receive enough heat, resulting in an incomplete or improper firing.
Radiation
At the beginning of the firing process, the kiln elements are the hottest part of the kiln. These elements radiate heat outward, much like the sun warming us on a cool day. As the firing progresses, the firebrick and ware also absorb heat and begin to radiate it.
As the kiln temperature rises, radiation becomes the dominant method of heat transfer. For even heating, it is essential that all surfaces of the ware are at least partially exposed to the heating elements.
This version corrects grammar, improves clarity, and enhances readability while keeping the content accurate. Let me know if you need any further refinements!
cracking and thermal shock
Cracks that appear in fired ware, which are not caused by casting or drying issues, may be the result of thermal shock.
What Is Thermal Shock?
Thermal shock occurs when excessive stress develops in a piece of ware due to temperature fluctuations during heating and cooling. Uneven temperature distribution within the ware can cause anything from small cracks to complete breakage.
Why Does Cracking Occur?
The likelihood of a piece being susceptible to thermal shock depends on:
- The strength of the piece – Stronger ware is more resistant to cracking.
- The thermal expansion of the material – Ware that expands and contracts significantly during firing is more prone to thermal shock.
Thermal shock occurs when temperature changes happen too quickly in the kiln, causing the exterior of the ware and kiln furniture to become much hotter or cooler than the interior. This uneven heating or cooling creates stress, leading to cracks or breakage.
Factors that contribute to thermal shock include:
- Rapid heating or cooling – A fast firing schedule increases stress on the ware.
- Sudden influx of cool air – Opening the kiln lid before it has cooled sufficiently can cause cracking.
- Gas kilns – Turning off the gas too quickly can allow cool air from the burners to enter the kiln, leading to thermal shock.
Thermal shock can also occur outside the kiln, such as when a casserole dish is taken directly from the freezer and placed in a hot oven.
Material Strength and Porosity
The stronger the ware, the better it resists cracking from thermal shock. Weak or porous ware is more likely to break when stressed.
- Porosity increases susceptibility – Water or condensation trapped in the pores of the ware can turn to steam when heated, expanding and causing cracks.
- Higher firing temperatures reduce porosity – The hotter the ware is fired, the denser and less porous it becomes, making it more resistant to thermal shock.
- Materials with lower thermal expansion resist shock better – Most kiln shelves contain cordierite, which has a lower expansion rate than most ceramics, making it less prone to thermal shock.
What Happens to Ware During Firing?
During the heating and cooling process, the body and glaze undergo several physical and chemical changes:
- Moisture is driven out – If this happens too rapidly, cracking can occur.
- Organic materials oxidize and burn away – This process releases gases from the material.
- The glaze softens, melts, and flows – If trapped gases are not released, they may create imperfections.
- The body expands when heated and contracts when cooled.
- The glaze solidifies and contracts during cooling.
If the body or glaze contains silica, it undergoes a significant expansion at 1,063°F (573°C) during heating and contracts rapidly during cooling. If the heating or cooling process is too fast near this temperature, it can cause cracking.
Control of heating and cooling is particularly important when firing thick-walled pieces or those with uneven wall thickness, as these pieces are more susceptible to thermal shock.
How to Reduce Thermal Shock
To minimize the risk of thermal shock:
- Use a smooth, moderate heating rate – Avoid firing too quickly.
- Let the kiln cool naturally with the lid closed – Prevent sudden temperature changes.
- Use a controller to slow down the cooling process – This ensures even cooling and reduces stress on the ware.
- Avoid sudden temperature shifts – Never introduce cool air into a hot kiln.
A programmable controller, such as the Orton AutoFire™, is the best way to regulate heating and cooling rates for a smooth temperature change.
If automatic controls are unavailable, manually controlling heat loss by keeping the kiln closed until the temperature drops well below red heat (900°F / 482°C) can help prevent cracking.
To ensure proper maturation of ware, always use witness cones. Underfired bisque continues to shrink during glaze firing, which can lead to a poor glaze fit.
cracking and warping caused by drying and casting
In some instances, cracking and warping share a common cause: the casting and drying process. In other cases, cracking may be related to how the piece is fired. This section focuses on problems related to casting and drying.
DRYING CERAMICS
Ceramics contain clay, which absorbs and holds water. Before firing, all physical water must be removed to prevent the piece from cracking or exploding when heated. This process often occurs in stages, with firing being the final step. During firing, chemical water is also removed, and the piece gains strength while developing its final surface characteristics.
UNDERSTANDING DRYING
Simply put, drying is the removal of water from the body by evaporation. As the ware dries, the film of water separating the clay particles becomes thinner, the solid particles move closer together, and the piece shrinks. Shrinkage stops once the particles make full contact with each other.
DRYING FAULTS
Cracking, distortion, and warping may not become apparent until after firing but are often caused by drying too quickly or unevenly.
- If ware is heated too fast, the pressure from water vapor trapped inside the piece can cause cracking.
- Ware dried only on one side shrinks more on that side, leading to warping or bending while the piece is still somewhat plastic (flexible). Once one surface finishes drying, the piece becomes too stiff to recover, and the warping becomes permanent, which can lead to cracking.
- Bodies made of very plastic clays or those with a high clay content require slow, uniform drying.
- Thicker-walled pieces tend to warp or distort more easily.
- Proper air circulation around all sides of a piece helps prevent drying issues. In some cases, drying must be slowed to avoid cracking.
- Handles on cups may pull away from the mug. Doll heads and chest cavities may deform inward if not properly supported.
REDUCING WARPING AND CRACKING
To minimize warping and cracking, ensure slow and even drying from all sides:
- Avoid drying flat objects on wet or cool surfaces like Formica, plastic tabletops, or damp newspaper, as this prevents even drying. Instead, use porous materials like wood or plaster, or elevate the piece to allow air circulation.
- Turn pieces over during drying to promote even moisture loss.
- Slow the drying process for thick-walled pieces and hand-built ware.
- Support areas prone to stress during drying to prevent deformation.
DRYING TECHNIQUES
Slip-cast ware
Slip-cast ware may warp or crack if stressed or deformed when removed from the mold. Even if gently reshaped, the stress created during removal can eventually cause warping or cracking.
Wheel-thrown ware
Wheel-thrown ware generally does not distort during drying unless subjected to mechanical forces. Allowing it to dry naturally on a bat or shelf is usually sufficient.
Thick hand-built ware
Thick hand-built pieces require an extended drying period before firing; otherwise, trapped moisture can cause them to explode in the kiln. Drying for several days or using low heat in an oven may be necessary to remove all water.
Plates
Even drying is especially important for plates. Uneven drying can cause the center to sag or arch up. Rims and centers must dry at the same rate to prevent warping, humps, and cracks.
Drying tiles
Tiles present a particular drying challenge since air typically passes over the top while the bottom remains wet, leading to warping. Using tile racks can improve air circulation and promote more even drying.
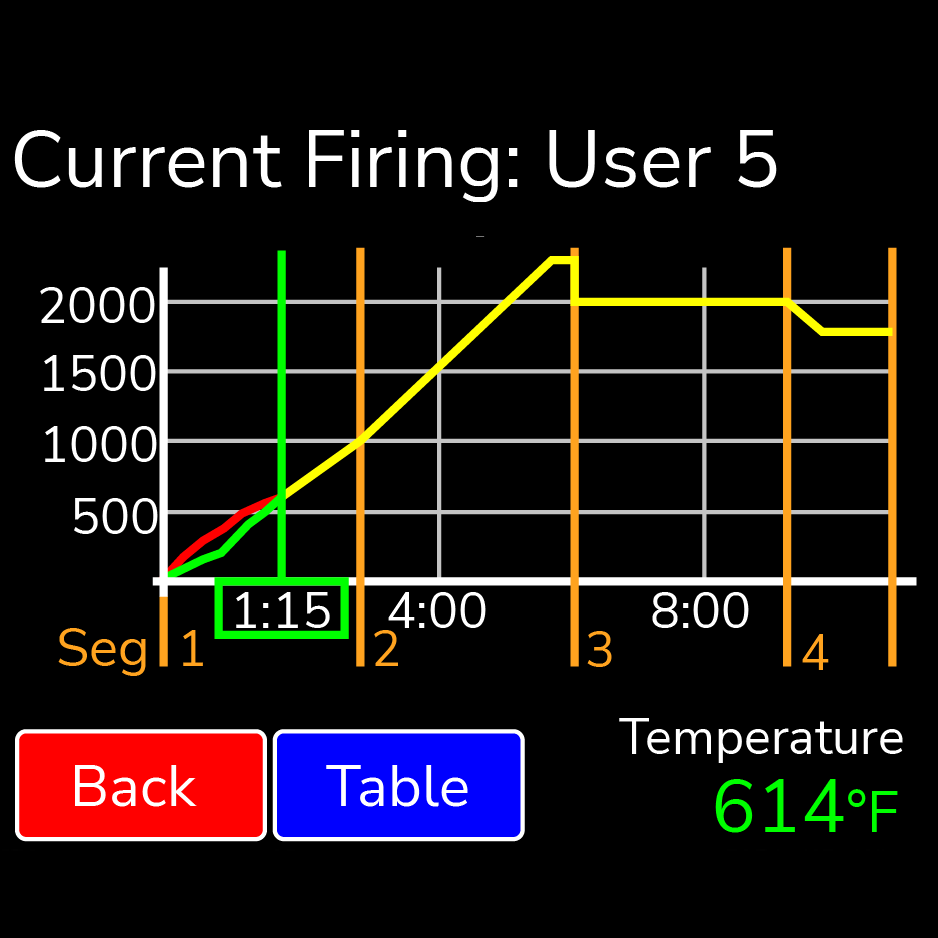
using the three cone system
All ceramic products fire within a range to achieve the best-fired properties. Some products, such as stoneware, have a wide firing range, while others, like porcelain slip and leadless glazes, have a narrow firing range (less than two cone numbers).
To ensure ware is properly fired, it is important to understand how your kiln is firing. The Three Cone System is an excellent tool for this.
What Is the Three Cone System?
The Three Cone System consists of three consecutively numbered cones:
- Firing Cone – The cone number recommended by the manufacturer
- Guide Cone – One cone number cooler than the firing cone
- Guard Cone – One cone number hotter than the firing cone
For example: Cones 017 (guide cone), 018 (firing cone), and 016 (guard cone).
Uses of the Three Cone System
The Three Cone System helps to:
- Determine temperature uniformity in the kiln
- Check the performance of the Kiln-Sitter® or electronic controller
- Manually shut off the kiln by observing the cones bending
- Evaluate the heatwork that ware receives during firing
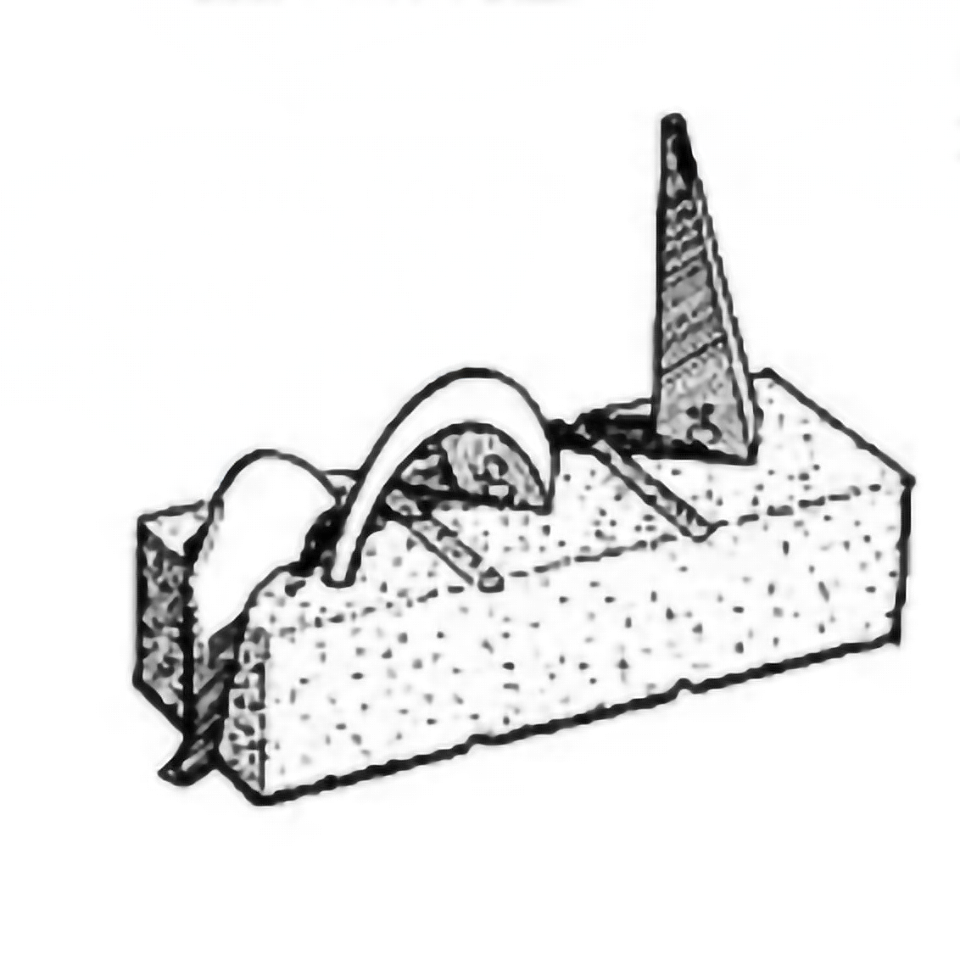
How Witness Cones Work
Pyrometric cones indicate how much heat has been absorbed. Witness cones placed on the shelf near the ware provide a true indicator of whether the ware has received the proper amount of heat.
Products are typically fired to a specific cone number or within a range. Some materials yield good results at a cone higher or lower, while others require precise firing.
Using the Three Cone System for Manual Shut-Off
By observing witness cones during firing, you can determine when to manually shut off the kiln.
To use the Three Cone System for manual shut-off:
- Place the cones on a kiln shelf near the center of the load, away from drafts, and where they can be observed through the peephole.
- As the kiln nears its firing point, the Guide Cone will begin to bend, indicating the ware is approaching maturity.
- The Firing Cone will take approximately 15 to 20 minutes to reach its endpoint. It bends slowly at first, then more quickly after the halfway point.
- When the tip of the Firing Cone is level with the top of its base, it is time to shut off the kiln.
- If the Guard Cone bends, the desired heatwork has been exceeded.
Using the Three Cone System to Evaluate Kiln Performance
Most kilns have temperature variations from top to bottom. The degree of difference depends on:
- The kiln's design
- The age of the heating elements
- Load distribution in the kiln
- The cone number being used
Temperature differences are usually more pronounced at lower cone numbers than at higher ones. By placing a set of cones on each shelf during different firings, you can evaluate the heating uniformity of your kiln.
After firing, observe the cones to assess heat distribution:
- If only the Guide Cone is bent, there was less heat on that shelf.
- If the Guard Cone is bent, there was more heat on that shelf.
If you notice significant temperature variations, uniformity can be improved by adjusting kiln loading, modifying switching, or adding a downdraft vent system.
Checking Kiln-Sitter® Performance
The Kiln-Sitter® is designed to shut off the kiln when a Small Cone or Bar deforms. Here’s how it works:
- A Small Cone/Bar is placed under the sensing rod.
- As firing begins, the cone/bar absorbs heat and starts to soften.
- The sensing rod presses down, and the cone bends under the weight.
- The movement of the rod activates the shut-off mechanism.
Since the cone or bar in the Kiln-Sitter® is positioned near the kiln wall (closer to the heating elements), it may receive more heat than the witness cones on the shelf. If the kiln shuts off before the witness cones have properly deformed, you may need to use the next hotter cone number in the Kiln-Sitter®.
Witness Cones Are Like Insurance
Witness cones are an inexpensive and reliable way to monitor kiln performance and detect potential issues before they become major problems. Self-Supporting Cones are recommended for the Three Cone System because they are the easiest to use and provide the most consistent results.
cones and controllers
Automatic controllers and shut-off devices provide a convenient way to heat and turn off a kiln. However, for consistent results, it is still important to know how much heat the ware received. Only cones provide this information.
Witness cones placed near the ware indicate whether the firing reached the necessary cone value to properly mature the ware. Cones also help diagnose firing problems.
Advantages of Controllers
Electronic controllers offer many benefits:
- Control over heating rates – Regulate kiln heating and cooling.
- Slow down firing below red heat – Allows carbon and organic materials to burn out properly.
- Eliminate the need for a kiln shut-off device – Though some still use one as a safety backup.
- Enable soaking at the firing temperature – Promotes uniformity in fired pieces and allows for special effects.
- Provide more consistency – Ensures repeatable results from firing to firing.
So why are cones still needed?
Firing Ceramics
Firing ceramics is similar to baking food, except ceramics reach much higher temperatures.
When we bake, we leave food in the oven at a set temperature for a certain period. A thermometer might help measure the food's temperature, or we might use a fork to check if it is done.
Firing works the same way – a combination of temperature and time "cooks" the ware. However, unlike baking, we can’t place ware into a preheated kiln and poke a fork in to check if it’s ready. The next best option is using Pyrometric Cones near the ware to measure whether it has received enough heat.
Firing With Cones
The bodies, glazes, and decoration products used in ceramics are all formulated to be correctly fired when they have received enough heat to properly bend a cone.
Manufacturers and ceramic artists test these materials using Orton Cones, which deform when they have received the correct amount of heat—not just when the kiln reaches a set temperature. In other words, cones behave just like your ware, making them excellent indicators of whether firing conditions were correct.
How Controllers Work
Electronic controllers regulate power to the heating elements by comparing the temperature measured by a thermocouple with the expected temperature programmed into the controller. If the temperature is too low, the controller adds heat to reach the desired setting.
Controllers fire a kiln to a temperature. However, if this temperature is not measured accurately, the kiln may fire improperly.
Most controllers use a:
- Type K thermocouple – Less expensive but less accurate.
- Platinum thermocouple (Type S) – More expensive but highly accurate and longer-lasting.
Measuring Temperature
Even when brand new, a Type K thermocouple can deviate from a true reading, as shown below. In contrast, a Self-Supporting Witness Cone will vary no more than 4°F.
Over time, this thermocouple variation increases. After multiple firings to Cone 6, a Type K thermocouple may develop an error of more than 25°F—a difference greater than a full cone.
Using Controllers and Cones
Controllers are excellent at maintaining heating and cooling rates and ensuring firing consistency.
However, without witness cones, there is no way to verify actual firing conditions—except by examining the ware. By that point, if something went wrong, it may be too late to correct the issue.
This version maintains all the key details while improving clarity, fixing grammar, and ensuring readability. Let me know if you'd like any additional refinements!
avoiding carbon burnout problems
Materials used in ceramics contain naturally occurring impurities that can affect the color, appearance, and maturing temperature of the product.
Carbon, found in most clays, is one of these impurities. It can also be present in the additives and binders used in clay bodies, slips, decals, and lusters.
How Carbon Burns Out
During heating (firing), carbon reacts with oxygen to form carbon dioxide (CO₂) and carbon monoxide (CO) gases, which leave the body as gas.
- Binders burn off at relatively low temperatures: 300°F to 500°F.
- Naturally occurring carbon in clay burns off at higher temperatures: up to 1200°F – 1400°F.
The rate at which carbon burns out depends on:
-
The amount of carbon present
- Some bodies contain more natural contaminants than others. For example, red clays have higher carbon content than white clays. This must be considered when planning the firing schedule.
-
The amount of air available (oxygen is needed for burnout)
- Air must reach the carbon inside the ware to allow for complete burnout. Several factors can affect this:
- Fast firing may not allow enough time for oxygen to react with the carbon, preventing complete burnout.
- Stacking ware in a bisque firing may block oxygen from reaching all surfaces.
- Poor kiln ventilation can result in insufficient oxygen for carbon burnout. If gases are not removed from the kiln and replaced with fresh air, burnout may be incomplete.
- Air must reach the carbon inside the ware to allow for complete burnout. Several factors can affect this:
-
The thickness of the piece
- Oxygen must penetrate the entire thickness of the ware, and gases must escape the same way. Thicker pieces require more time for complete burnout.
-
Time and temperature profile during burnout
- Both time and temperature are critical. Some carbons require much higher temperatures for complete burnout.
- Oxidation should be completed below red heat (1400°F).
- Carbon burns out from the surface first. As more oxygen penetrates the body, more carbon reacts to form CO₂ or CO gas, allowing the burnout process to continue.
- If there is sufficient time, temperature, and oxygen, complete burnout occurs. If these conditions are not met, incomplete burnout may occur, leading to black coring (where the center of the piece has a black or gray cast).
Incomplete Burnout
Incomplete burnout can cause several firing defects, including:
-
Bloating of the ware
- If the temperature gets too high before all gases escape, the outer surface of the piece may seal off.
- As the body becomes plastic due to glass formation, trapped gases expand, leading to bloating and sometimes cracking of the ware.
-
Glaze defects (such as pinholes)
- Escaping gases push through the glaze surface, creating bubbles.
- If these bubbles do not heal, pinholes may form, leaving defects in the glaze.
-
Appearance defects in bisque firing
- Incomplete burnout in white bodies results in a grayish cast.
- Incomplete burnout in red bodies may cause a greenish cast.
- The body will also be more porous and weaker than properly burned-out ware.
Preventing Incomplete Burnout
- Slow down the firing – Allow enough time for carbon to fully burn out before sealing the body.
- Ensure proper kiln ventilation – Maintain adequate airflow so oxygen can enter the kiln and react with the carbon.
- Load the kiln with burnout requirements in mind:
- Leave plenty of space between ware and shelves.
- Do not stack ware—this prevents oxygen from reaching all surfaces.
- Use tile and plate slackers, and invert pieces on top of one another to conserve space while ensuring proper burnout.
firing hand built or thick cast ware
Most pinch pots, coiled, or slab-built ware generally have thicker walls than their slip-cast counterparts, although molded pieces may also be cast heavily. The thicker walls in these types of pieces create unique challenges during firing.
Common Firing Issues
Basic problems that can occur when firing hand-built or thick-cast ware include:
- Cracking or exploding due to trapped moisture or stress.
- Carbon burnout issues leading to discoloration, glaze defects, or structural weaknesses.
Because of the thicker walls, it is important to fire slowly and carefully control heating and cooling. Proper preparation of the piece is also essential.
Drying & Preparation
During forming, stresses within the piece may create hairline cracks that only become visible during firing. Additionally, thicker pieces take longer to fully dry, and uneven drying can result in warping or cracking.
For pieces that have been properly prepared, handled, and dried, the next critical step is firing.
Firing Considerations
Is the ware fully dry?
Ware that is not adequately dried may crack or explode during the early stages of firing. As water inside the pores of the ware turns to steam, it exerts pressure inside the clay body.
To fully dry a thick-walled piece, the ware should be kept warm for more than 12 hours before firing.
Am I firing too fast?
All bodies expand when heated and shrink when cooled. If the outside wall expands faster than the inner wall, internal stresses develop. If these stresses become too great, they will pull the body apart, causing cracking.
For example, a 1-inch thick wall can have a 10°F temperature difference between its hotter and cooler surfaces. To prevent cracking, firing should be slowed down for thicker-walled pieces. Similarly, cooling should not be too rapid.
Have I allowed enough time for carbon burnout?
It is essential to burn out all carbon before reaching higher temperatures (1200°F / 650°C).
- Oxygen must penetrate the porous body to react with carbon and allow it to escape as gas.
- If carbon remains, many problems can occur, including poor color, glaze fit issues, weak structure, blistering, and discoloration.
- Using a downdraft vent system, combined with slower heating, greatly reduces carbon-related problems.
Heating & Cooling Control
The best way to prevent cracking is by controlling the kiln’s heating and cooling rates.
During firing, the materials in the clay body undergo many changes. Special care should be taken below 1500°F (815°C) to heat the body evenly.
- The thicker the wall, the slower the heating should be.
- Above 1500°F, temperatures can be increased more rapidly since changes at this stage are less likely to cause stress cracks.
What kind of changes occur?
- Water release – Clays and minerals contain water that does not fully leave the body until above 700°F.
- Carbon burnout – Organic materials must be fully oxidized to prevent defects.
- Gas release – Minerals such as calcite break down and release carbon dioxide (CO₂) gas.
- Silica expansion – Flint (silica) undergoes sudden expansion at 1060°F, followed by contraction during cooling, which can lead to cracking.
How can I control heating?
- If using manual switches, keep them at medium settings longer.
- It should take at least 3 hours to reach red heat, and even longer for thick pieces or a heavily loaded kiln.
- Ensure the kiln is well-vented below red heat and fully closed above red heat.
- Keep the kiln closed during cooling for at least 8 hours, or until it is well below red heat.
Cracking Diagnosis
When did the cracking occur?
- If the crack has sharp edges, it likely occurred during cooling.
- If the crack has rounded edges or glaze has flowed into it, it likely occurred during heating.
What else can cause cracking?
-
Uneven heating
- Hot and cold spots in the kiln can cause uneven expansion, leading to cracking.
- Use witness cones to identify hot and cold spots.
- Adjust switching, or use a downdraft vent to improve uniform heating.
- Load ware carefully on setters or stilts to ensure good air circulation.
-
Underfired bisque
- Underfired bisque is weaker and more likely to crack in the glaze firing.
- Use witness cones to ensure proper bisque firing and prevent underfired ware.
-
Air pockets trapped in the clay
- Expanding gases trapped in air pockets during firing can cause large cracks.
- Proper wedging and careful forming techniques can help eliminate air pockets.
firing ceramic bodies
Most ceramic bodies and glazes contain clay. The fine clay particles provide strength, plasticity, and bonding properties that help bind other materials together.
What Happens During Firing?
When the body is fired:
- Clay and other minerals in the body begin to change.
- Clay and minerals break down and react with other materials, producing gases.
- At 900°F (red heat), tightly held water molecules start to break free and leave.
- Gases such as sulfur oxides and fluorine may be released.
- As the temperature increases, clay and other minerals continue to react and form new compounds that become part of the final product.
- Some materials form glass, which bonds everything together.
Gases in the Firing Process
Gases must be removed from the body to avoid defects. For example:
- Carbon is naturally present in clay.
- Organics are added to bodies, glazes, or decorations to improve strength during handling or application.
These materials must fully burn out during firing, or defects may occur.
Firing Conditions and Their Impact
Firing conditions greatly influence the final properties of the ware. Firing too quickly at lower temperatures may not allow enough time for:
- Materials to fully react.
- Gases to escape from the body or glaze.
Common Problems from Firing Too Fast
- Weaker bodies
- Pinholing
- Glaze bubbling
- Color changes in the body or decoration
- Porcelain mildewing
- Crazing or peeling glazes due to improper maturation of the body
TYPES OF CERAMIC BODIES
Earthenware
- Typically fired from Cone 07 – 03
- Made with talc and less expensive clays
- Clays contain many impurities, requiring longer firing at lower temperatures
- Low shrinkage
- Porous after firing
- Usually tan or red in color
- Often glazed or stained, but sometimes left unglazed
Potential Issues with Earthenware
- Underfired bodies may appear fine but remain porous and weak.
- If underfired, the body and glaze may not expand at the same rate, leading to glaze fit issues or cracking.
- High iron and carbon content requires plenty of air during firing to maintain good color and ensure full carbon burnout. Incomplete burnout can cause problems during glazing and refiring.
Stoneware
- Typically fired between Cone 6 – 10
- Wide variety of compositions
- Contains clays and minerals such as sand, feldspar, and grog
- Additives provide plasticity, workability, strength, color, and shrinkage control
- Final color depends on raw materials
Firing Considerations for Stoneware
- Due to additives and impurities, proper ventilation is required early in the firing to burn out organics.
- Stoneware is vitreous and contains a high percentage of glass after firing.
- Color variations can be achieved by firing under reducing conditions.
Porcelain
- Typically fired from Cone 3 – 10
- Compositions vary, but use high-quality materials
- Colorants may be added
- Bodies are hard, white, and translucent
- High glass content
- Narrow firing range – Must be fired close to the slumping/sagging point for best properties
Firing Considerations for Porcelain
- Color is highly important, so plenty of air is needed below red heat to ensure complete carbon burnout.
- High shrinkage requires proper support during firing to prevent warping and distortion.
CRITICAL FIRING PERIODS
For all clay-containing bodies, as well as most glazes and decorations, follow these key firing guidelines:
- Ensure ware is fully dry before firing.
- Fire slowly below red heat (1100°F) – Many physical and chemical changes occur at this stage.
- Provide plenty of air below red heat – This ensures proper oxidation and full burnout of organics and carbon.
- Do not force-cool the kiln while it is still glowing red – Rapid cooling can cause stress fractures or warping.
firing lead free glazes
Changes in Glazes
Lead-free glazes are becoming the industry standard due to government regulations and health concerns from manufacturers.
As the name implies, lead-free glazes are formulated without the addition of lead. However, removing lead from glazes requires reformulation, which can alter their properties. Some differences you may notice include:
- Less flow or run during firing compared to lead-containing glazes.
- Visible brush marks after firing.
- Narrower firing range.
- Less compatibility with certain clay bodies, which may cause shivering or crazing.
- Color variations compared to traditional lead glazes.
- More surface defects.
For problem-free results, firings must be carefully controlled and kilns should be well-ventilated. In some cases, bisque firing temperatures may need to be adjusted to achieve better glaze performance.
Why Do Problems Occur?
Lead acts as a flux, softening the glaze and allowing it to be fired over a wider temperature range.
- Traditional lead glazes can typically be fired over a four-cone range (e.g., Cone 08 to Cone 05).
- Lead-free glazes usually require a much narrower range—within two cone numbers (e.g., Cone 06 to Cone 05).
This narrower firing range makes precise temperature control more critical when using lead-free glazes.
Glaze and Body Fit
Since the glaze and the clay body (bisque) are made from different materials, they expand and shrink at different rates during firing.
If the glaze and body do not expand and contract at compatible rates, problems can occur:
- Crazing – The glaze is stretched too much, causing it to crack.
- Shivering or crawling – The glaze is compressed too much, causing it to flake off.
Preventing Fit Issues with Lead-Free Glazes
-
Test firing
- Fire test pieces of the body and glaze separately to their recommended cone numbers.
- First, fire the unglazed body, then fire glazed bisque.
-
Use witness cones
- Place witness cones near the ware to ensure the proper cone number is reached.
- Temperature variations may occur between the Kiln-Sitter® and witness cones or from the top to bottom of the kiln.
- Simply firing to a set temperature with a controller may not be sufficient—use witness cones to confirm accuracy.
-
Solving crazing problems
- If crazing occurs and the witness cones confirm proper firing, test bisque firing at progressively higher temperatures.
- Example: If you bisque at Cone 05, try testing Cone 04, then Cone 03.
- Higher bisque temperatures change the body’s expansion properties, potentially improving glaze fit.
-
Solving shivering problems
- If shivering occurs, try firing one cone cooler.
- If the issue persists, consider using a different clay body for bisque firing.
- Avoid underfiring, as it reduces strength and increases porosity, which can cause issues in the final product.
Is Your Kiln Uniform in Temperature?
If your kiln has a temperature variation of more than 1 to 2 cones, some pieces may fire correctly while others develop glaze defects due to inconsistent temperatures.
Most kilns have natural variations in temperature from top to bottom.
- To determine your kiln's heat distribution, place witness cones on each shelf during firing.
- Higher temperature firings tend to have less variation from top to bottom.
- Each kiln has its own firing characteristics, so improving uniformity may require adjustments.
Improving Kiln Temperature Uniformity
If glaze firing problems occur due to temperature variation, try the following solutions:
- Repair any cracks or holes in the kiln to retain heat.
- Fire more slowly at lower temperatures (below 1200°F).
- This allows heat to soak into the kiln’s refractory materials and promotes even temperatures.
- Adjust switching patterns to balance top and bottom temperatures.
- Try setting the bottom elements higher before adjusting the top, or vice versa.
- Higher settings add more heat where needed.
- Use an Orton Kiln Vent.
- Orton Kiln Vents pull hot gases from the top to the bottom of the kiln, cutting temperature variations in half.
- Overhead hoods will not improve temperature uniformity.
firing red glazes
Red glazes are among the liveliest and brightest colors in ceramics, but unfortunately, red glaze problems are well known. Many potters give up on reds or settle for inconsistent results, including various defects.
Common Red Glaze Problems
- Improper color development – A dark bluish or purple cast instead of red.
- Color loss – The glaze appears gray or white instead of red.
- Poor surface texture – A rough matte finish or visible surface defects.
- "The Strawberry Effect" – Tiny black dots or spots in the fired glaze.
- Crazing – A crackled or cracked appearance in the glaze.
Some of these problems are related to glaze preparation and application, but many are caused by improper firing practices.
Preparation and Application
- Ensure ware is clean and free of dust.
- Do not apply red glaze to greenware.
- Apply glaze only to properly fired bisque (use witness cones to verify the firing).
- Keep the work area and tools clean to avoid contamination.
- Do not eat or smoke in the glazing area.
- Glaze away from cleaning areas to avoid dust contamination.
- Apply an adequate number of coats – Four coats are often recommended.
- Allow each coat to dry completely before applying the next.
How Colors Develop
Many ceramic glazes require oxidizing conditions (plenty of air) during firing to develop their proper color.
Red, orange, and yellow glazes are especially oxygen-sensitive. These colors need sufficient air circulation during firing to:
- Develop their full color potential.
- Prevent surface and finish defects.
To achieve successful reds, you must control the firing rate and vent the kiln properly.
Controlling the Firing Rate
Nearly all ceramics fire better when fired slowly below red heat.
Why slow firing is important:
- Allows the necessary physical and chemical changes to occur gradually.
- Provides time for sufficient air to enter the kiln and displace carbon monoxide.
- Prevents color loss, poor surface texture, and other glaze defects.
This applies to both bisque and glaze firings.
How to control firing rate:
- Adjust automatic kiln settings, program an electronic controller, or manually adjust switches.
- Slowing the firing rate is most critical in the early stages when organics and carbon are burning out.
- Near vitrification (the final stages of firing), a faster rate is desirable and can typically be applied.
Venting for Proper Airflow
Proper air circulation is essential during the early stages of firing.
This is when organic materials are burning out, and oxygen is needed to react with carbon to prevent defects.
Kilns can be vented manually or with an automatic venting system.
Manual Venting
Manual venting helps remove fumes, but it is less effective at bringing fresh air into the kiln.
- Prop the lid open and remove peephole plugs for at least the first 1.5 hours.
- Slower firings require additional time for proper burnout.
- When the kiln reaches red heat, close the lid and replace the peephole plugs.
- Do not leave the peepholes open for the entire firing, as this can create cold spots.
Tips for better manual venting:
- Fire smaller loads for better air circulation.
- Use split shelves to improve airflow.
- Place red-glazed ware on the top shelf to ensure better oxygen exposure.
Manual venting is recommended if a downdraft vent is not available.
Automatic Downdraft Venting
A downdraft venting system, such as the Orton Kiln Vent, provides consistent and controlled airflow throughout the firing.
- Automatically brings in fresh air while exhausting fumes.
- Allows the kiln to be fired with the lid and peepholes closed the entire time.
- Red glazes can even be fired alongside other colors with good results.
Firing to the Proper Cone Number
Using witness cones on the kiln shelf to verify firing accuracy is essential for achieving good red glaze results.
Why proper firing matters:
- Underfired red glazes may blister.
- Overfired red glazes can lose their color.
- Glaze applied to underfired bisque may craze.
- Lead-free red glazes are particularly sensitive to incorrect firing temperatures.
Final Thoughts
Firing red glazes can be challenging, but by following these best practices, most problems can be avoided:
✔ Proper glaze preparation and application.
✔ Careful control of firing rates.
✔ Adequate kiln venting for oxygen circulation.
✔ Firing to the correct cone number and verifying with witness cones.
With attention to detail, you can achieve vibrant, consistent red glazes without defects!
understanding crazing
What Is Crazing?
Crazing is one of the most common glaze defects, appearing as a network of fine hairline cracks on the glazed surface of fired ware.
- Initial cracks are thicker and spiral upward.
- Finer cracks fill in horizontally.
Crazing occurs when the glaze is under too much tension because it contracts more than the body during cooling. Since glazes form a thin coating, they will pull apart (craze) under very little tension.
Crazing can:
- Compromise food-safe glazes, making them unsafe.
- Ruin the appearance of a piece.
There are two types of crazing, each with a different cause:
Immediate Crazing
- Appears when the piece is removed from the kiln or shortly after.
- Caused by glaze-body misfit (the glaze contracts too much on the body).
Delayed Crazing
- Appears weeks or months later.
- Caused by moisture absorption, leading to expansion of the body.
Immediate Crazing
Size Changes During Firing
All ceramic bodies change in size during firing and cooling. Ideally, the glaze should shrink slightly more than the body during cooling. If this does not happen, glaze defects may occur.
Proper matching of expansion and shrinkage between the glaze and body is critical to prevent crazing.
What Happens to Glaze During Firing?
- During firing, the glaze undergoes physical and chemical changes.
- As heating progresses, the glaze melts.
- With further heating, more liquid forms, becoming a thick, viscous fluid.
- With continued heating, the glaze becomes more fluid.
- At this point, the thick glaze still conforms to the size of the bisque.
- Any gases escaping from the body can form blisters, which may heal if the glaze is still fluid.
- When the kiln shuts off, the glaze and body begin to cool together.
- During cooling, both the glaze and body shrink.
- Eventually, the glaze hardens into a solid glass and stops flowing.
The thermal expansion and shrinkage properties of both the body and glaze determine whether crazing will occur.
Why Does Crazing Happen?
- Glazes are designed to shrink less than the body, which puts them in compression, making them stronger and less likely to craze.
- If the glaze shrinks too much, it will pull apart, leading to crazing.
Solutions for Proper Glaze and Body Fit
- Test samples to ensure a good glaze-body fit.
- Bisque fire to 1–2 cone numbers hotter than the glaze to ensure the body is mature.
- Use Self-Supporting Witness Cones to verify proper heatwork.
- Understand that heatwork affects glaze fit – A glaze may fit bisque fired to Cone 03, but craze on Cone 07 bisque.
Delayed Crazing
Why Does It Happen?
Delayed crazing appears weeks or months after firing and is almost always caused by underfiring.
- If the ware does not reach full maturity, it remains porous.
- Over time, moisture can enter the pores, causing the body to expand.
- If the glaze and body expand at different rates, hairline cracks (crazing) may appear.
- Sudden temperature changes can also cause crazing if the body and glaze do not expand and contract uniformly.
How to Fix It
- Refiring to the proper cone number may solve the problem.
- Ensure ware reaches full maturity by verifying the heatwork with witness cones.
Proper Firing to Prevent Crazing
Firing to the correct cone number is critical for preventing crazing.
- Always use witness cones to confirm the ware received enough heatwork.
- If the Kiln-Sitter® shuts off early, but the witness cone is not properly deformed, the ware has not reached maturity.
Why Underfiring Happens
Underfiring can be caused by:
- Uneven kiln heating – Some areas receive more heat than others.
- Kiln-Sitter® out of adjustment – The kiln shuts off too soon.
- Inaccurate thermocouple in an electronic controller.
- Heatwork differences between the kiln shelf and Kiln-Sitter® location.
How to Reduce Crazing
- Fire and cool the kiln slowly.
- Ensure proper heat distribution throughout the kiln.
Crazing in Lead-Free Glazes
Modern lead-free glaze formulations have a narrower firing range and develop their final properties more quickly. This makes proper firing even more critical to avoid crazing.
solving glaze defects: blistering, craters, and pinholes
Blisters, craters, and pinholes are related glaze surface defects. They appear as a rough, grainy, or bubbled surface on the ware after the glaze or decorating firing.
What Causes These Defects?
This group of problems can be caused by several factors, including:
- Dust or contamination in the glaze.
- Air bubbles trapped in the glaze.
- Air pockets in the slip.
- Improperly mixed slip.
- A dirty kiln.
However, the most common cause is gases released from the body, glaze, or kiln atmosphere during firing.
What Happens During Firing?
Clays and glazes contain organic materials that burn out during heating, releasing gases such as carbon, sulfur, and water vapor.
If carbon is not fully removed from the body, it can form gas bubbles during the glaze or decorating firing, leading to blisters, craters, or pinholes when the bubbles pop.
Common Causes of These Defects:
- Insufficient oxygen in the kiln during firing – Any combustion process requires oxygen. If there is not enough air in the kiln, carbon cannot fully burn out.
- Incomplete removal of carbon monoxide from the kiln – If gases produced during firing are not removed, they may deposit onto the glaze surface, affecting the glaze color and texture.
- Firing too quickly – Rapid heating may not allow enough time for carbon to burn out completely. If only partially burned, the carbon will continue oxidizing during the glaze firing, causing defects.
- Underfiring the ware – If the body does not receive enough heatwork, it remains weak and its expansion may no longer match the glaze, leading to surface defects.
How to Prevent Glaze Defects
To prevent glaze defects, it is essential to:
- Properly mix glazes and slips.
- Use correct pouring (slip) and application (glaze) techniques.
- Maintain a clean kiln and workplace.
- Strain glaze through nylon to remove lumps.
However, proper firing practices are most critical for achieving good results. Follow these recommendations:
1. Improve Airflow in the Kiln
Ensure sufficient airflow in the kiln, especially during bisque firings, to allow gases to escape:
- Use setters and stilts to improve air circulation around the ware.
- Use half shelves to improve airflow throughout the kiln.
- Vent the kiln adequately to allow carbon and other gases to burn out.
- Position ware to take advantage of airflow in the kiln.
Use a downdraft vent system like the Orton Kiln Vent to bring in a controlled amount of fresh air and circulate it throughout the kiln. This helps remove fumes and even out kiln temperatures.
2. Control the Firing Process
- Fire more slowly, especially below 1200°F (650°C).
- Adjust switches to lower settings or soak/hold at specific temperatures to allow carbon to burn out.
- Use an automatic controller to set precise heating rates and hold times.
3. Use Witness Cones to Verify Heatwork
Underfiring can occur due to:
- Burned-out heating elements.
- An improperly adjusted Kiln-Sitter®.
- A controller thermocouple that has drifted out of calibration.
- Temperature variations within the kiln.
Witness cones provide a true reading of the heatwork received by the ware. Placing cones on multiple kiln shelves reveals any temperature variations.
4. Vent the Kiln Properly
- Vent the kiln throughout firing to remove gases and prevent them from redepositing onto the ware.
- Only downdraft venting effectively removes gases from the kiln.
Final Thoughts
By following good firing and venting practices, glaze surface defects such as blisters, craters, and pinholes can be effectively controlled or eliminated.
successful glass fusing
One of the most common problems encountered when fusing glass is that it breaks during firing. Several factors can contribute to this, including:
- Glass incompatibility
- Glass sticking to shelves
- Glass heated too rapidly
- Glass annealed too quickly
Glass Compatibility
For glass to be compatible, all pieces must expand and contract at the same rate during heating and cooling. If this does not happen, the glass is considered incompatible.
- If incompatible glass is fused together and then cooled, stress will develop in the piece.
- Excessive stress can cause the glass to break immediately upon cooling or months or even years later.
Coefficient of Thermal Expansion (COE)
Glasses are rated using a coefficient of thermal expansion (COE) scale, which measures the linear expansion of glass during heating.
- Higher COE values indicate greater expansion.
- Lower COE values indicate greater resistance to thermal shock and less likelihood of breaking or cracking.
Tip: When purchasing glass for fusing, ensure that all glass pieces in your project have similar COE values to avoid stress fractures.
Glass Sticking
If kiln wash (shelf primer) is applied unevenly or bare spots are left, the glass may stick to the shelf as it expands during firing. This can cause the glass to pull itself apart and break.
Preventing Glass Sticking
- Apply kiln wash evenly to avoid bare patches.
- Avoid excessive kiln wash – too much may require sandblasting to remove it from the bottom of the fired piece.
- Reapply kiln wash regularly for consistent coverage.
Glass Heating Too Rapidly
Thermal shock occurs when glass is heated too quickly, causing uneven expansion and cracking.
Preventing Thermal Shock
- Control the heating rate between 150°F and 500°F to allow for even expansion.
- Larger or thicker pieces require longer heating times.
- Glass fired in a mold is more prone to uneven heating because the cooler refractory surface can cause temperature imbalances.
- Ensure even heat distribution – in electric kilns, heating elements are often placed above the glass to promote uniform heating.
Glass Annealed Too Quickly
Annealing reduces internal stress in glass, preventing cracks or breaks.
Annealing Process
- Soaking during the cooling cycle at approximately 900°F.
- Slow cooling between 900°F and 500°F to allow for temperature equalization.
- The required annealing time depends on the thickness of the glass.
Tip: Annealing too quickly can leave residual stress, making the glass prone to cracking.
Firing Down for Thick Glass
When working with thicker glass, firing down may be necessary.
- Firing down is a process of adding small amounts of heat as the kiln cools.
- This slows the cooling rate to prevent thermal stress when the kiln itself cannot cool slowly enough on its own.
Using an Automatic Controller
- The anneal temperature, soak time, and cooling rate can be programmed into an automatic kiln controller.
- The temperature display allows for real-time monitoring.
- However, even with an automatic controller, the set cooling rate may be too fast for the kiln to maintain. Monitor temperature changes carefully to ensure proper annealing.
Final Thoughts
For successful glass fusing, ensure:
✔ Glass pieces are compatible (same COE values).
✔ Kiln wash is evenly applied to prevent sticking.
✔ The heating rate is controlled to prevent thermal shock.
✔ Annealing is done slowly to eliminate residual stress.
✔ An automatic controller is used to monitor and regulate cooling.
By following these best practices, glass fusing can be done successfully with minimal breakage or defects.
success with golds
Gold overglazes, also known as liquid precious metals, are expensive and traditionally used only for decoration.
Golds are commonly applied to plates, cups, and china blanks to add detail and distinction.
There are several types of gold available in different forms, including bright golds and burnished golds.
Bright Golds
Bright golds are gold overglazes, but they are not solid gold—they typically contain 5 to 15% gold.
- They come in liquid form and are usually applied with a brush to minimize waste.
- A thin coat is preferred to prevent running or adhesion failure.
- If the liquid gold becomes too thick, it can be thinned with gold essence.
Tip: Both bright gold and gold essence are very expensive and typically sold in small vials or bottles.
Burnished Gold
Burnished golds are also gold overglazes, but they require finishing (burnishing) to develop a lustrous, bright sheen.
Characteristics of Burnished Golds
- More durable and highly resistant to scratching.
- Have a rich, dense appearance, often with a slightly matte finish.
- Brightness or matte quality can be controlled by application thickness—thinner applications result in brighter gold.
Composition & Forms
- Contains 16-32% gold, including gold powder.
- Available in liquid, paste, dry powder, or concentrated pats.
- Dry powder is extremely expensive.
Tip: Some burnished golds do not require polishing and typically contain 12-20% gold.
Firing Golds
Golds generally fire between Cone 022 and Cone 018, but the exact range depends on:
- The type of gold.
- The type of ware being decorated.
Typical Firing Ranges
- Glassware → Cone 022-021.
- China blanks → Can fire as high as Cone 011.
Firing Considerations
- Follow manufacturer instructions for the specific gold being used.
- Slow firing with a soak produces the best adhesion, color, and finish.
- Fast firing increases the risk of surface defects, which can become more noticeable with washing or use.
Ventilation Is Essential
Golds contain heavy solvents, so proper kiln ventilation is necessary for:
- Health and safety.
- Ensuring proper air circulation inside the kiln.
Tip: Gold is usually fired alone to reduce contamination issues.
Common Gold Defects and Their Causes
Most gold defects are surface-related and result from improper application or firing:
- Cloudy appearance – Caused by inadequate ventilation, excessive application, firing too fast, or overfiring.
- Gold not adhering – Caused by underfiring or applying too much gold.
- Gold running – Occurs when the application is too heavy.
- Burnished gold appears dull – Caused by insufficient burnishing or underfiring.
- Dull or scummy surface – May result from poor ventilation or overfiring.
- Cracking in the finish – Caused by firing too fast.
- Pinholes and blemishes – Can occur due to poor-quality gold or contamination.
- Blisters – Caused by a heavy application.
Best Practices for Successful Gold Firing
✔ Apply gold sparingly—a thin, even coat ensures better results.
✔ Vent the kiln until it reaches red heat to prevent cloudy or scummy finishes.
✔ Use witness cones to verify the correct heatwork has been achieved.
By following proper application and firing techniques, beautiful, high-quality gold decoration can be consistently achieved.
success with decals
Decals offer an easy way to add decoration to ceramic and glass ware without the time and skill required for hand painting. When properly applied and fired, decals can enhance a piece with color, texture, design, and personalization.
To achieve professional results, it's important to understand how to select, apply, and fire decals correctly.
Key Factors for Successful Decal Application
Types of Decals
- Different decals are designed for glass and ceramics.
- Ceramic decals often fire at higher temperatures than glass decals.
Application
- Decals must have full contact with the surface of the ware.
- Smooth out all wrinkles and bubbles to prevent defects.
- Avoid tearing the decal during application.
Firing
- Decals are generally low-firing, usually between Cone 022 and Cone 016.
- Always check the package instructions for the proper firing range.
Venting
- Decals contain organics that must be burned off during firing.
- Decal firings often produce strong-smelling fumes, so proper ventilation is essential.
Firing Decals
Firing decals is similar to firing other types of ware, but there are special considerations to keep in mind.
1. Venting Is Critical for Good Results
Proper venting is essential to achieve true colors and prevent firing defects.
Problems related to poor venting:
- Poor color development
- Cloudy or hazy appearance
2. Proper Heatwork Is Important
Underfiring or overfiring can cause issues with color and adhesion.
Common decal defects caused by improper heatwork:
- Faded colors → Caused by overfiring
- Color shift → Caused by underfiring
- Decals rubbing off → Caused by underfiring
- Dull metallic finishes → Caused by underfiring
Determining the Correct Firing Range
Since decal colors are highly sensitive to heatwork, it’s recommended to perform test firings to determine the best firing range.
How to test firing ranges:
- Use witness cones to monitor heatwork.
- Fire sample decals on tiles or blanks at different temperatures.
- Compare fired results and select the best appearance.
Color Development and Venting
If decals appear cloudy or colors are dull, additional airflow is needed to ensure proper color development.
Decals contain organics that must burn out completely, and carbon monoxide fumes must be removed from the kiln.
Ways to improve decal color development:
- Manual venting – Prop the kiln lid and remove peephole plugs to improve airflow.
- Downdraft vent system – Ensures consistent air circulation throughout the kiln.
Measuring Heatwork for Decals
Heatwork is a critical factor in decal firing.
Signs of improper heatwork:
- Fading, color shifting, and dullness indicate too much or too little heatwork.
- Decals rubbing off after firing suggests insufficient heatwork.
To accurately measure heatwork:
- Use witness cones to monitor actual heat received by the ware.
- Check heat distribution across different kiln shelves.
- Do not rely solely on a Kiln-Sitter® or controller temperature readings.
Measuring Heat Distribution in the Kiln
Heat distribution varies from top to bottom in a kiln, especially during cooler firings like decals.
Key considerations:
- A 2-3 cone difference at Cone 022 may only be a 1-cone difference at Cone 6.
- Radiation heats the kiln more effectively at higher temperatures, reducing variation.
- Slowing the first half of the firing helps equalize heat and burn out organics more efficiently.
Using a Controller for Precision
- Set precise heating rates and soak times to achieve the best results.
- Automating firing schedules ensures consistent decal firings.
Final Thoughts
For successful decal application and firing, follow these best practices:
✔ Choose the right decal type for your ware.
✔ Apply decals smoothly without wrinkles or bubbles.
✔ Vent the kiln properly to prevent color and adhesion issues.
✔ Use witness cones to verify accurate heatwork.
✔ Slow the first half of the firing to improve heat distribution.
✔ Use a kiln controller for precise firing.
By following these steps, you can achieve bright, vibrant, and well-adhered decals for professional-quality results!
making food safe ware
When creating food and beverage containers, it is essential to ensure that they are food safe. Important considerations for mugs, serving pieces, and dinnerware include:
- Body composition
- Design of the ware
- Glaze selection
- Decoration
- Firing to maturity
- Testing for lead safety
- Government regulations
What Type of Ware Is Suitable?
Some designs inherently make pieces unsuitable for containing food and beverages.
Design Problems That Can Affect Food Safety:
- Cracks, rough areas, and crevices – Difficult to clean and may trap bacteria.
- Nooks and crannies – Hard to fully glaze, leading to unsealed surfaces.
- Hollow handles on pitchers – Can trap moisture and bacteria, making thorough cleaning difficult.
Ware should also be serviceable—meaning strong and durable to prevent breakage during use.
Making Smart Glaze Choices
While glazes are durable, most are not completely insoluble.
- Acids in foods such as orange juice, vinegar, and tomatoes can dissolve small amounts of glaze, potentially posing a health risk.
- Acid-resistant glazes have undergone rigorous testing and are labeled as food safe. These should be chosen for glazing foodware.
- Lead-free glazes are not always acid-resistant. They should only be used if they are explicitly labeled as food safe.
Avoid using these glazes for food-contact surfaces:
- Homemade or altered glazes
- Crackle glazes (which can trap bacteria in fine cracks)
- Matte or specialty glazes (which may be porous or prone to wear over time)
How to Decorate Safely
- Fully glaze the ware to ensure the entire body is sealed.
- Properly bisqued porcelain may be dry-footed, but only if it has been fired to full vitrification.
- Clearly label the ware as food safe for future users.
Decorative Considerations
- China paints, decals, and rim designs are popular, but may not be safe for food-contact surfaces.
- Rim decorations must comply with specific food safety regulations.
- Decals should only be applied to the outside of pieces to prevent contact with food or beverages.
- China paints should be reserved for decorative items only.
Safe Firing Practices
Proper bisque and glaze firing are essential for ensuring food safety.
- Underfired bisque may cause glaze and body fit issues, leading to crazing or glaze surface defects (such as pinholes), making the ware unsuitable for food use.
- Improperly matured glaze will not meet food safety standards and may craze over time.
Ensuring Proper Firing:
- Use pyrometric witness cones on the kiln shelf to verify that proper firing has occurred.
- For food-safe ware, many prefer to fire bisque to an 03 witness cone to ensure full maturity.
- Follow the manufacturer’s instructions for glazes to achieve the best and safest results.
Understanding Food Safety Regulations
Several specific regulations govern ware that will contain or contact food and beverages.
- California has the most stringent regulations for dinnerware.
- The FDA has established new standards for rim decorations on food-contact ceramics.
- Regulations vary by state and country, so if you sell dinnerware, you may be subject to additional requirements.
For more information, consult state and federal agencies to ensure compliance.
How to Test for Lead Release
Several easy-to-use test kits are available to check for lead release.
- Most are qualitative tests—meaning they provide a yes/no answer regarding lead levels above a certain threshold.
- The most common test involves a cotton swab that turns pink if lead is present above the safety limit.
- These tests do not damage the ware, so if a piece tests positive for lead, it can still be used as a decorative item.
- Lead test kits are a simple, affordable way to ensure that your ware is safe.
Final Thoughts
For food-safe ceramic ware, always ensure:
✔ The design allows for easy cleaning and full glaze coverage.
✔ Only acid-resistant, food-safe glazes are used.
✔ Decorations and decals are properly placed to avoid food-contact surfaces.
✔ Firing is done correctly to prevent glaze defects like crazing or pinholes.
✔ State and federal food safety regulations are followed.
✔ Lead-release tests are conducted when necessary.
By following these best practices, you can create safe, functional, and beautiful ceramic ware for food and beverages!