


Element Troubleshooting
Rev: 2/1/2025
Common Issues
Error 1
If your controller shows an Error 1, E1, E-1, or Err1 error code, your kiln is slowing down and can no longer reach temperature. There are three leading causes of this in order of likelihood:
- Your elements have aged and need to be replaced. This is most likely when you notice the kiln gradually slowing down.
- One or more contacts or relays have failed. This is most likely if you notice a sudden change.
- You have a low voltage problem. This is most likely if you find this happening in the summer.
Why does an older kiln slow down?
Aging elements will be slowly eaten away by the atmosphere in the kiln. They will also increase their resistance, which decreases the amount of amperage and, ultimately, the amount of heat given off by the elements. This is why older kilns sometimes fire slowly and may not reach their maximum temperature. Periodic element resistance readings using the multimeter will allow you to check the “health” of your elements. Of course, a slow-firing kiln is the first indication that you have an element problem.
Elements expand and grow with age
If you use low-fire clay and glaze (never firing above cone 4) or only bisque fire, your elements will last a long time. This is good, but you will encounter another problem over time. Elements expand as they age, increasing in length and coil diameter. Although resistance usually increases as the elements age, this expansion can decrease it. As the element expands, it binds up in the corners, pushing individual coils together. This creates shortcuts for the electricity and reduces the material it must pass through. In turn, the resistance in the whole element is reduced. Only the parts of the wire that don’t contact the coils on either side of them will emit heat. Suppose there is a lot of element material jammed in the corners. In that case, there won’t be enough material left in the coil to radiate the heat generated by the increased amperage and decreased resistance. More amperage through the electrical components in the controller could cause damage if the situation continues or the resistance drops far enough. Additionally, the expanding diameter of the elements can make them challenging to remove from the holders.
This won’t typically happen to those firing at higher temperatures because increases in resistance quickly compromise the kiln’s maximum temperature, requiring the elements to be changed long before they can jam up in the corners. High temperatures and glaze firings are also more prone to eating through the element, causing it to fail before it can expand enough to cause the abovementioned problems. Occasionally, use a multi-meter and visually inspect your elements.
What if I see charred and blackened corners?
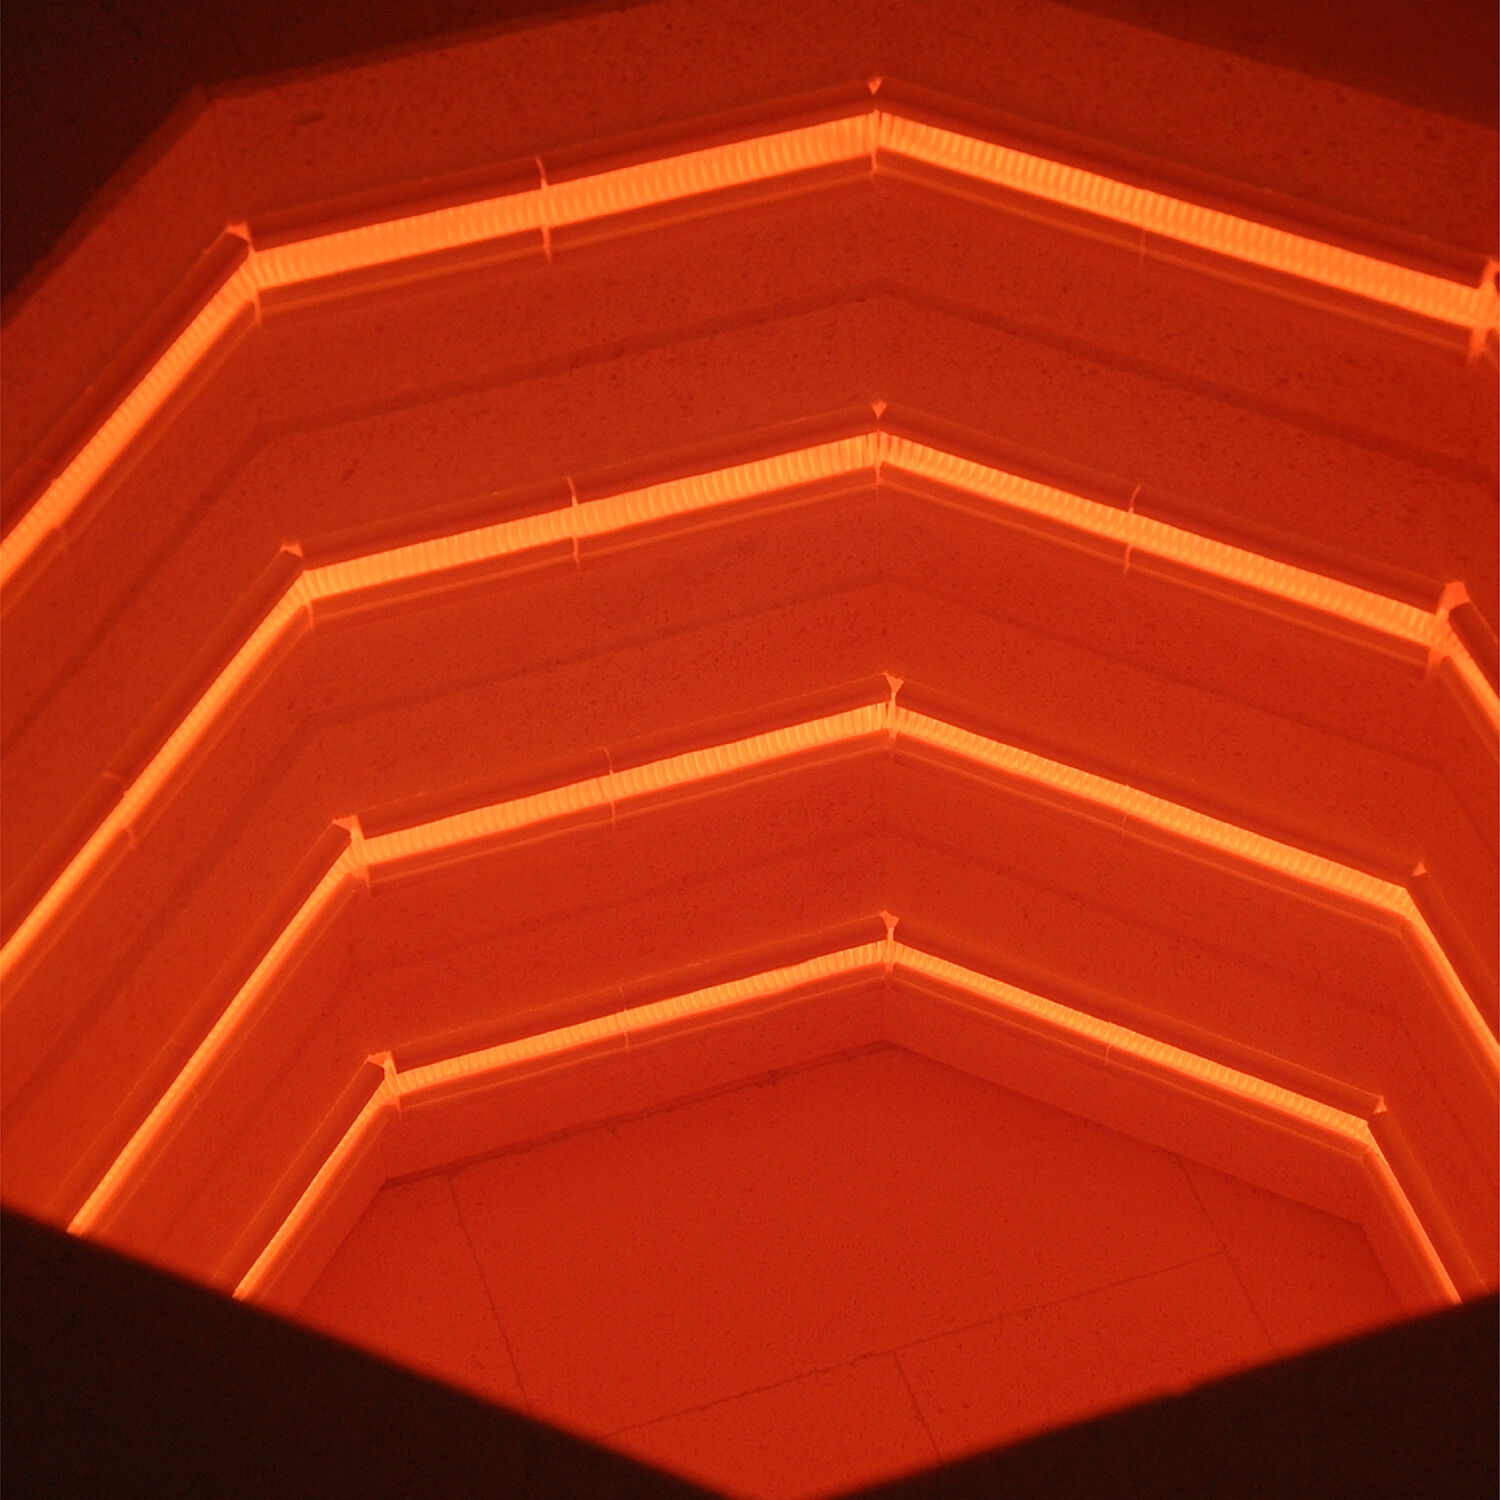
When the coils bunch up in the corners, they may not always touch each other. However, they could be close enough to allow electricity to ‘arc’ across the gap. This arc can generate extreme temperatures. Charred and blackened corners of the kiln are clear warning signs of this potential problem.
Do not confuse this with randomly sized sections of the coils glowing more quickly than other sections. This is normal and can even be observed with new elements. The wire’s annealing process causes this and does not adversely affect the elements’ operation in the kiln.
Factors shortening element life
- Contamination such as glaze or kiln wash. Silica, a main ingredient of both, attacks the element wire.
- Tightly wound areas on element coils. The elements must be stretched evenly. If the element coils are bunched up along the length of the element, it can overheat. See the section below on stretching elements.
- Glaze rubbing off onto the holders and elements when loading the kiln. If this occurs, thoroughly vacuum the element holders immediately.
- Exploding bisque ware. This can blow bits of clay into the element holders. Temperatures are much higher next to the elements and may exceed the clay melting temperature. If not removed, the clay may melt, contaminating the element. To avoid this, only fire bone dry clay. Fire on low for an extended period or use the preheat feature on your controller for thick pieces. If you hear a “pop” when firing such pieces, stop firing and cool the kiln. If an explosion has occurred, thoroughly vacuum all element holders.
- Firing pieces too close to the elements. We recommend at least a 1-1/2” gap between pieces and elements, further if large flat surfaces are parallel to the kiln wall.
- A reducing atmosphere. This will destroy elements. Iron-chrome-aluminum elements require an oxidizing atmosphere. Do not use wood chips, oils, or other materials to generate a reduction firing. Rapid element failure may result. NOTE: Reducing atmospheres is the opposite of oxidizing atmospheres (i.e. normal air). The name comes from the ability of a reducing atmosphere to “reduce” oxides.
- Various fumes from oils, waxes, carbon, fluorine, or lead glazes are present. The aluminum in the Iron-chrome-aluminum elements forms a protective oxide coating. This coating is attacked by many things, including oils, carbon from wax burnout, free carbon, halogens such as chlorine or fluorine, halogen salts, the salts of alkali metals, nitrates, silicates, borax compounds, iron oxides, and molten metals such as zinc, aluminum, copper, lead, and their oxides. Use a kiln vent if you use lead glazes (or cause any of these problems). Fire frequently with a noncorrosive load, such as a bisque firing. This will help the elements restore their protective oxide coating. Note that clay almost always has organics, sulfur, and fluorine. Proper venting is critical for your kiln’s long, trouble-free life and operation.
- Excessive soaking time. The higher the temperature, the longer the soak, the sooner the element will increase in resistance and decrease in life. Usually, short soaks work fine.
- Using third-party elements. Several people sell “replacement elements” for kilns without the proper design information. Making an element with the same wattage as an L&L element is easy, but it lacks the other qualities contributing to a long life. Designing an element is a complicated process that balances voltage, wire diameter, watt density, stretch ratio, etc.
- Make sure all elements are heating. If one element is not doing its share of the work, the other element will not last as long.
Terminal Burn-out
Sometimes, the ends of the elements can burn out at the terminal hardware connections. This can be due to any or all of the following causes:
- The element tails are not twisted properly. Extra heat could be generated at the element’s end if the twist is too loose.
- The element through-holes are too large. This could cause too much heat to escape from the kiln, thereby overheating the terminal connections. This can be remedied by lightly stuffing ceramic fiber (we have non-RCF ceramic fiber available) in the through-holes
- The terminal hardware may not be tight enough. A loose connection can generate heat and cause the hardware to oxidize, which in turn will cause a worse electrical connection and more heat. Replace it with new hardware and tighten it correctly.
- The terminal hardware should be stainless steel. Check to see if it is in good shape. If not, replace it with stainless steel hardware, or if need be, replace the whole terminal block assembly with one of our new ones.
Measuring Element Ohms
Why measure your element Ohms?
Aging elements generally increase in electrical resistance. When resistance (Ohms) increases, current and power (Amps and Watts) decrease, assuming Voltage remains constant. Without enough power, your kiln will fire slowly and may not reach the desired temperature. This makes measuring your element Ohms the best way to identify when elements need replacing.
By measuring resistance in Ohms (Ω), we can tell how much power your kiln has lost throughout the element’s life. For example, a brand-new section on an e23T 240V kiln would read about 14.5 Ω. If you measured this same kiln section after many cone 6 firings, you might get a reading of 16.5 Ω. Divide the current reading by the original reading to calculate the increase in resistance.
16.5/14.5=1.1379, or close to a 14% increase in resistance, means a power decrease.
We recommend changing elements after a 10% increase in resistance, as this is when most kilns will slow down. This will vary based on your kiln, your voltage, and the types of firing you do. People doing low-fire work will get by longer on lower power than those firing at higher temperatures (cone 6+).
Ohms Per ELEMENT VS Ohms Per SECTION
Remember that the Ohms listed on the wiring diagram are per ELEMENT, while your readings will be per SECTION. How you figure out the ideal ohms per section depends on whether the elements are wired in Parallel or Series. Most kilns are wired in parallel except for JD230V, and most 18” kilns are like the e18T.
Divide the per-element Ohms listed by the number of elements per section for a parallel kiln. Multiplying the per-element Ohms listed for a series kiln by the number of elements per section.
Example 1 (2 Elements in Parallel): e23T 240V 1 Phase: Elements are 28.9 Ohms each. Divide by two and you will get a reading of 14.5 Ohms per section.

Example 2 (2 Elements in Series): e18S 240V 1 Phase: Elements are 9.6 Ohms each. Multiply by two and you will get a reading of 19.2 Ohms per section.
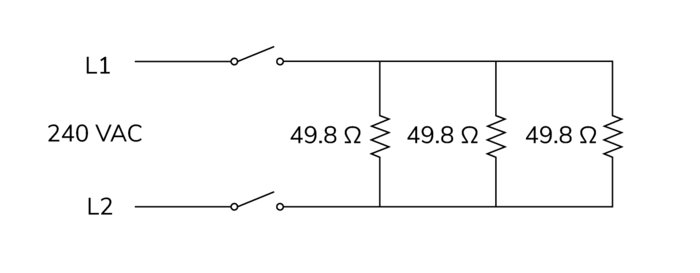
Example 3 (3 Elements in Parallel): JD2927 240V 1 Phase: Elements are 36.5 Ohms each. Divide them by three because they are parallel, and you will get a reading of 12.3 Ohms per section.
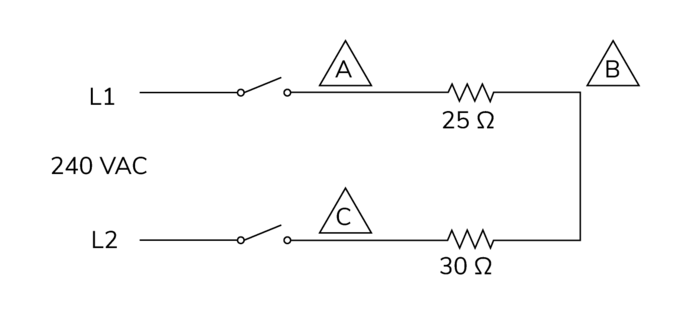
Example 4(3 Elements in Series): Doll DLH11-DBX 240V 1 Phase: Elements are 6.6 Ohms each. Multiply by three because they are in series and you will get a reading of 19.8 Ohms per section.
Measuring Ohms in Easy-Fire, eQuad-Pro, Liberty Belle, Doll, School Master, and EFL Series kilns
A piggy-backed control panel covers up the element terminal blocks in these series of kilns.
- Power off the kiln and unplug it. If it is directly wired, turn off all power at the disconnect switch or circuit breaker.
- Open the outermost control panel by unscrewing it from the element cover box in the case of Easy-Fire, eQuad Pro, School Master, and Liberty Belle kilns, or from the kiln body in the case of older Doll kilns.
- Once you open the control panel, you will see the power wire terminal strip. It has numbered wires from the element terminal blocks and wires connecting to the power relays. There are two wires per kiln section/ring, so in a three-ring kiln, numbers 1 and 2 are for the top section, 3 and 4 for the middle, and 5 and 6 for the bottom.
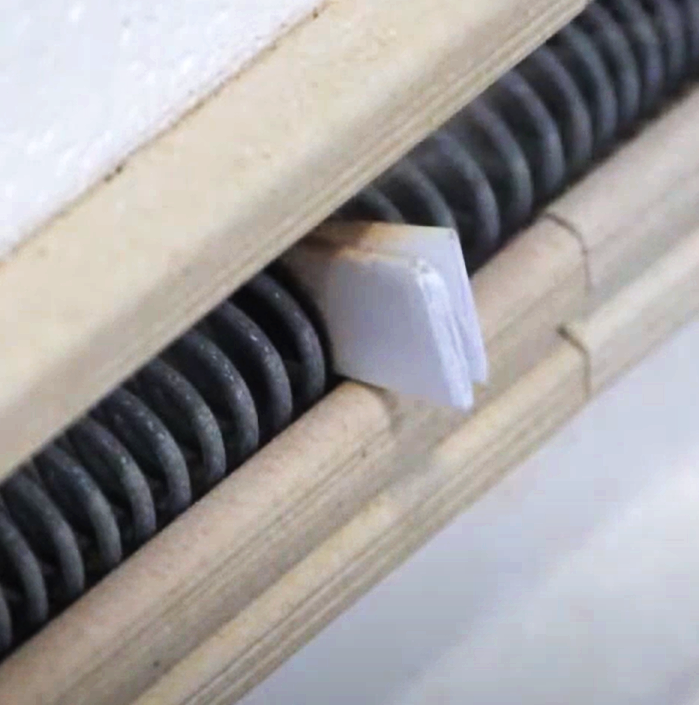
- Set your multimeter to Ohms (Ω), and place one lead between the two tabs with #1 wires connected. The lead fits into a small circular divot (see picture). Put the other lead on the #2 tabs and note the reading. Repeat the process for 3 & 4 and 5 & 6. Remember that each pair of wires represents one section.
- Compare your readings to those on the wiring diagram in your instruction manual. Remember that the ohms on the wiring diagram are per ELEMENT, while your reading will be per SECTION. See above for more info on understanding the readings.

See https://www.youtube.com/video/oq6A9LRf5Es
Measuring Ohms in Jupiter and Davinci kilns
The control panel is separated from the kiln body in these series of kilns, and the element terminal blocks are connected to the control panel via external jumper cords.
- Power-OFF the kiln and unplug it. Turn off all power at the disconnect switch or circuit breaker if it is directly wired.
- Unplug the first jumper cord from the control panel.
- Set your multimeter to Ohms (Ω), and using your testing leads, place one lead on each of the “hot” prongs—they will be the flat ones.
- Make note of the reading and move on to the next one.
- Compare your readings to those on the wiring diagram in your instruction manual. Remember that the ohms on the wiring diagram are per ELEMENT while your reading will be per SECTION. See above for more info on understanding the readings.

See https://www.youtube.com/video/oztzw95zLJ8
How Elements Are Wired
Importance
How the elements in a kiln are wired is vital because different wiring schemes with elements of the same resistance will yield drastically different results. For example, if a kiln section or group of elements is out, and the kiln is made up of series circuits, you would first check the elements because even one burned-out element in a series circuit can make all the elements appear burned-out. If this same kiln had parallel circuits, you would first check the switch or relay. This is because in a parallel circuit, if one element is out, the others will still light, so for all the elements in the parallel circuit to be out would mean that whatever controls the circuit (i.e., the switch or the switch by way of a relay, or the wires in-between) would be suspect. CAUTION: Accidentally wiring a kiln with parallel element circuits will heat up incredibly fast until the breaker trips. For instance, in series, an e18S-3 kiln wired correctly draws 23 amps at 240 volts. Wired in parallel it would draw around 90 amps at 240 volts, which would be disastrous.
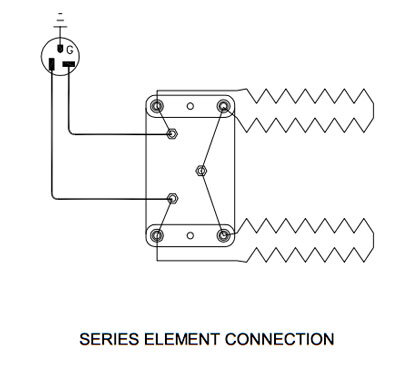
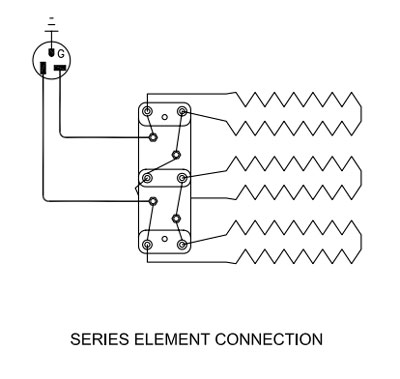
Series Circuits
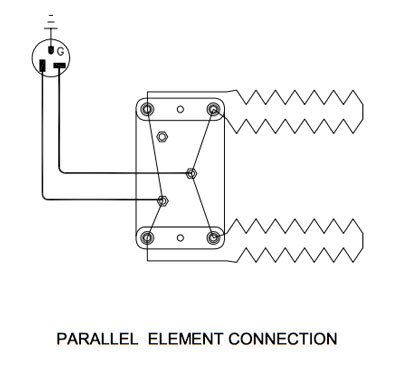
In a series circuit, power flows through one element and then another. We can see this in how it is wired. Think again of power coming in one wire and out the other.

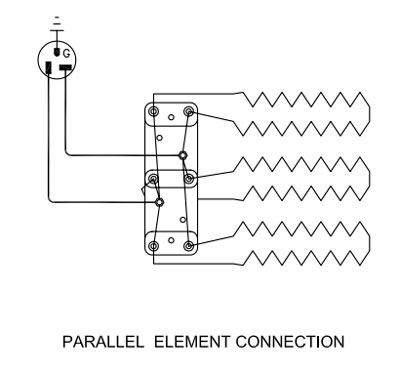
Parallel Circuits
Parallel circuits meanwhile allow power to flow through both elements simultaneously in no order. The power is applied to the elements' beginning and end at once. Thus, the resistance of the entire circuit is the number of elements divided by the factory resistance value for one element.

Series-Parallel
Sometimes element wiring can be termed series-parallel. Both series circuits get power at the same time, making them series-parallel circuits.

Specific to non-sectional kilns:
In non-sectional kilns, it can be difficult to tell the element circuits apart since the element connection board runs the entire length of the kiln and covers all the circuits. Trace the connecting wires to discover the beginning and end of each element circuit on the element connection board. Ideally, you would draw a picture of each element circuit before dismantling it. If you are replacing the elements, it is unnecessary to know if they are wired in series or parallel; they must go back together exactly how they came apart.
For a more in-depth description of Series, Parallel and Series-Parallel circuits, along with descriptive diagrams see BASIC ELECTRICITY TROUBLESHOOTING FOR L&L KILNS in the TROUBLESHOOTING Section for more information on circuit wiring. If you want more information about electricity for kilns, see hotkilns.com/volts.
Powered Bottoms
The elements on the powered bottoms are typically the same as those in the kiln with some exceptions. Series elements cannot be used by themselves in a powered bottom, so a parallel element must be used in smaller, series-wired kilns like the JD230V-PB.
Element Types
Heavy-Duty elements
If your kiln was made after January 1996, it will have larger element holders. These new holders can hold elements of a larger diameter and heavier gauge. These high-grade, heavy-duty elements feature lower watt density than standard elements, coupled with the heavier gauge wire, resulting in longer element life. You should try these heavy-duty elements if you are experiencing short element life because of your duty cycle (frequent firing, high-temperature firing, long soak times). They have the same resistance as the standard elements, so the power rating of the kiln does not change. It also means that you can use them alongside standard elements. One consideration when mixing the standard and heavy-duty elements is that the heavy-duty elements will age more slowly, which may influence uniformity in the kiln. Dynamic Zone Control will automatically compensate for this problem. However, we suggest that you put newer elements in the bottom ring where temperatures tend to be cooler and need as much power as they can get. L&L cannot keep track of which elements you have and that you must specify heavy-duty elements when ordering. If you don’t specify heavy-duty elements, you will get standard elements.
APM Elements
APM is a special version of the Kanthal A-1 alloy used in kilns. It is sintered and resists the crystallization that regular Kanthal-type alloys experience. As a result, it makes sense to use this when you are doing processes that require long holds at high temperatures (like crystalline glaze, for instance). On the other hand, these elements are costly and subject to the same problems, such as glaze contamination, that any element can experience. See hotkilns.com/apm for more information.
Quad Elements
The quad-element option gives you four rows of heavy-duty elements to maximize element life and heating power. Double the element surface area means that quad elements will degrade at a slower rate than ordinary elements, which is excellent for those firing to high temperatures. More surface area also means more radiated heat for faster and more even firings. Quad elements are also typically made from thick gauge element wire, further increasing their durability. Note: Quad-element designs use extra-long elements to wrap around the kiln twice each, meaning the electrical specs are the same. Because more element holders are needed in the brick, quad elements are not interchangeable with regular elements. See hotkilns.com/quad-elements for more information. See hotkilns.com/kiln-accessories/quad-element-option for more details.
Increasing Power in a JD230
If you have a JD230, you can retrofit the new Easy-Fire e23T elements into that specific model and increase the kiln's power rating. That will give you about 10% more power to start with, and therefore, as elements age, the lowering power will have less impact on your firings. See hotkilns.com/jd230-ez as an example. These elements can be retrofitted into older kilns.
