Changing Elements in an L&L Kiln
REV: 2/1/2025
Video Guide
This video guide demonstrates how to change the elements in a standard L&L kiln. For written instructions and more in-depth information, read on.

See https://www.youtube.com/video/aEfGj_eA8v0?si=Jry8IcFLUgh-8a1G
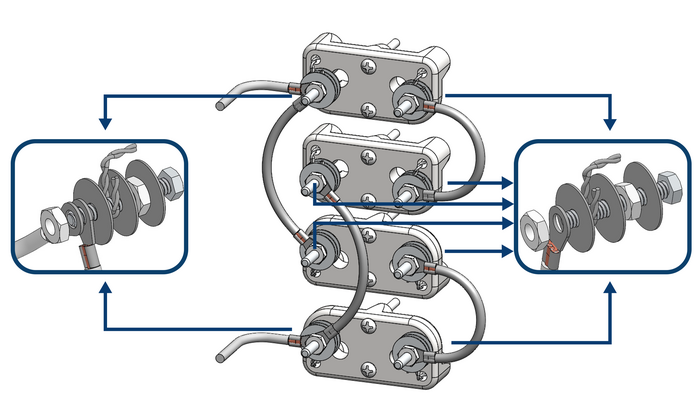
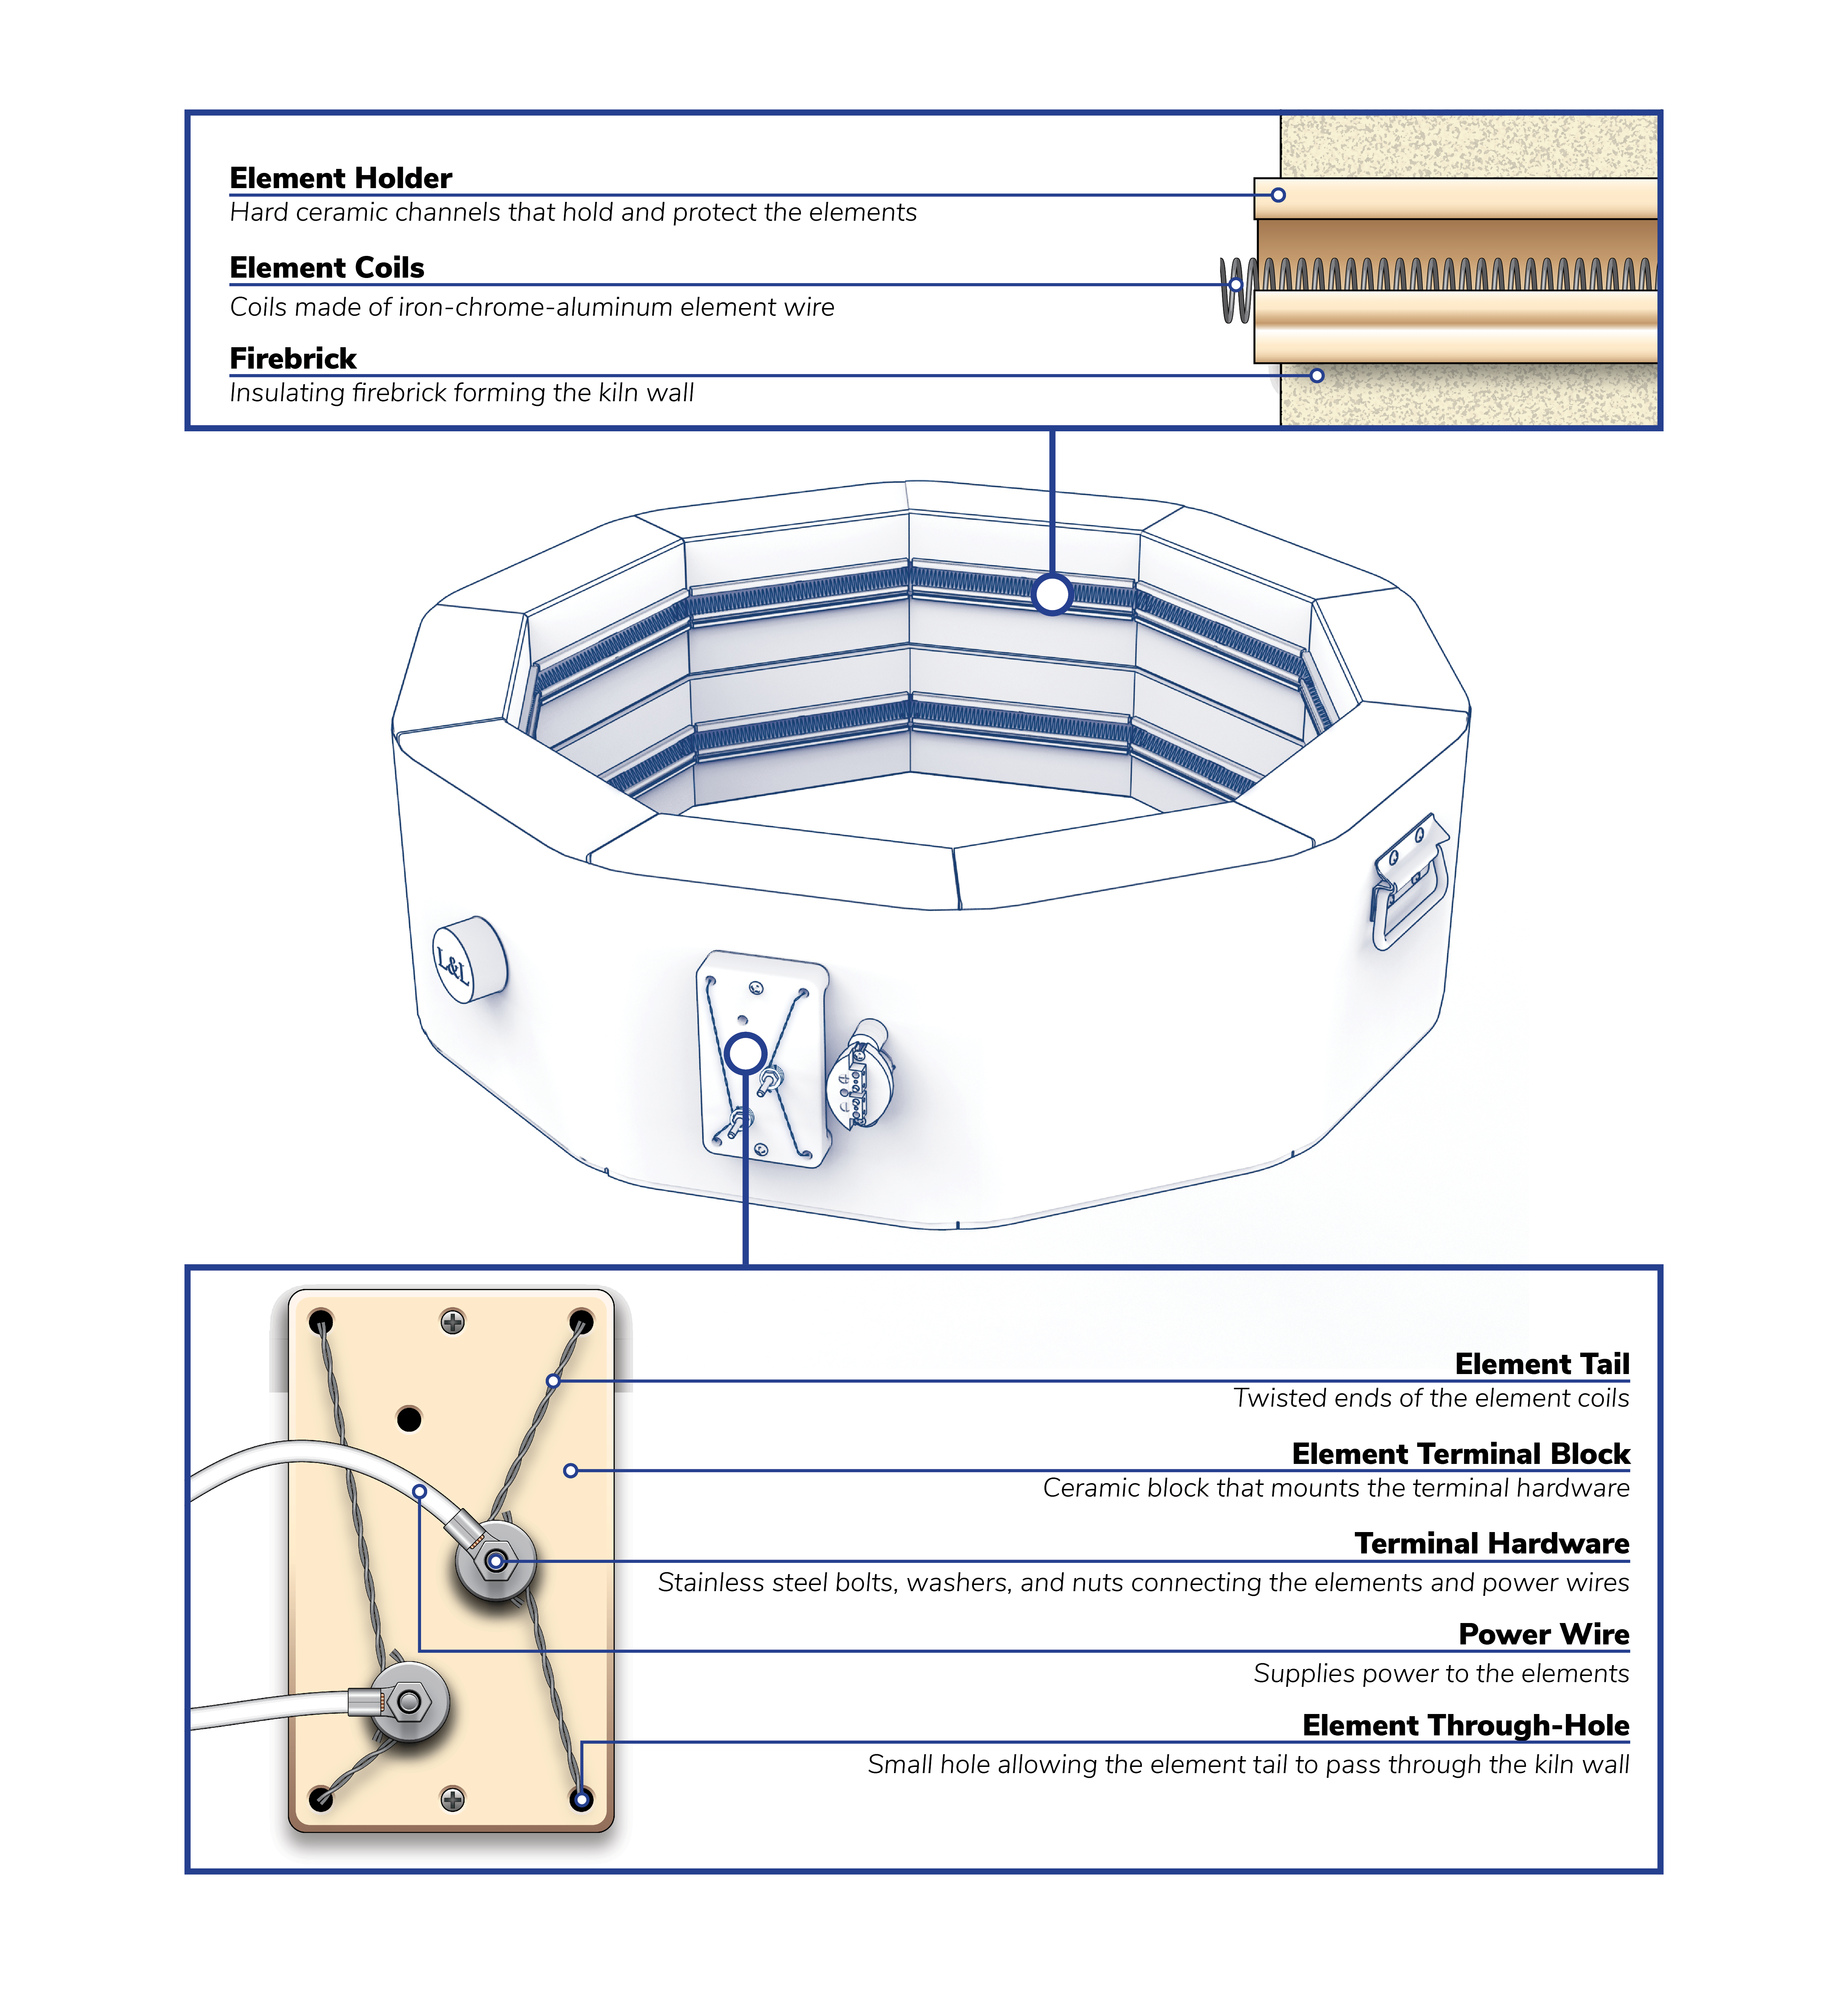
Element Diagram
Before Installing New Elements
Ordering new elements
When ordering new elements, contact L&L or your local distributor. Provide them with your kiln’s model number, serial number, voltage, and phase – all of which can be found on the nameplate, typically on the control panel. This step is essential to ensure you receive the correct elements for your kiln. In addition to new elements, you may want to consider getting new terminal hardware, as these can corrode over time, even though we use stainless steel.
Removing old elements
Ensure the kiln is unplugged or the circuit breaker is off before starting any maintenance.
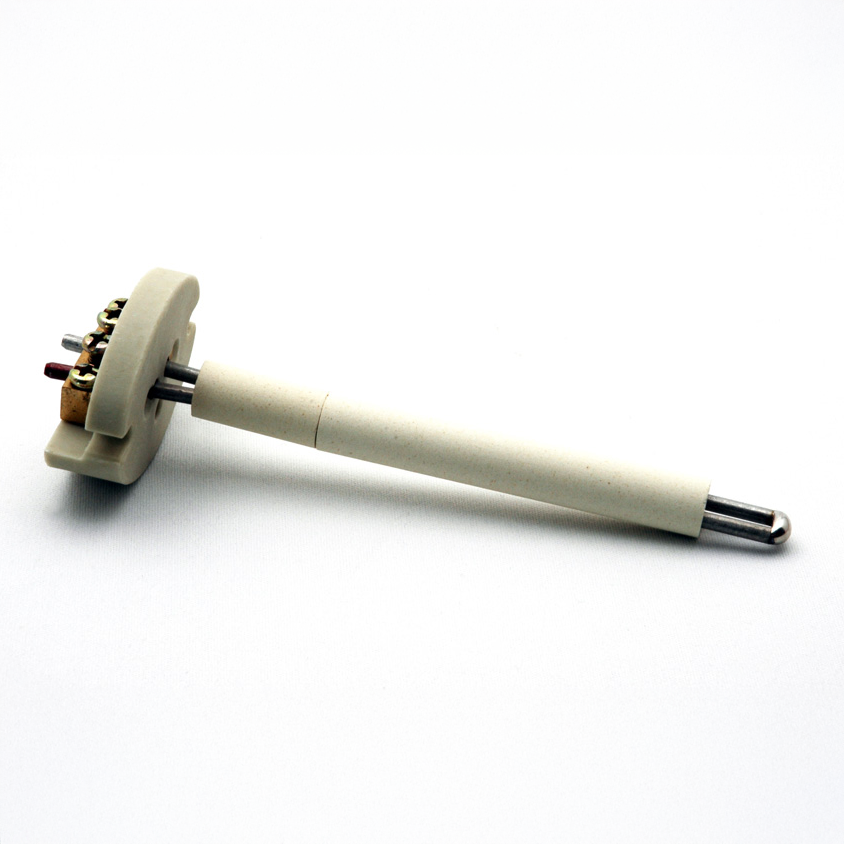
- Open the control panel and element box. On most L&L kilns, you will open the control panel by removing two screws on the top. Once open, unplug the thermocouple and power wires from the terminal strips (label how they are configured and take photos if needed), then remove the screws on the right-hand side of the element box and swing it open.
- You will find the element terminal blocks inside the element box. Their exact configuration may differ depending on your kiln’s model. In this example, we use standard terminal blocks with parallel wiring, the most common configuration. If your kiln has a different configuration, consult the terminal block diagrams below. Using an adjustable wrench or a 3/8” nut driver, remove the nuts, washers, power wires, and element tails from the terminal bolts. Please keep them in the correct order and photograph them before removal. The last washer and nut fastening the bolt to the ceramic block can remain in place if they are in good condition.
FOR OLDER NON-CERAMIC TERMINAL BOARDS: Remove all the old tails from the bolts and re-tighten these bolts to the element connection board. You may have to remove the element connection board from the kiln. If the bolts are corroded, replace them with new stainless steel terminal bolts, nuts, and washers. If the terminal board itself is burnt or broken, replace it as a complete unit with new hardware. - Clip off the element tails close to the through holes so they can slide through the kiln wall for removal.
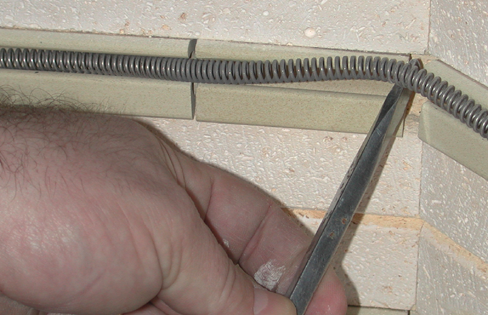
- Remove the old elements from the inside of the kiln. Use a sharp tool like a screw driver to lift the elements out of the ceramic grooves at the corners. You can slide the holder over to make enough of a gap to get the tool under the element. As long as the element holders are intact and the elements weren’t fired beyond their lifespan, the element coils should quickly come out of the holders. Very old elements can sometimes become wedged in the element holders, making it necessary to pry/twist/ break them out carefully using needle-nose pliers. If need be, a propane torch will soften the element wires and make them easier to remove. BE CAREFUL NOT TO BURN YOURSELF IF YOU DECIDE TO USE THIS METHOD. Use heat-protecting gloves.
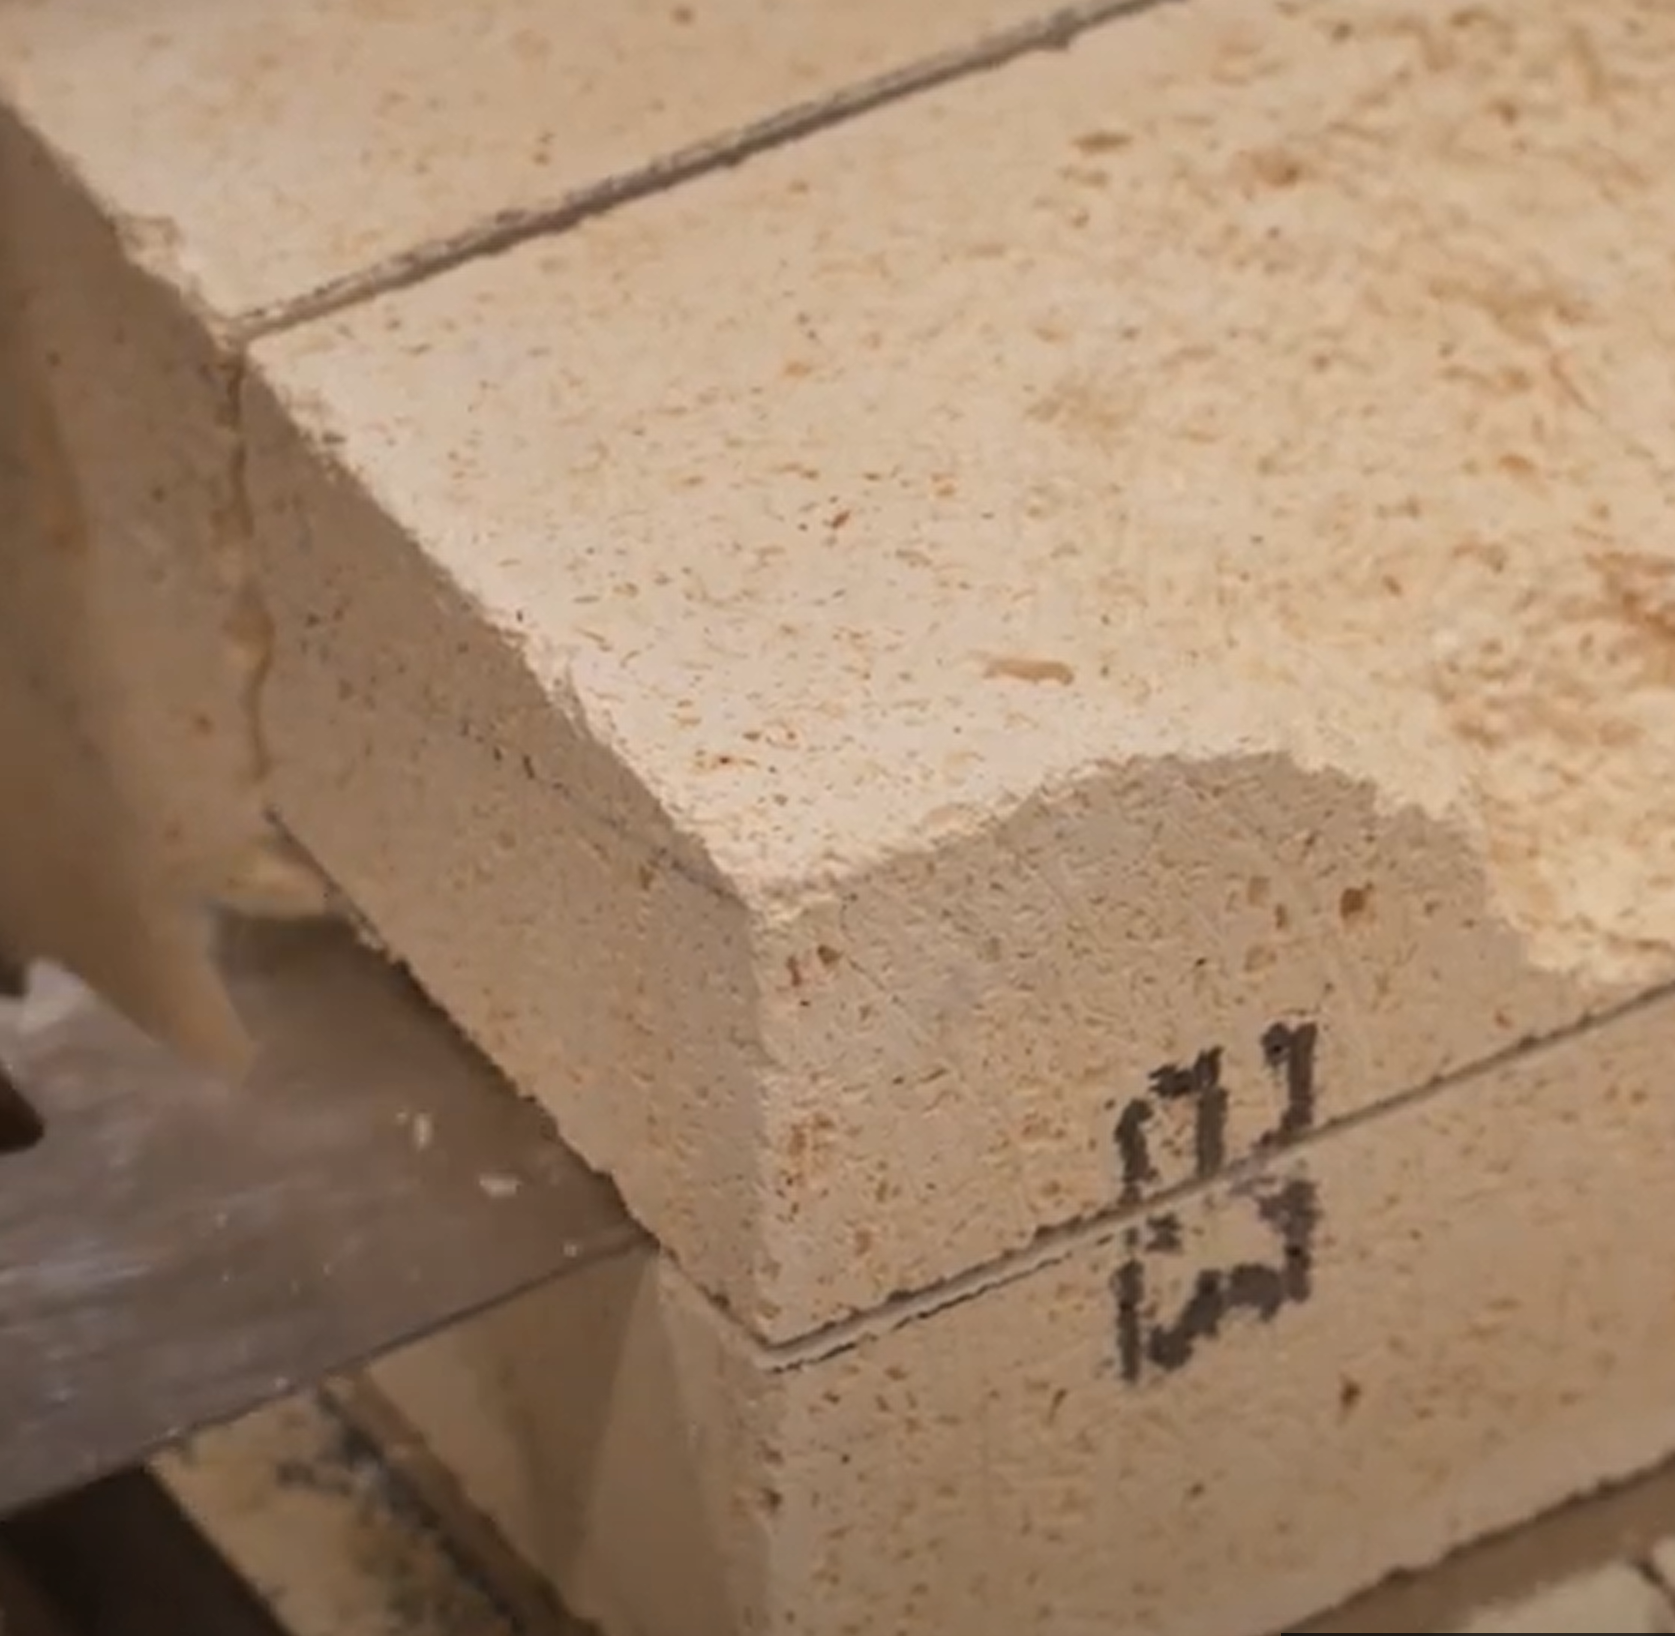
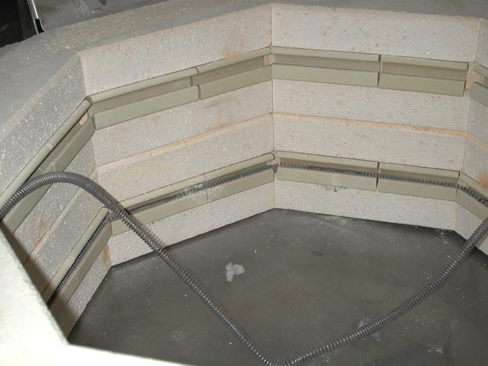
- From the inside of the kiln, pull the element tails through the kiln wall. Be careful not to enlarge the hole in the soft firebrick.
FOR OLDER NON-CERAMIC TERMINAL BOARDS: There are usually ceramic insulator bushings on the outsides of the through holes that the elements pass through. Some models (particularly older J2900 kilns and DaVinci kilns) have spacers to keep these insulators in place. These may fall out and break if you are not careful. Be sure not to lose these spacers when replacing elements. Note how they are positioned so you can replace them the same way. The newer ceramic terminal blocks have no bushings or spacers - they are all one integrated piece.
- With the elements removed, vacuum out the element holders of any dust or debris. Check them for evidence of glaze or material contamination. Contaminated holders can lead to the rapid failure of new elements. Chip or scrape carefully to remove the contaminant or replace the affected element holders. To replace them, refer to the Replacing Element Holders section.
Checking new elements
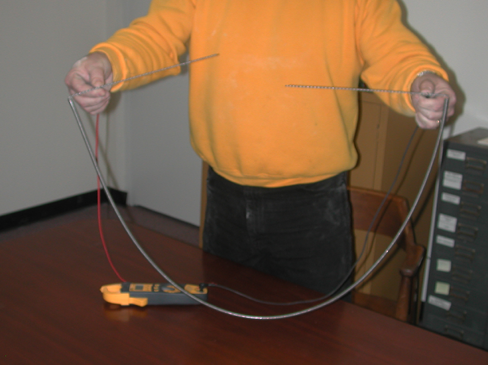
Thoroughly inspect your new elements. Ensure the wire thickness is similar to that of the old ones. Verify that the coils per inch and the diameter of the coils are also identical. Use your multimeter to check the resistance of your new element. Place the probes on the element tail about 3” away from the beginning of the coil. Compare it to your kiln’s elements’ factory resistance value(s). Your reading should be no more than one Ohm off (less for elements with Ohm readings of less than 10 Ohms). If you have received the wrong element in error, don’t hesitate to call the factory to get it exchanged. This is the time to address any issues. DO NOT WAIT UNTIL YOU STARTED THE JOB, STRETCHED THE ELEMENT, OR EVEN INSTALLED IT BECAUSE, AT THAT POINT, YOU COULD NOT RETURN IT.
Pre-stretched elements
Most replacement elements come pre-stretched. All elements are slightly under-stretched and can settle during shipping, requiring adjustment for the final fit. If that is the case, stretch out the element until it is the correct length. It is better to gently stretch out the whole element instead of aggressively stretching a small section, which could lead to deformation or bunching.
Stretching unstretched elements
- To determine the total length to stretch an element, measure the total length of the grooves.
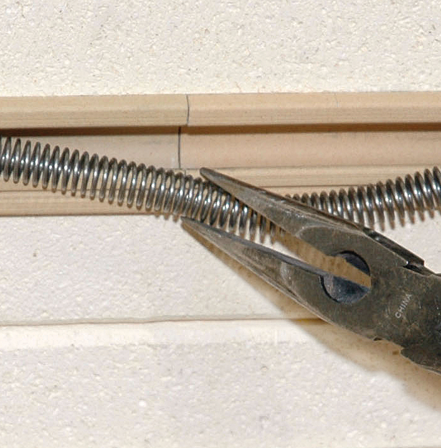
- Mark the floor with two marks for the stretched length. Have a helper stand on the tail of one element and pull the other tail until the element is the proper length. The assistant must stand very firmly because a flying element could cause severe injuries. WEAR SAFETY GLASSES WHEN YOU DO THIS. Alternately, clamp the end to something with vice-grips.
- Examine for evenness of stretch. Selectively stretch tightly wound sections to provide uniformity of stretch.
- Repeat this procedure several times.
- You will have to pull the elements beyond the last mark to obtain full stretch.
- If overstretch occurs, insert a metal rod or small-diameter dowel into the element coil and compress it with needle-nose pliers.
- Stretch uniformity is necessary for satisfactory element life.
Installing New Elements
Terminal Hardware
We highly recommend getting all-new element terminal hardware when you replace your elements, as these can strip or corrode over time, even though we use stainless steel. We offer a 50% discount on element terminal hardware when you buy elements.
Identical Elements
Besides a few exceptions, such as our Schoolmaster line, most L&L kilns will use identical elements throughout, so you don’t need to worry about installing them in a specific order. The description of each element on the website will alert you if this is the case.
Step by Step
Replace the elements in one section at a time so you don’t make a mistake with the wiring.
- Insert one element tail through the kiln wall and terminal block. At this point, the element ends should be straight.
- Feed the element coils into the holders, working your way around the kiln. Note that the unfired element will have some springiness. You may need to use a screwdriver to press the element into the holder. No pins are required.
- Insert the other element tail through the kiln wall and terminal block.
- Pull the coils up tight to the wall of the kiln by pulling the tails from the outside.
FOR KILNS WITH NON-CERAMIC TERMINAL BLOCKS OR RETROFITTED KILNS WITH CERAMIC TERMINAL BLOCK BUT STILL NEED BUSHINGS: Be sure to replace the insulators and spacers over the element tails.
- Ensure the element is securely seated in the holders and not popping out of any corners. If it doesn’t stay seated in a corner, stretch it a little more so there’s less tension.
- Repeat this process with the rest of the elements in the section.
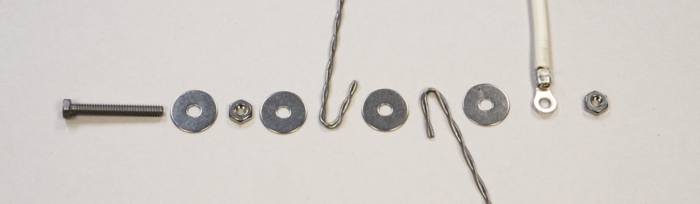
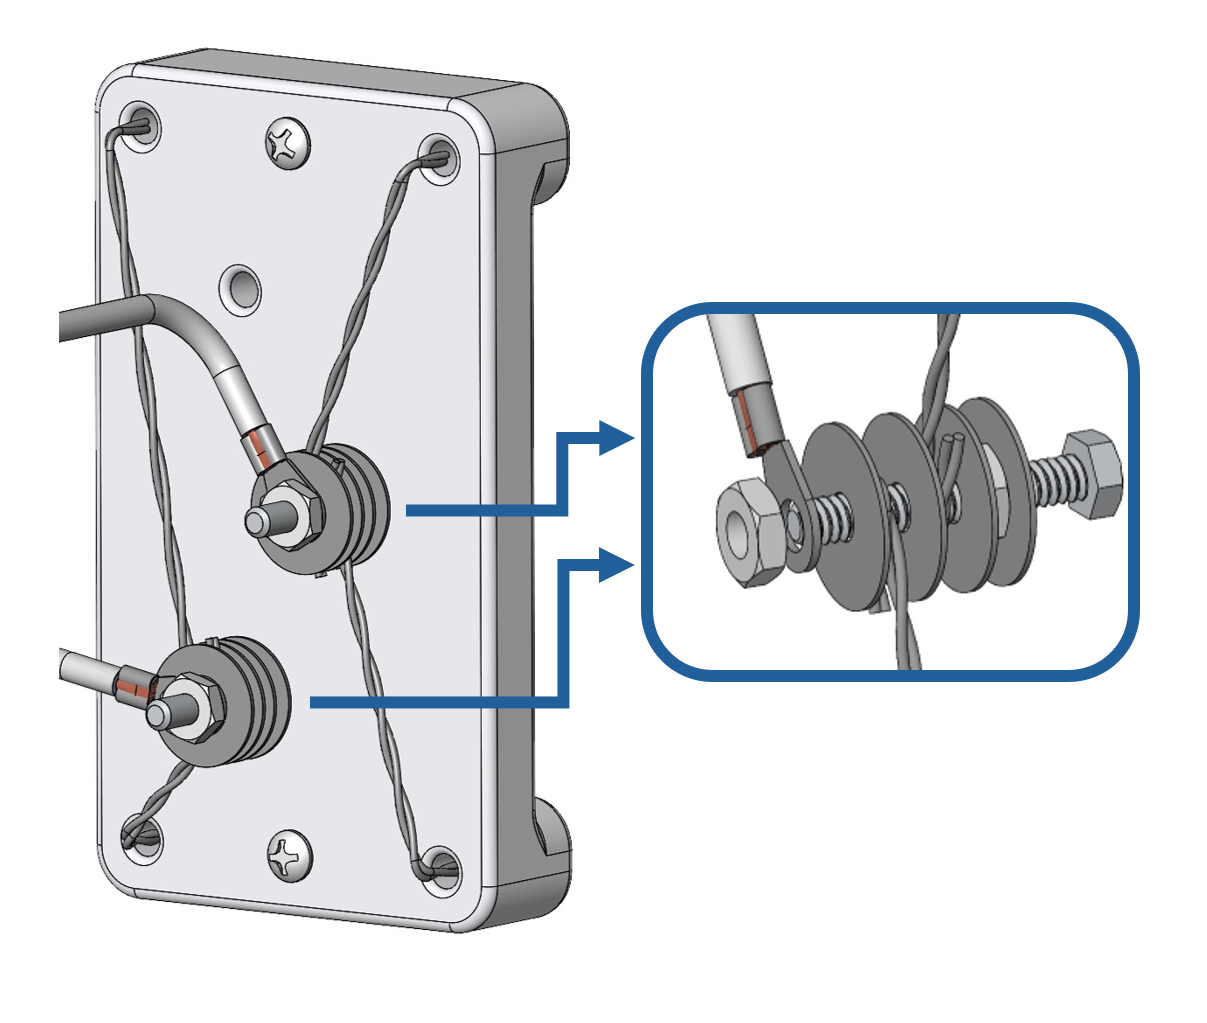
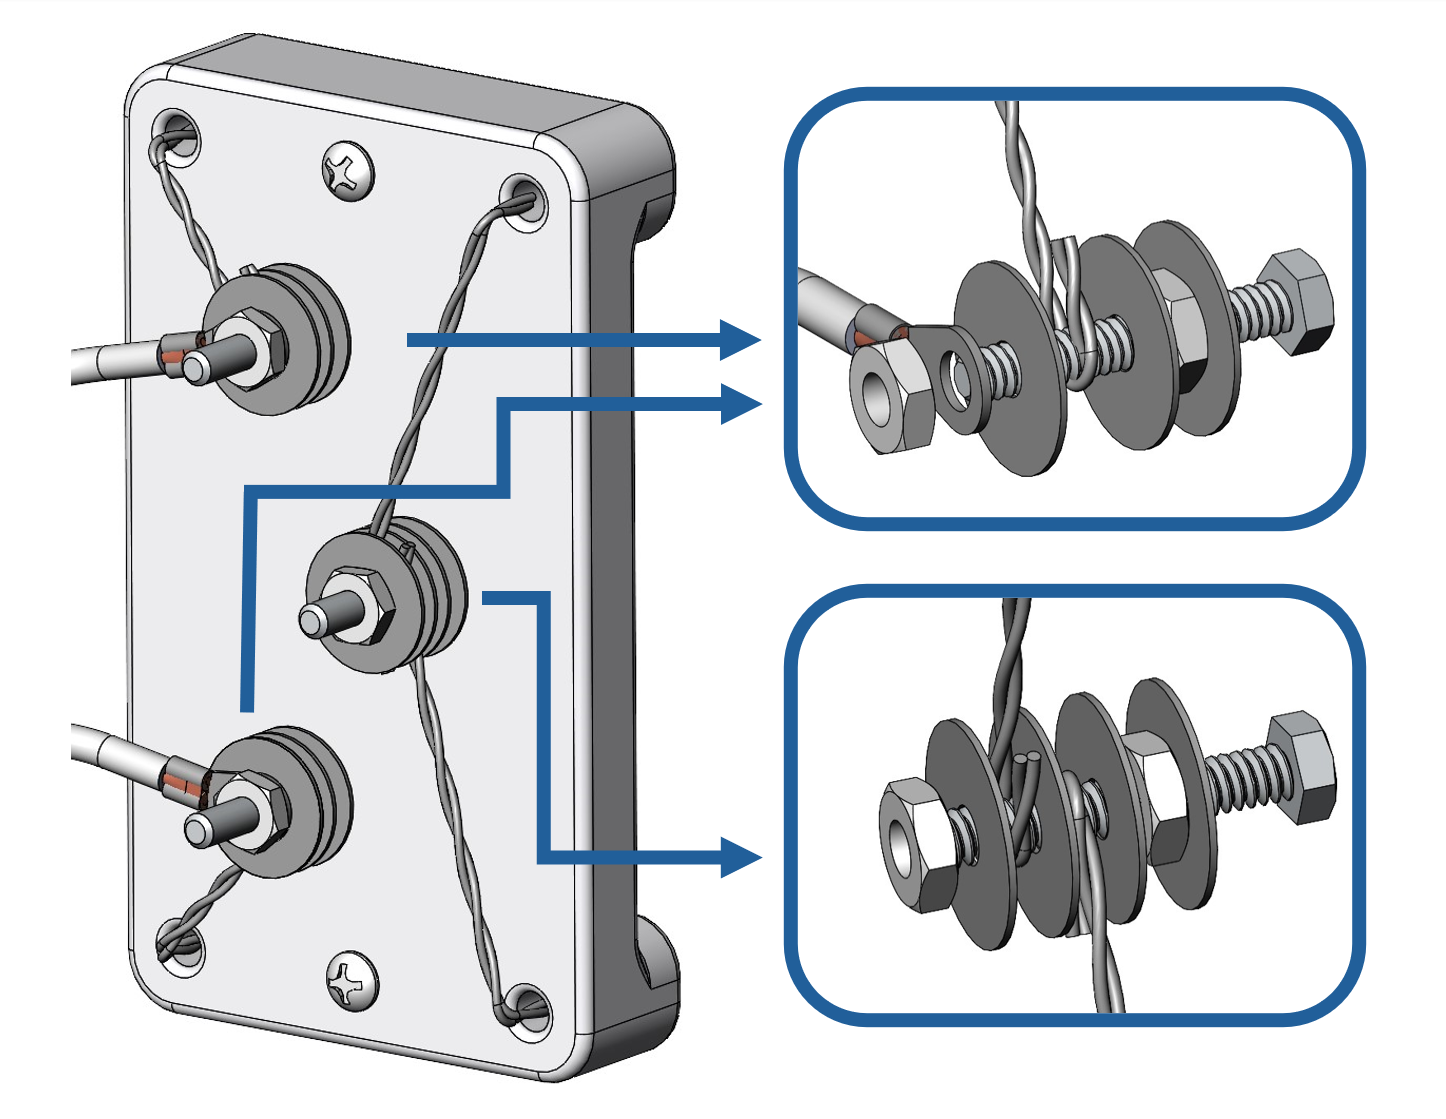
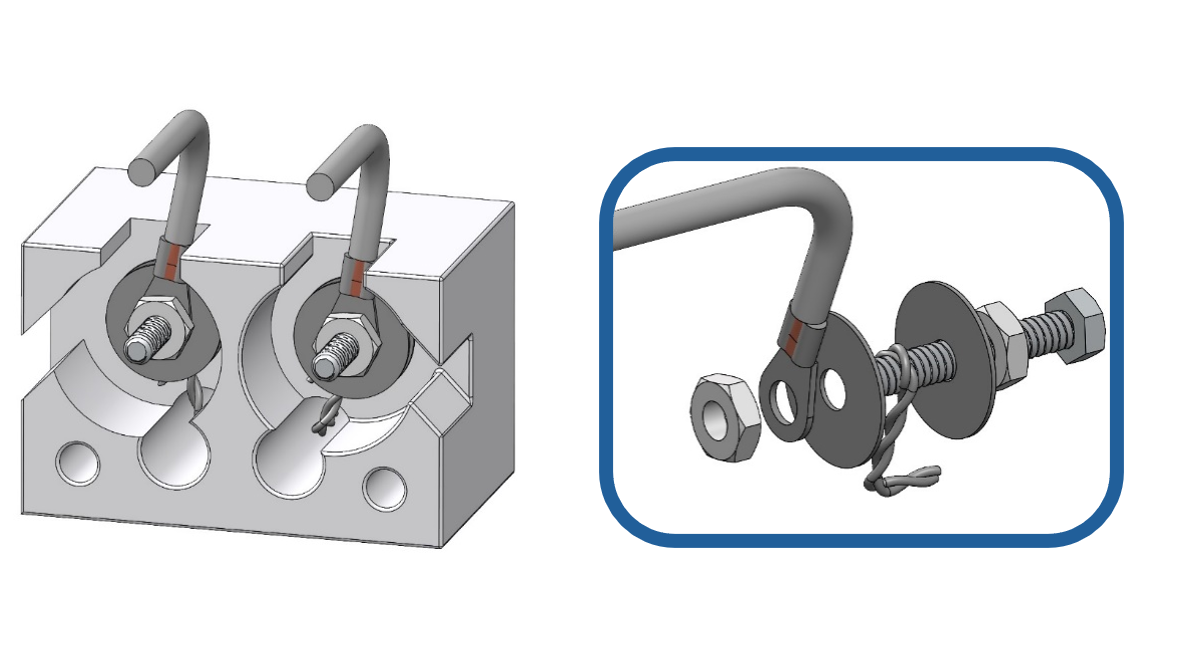
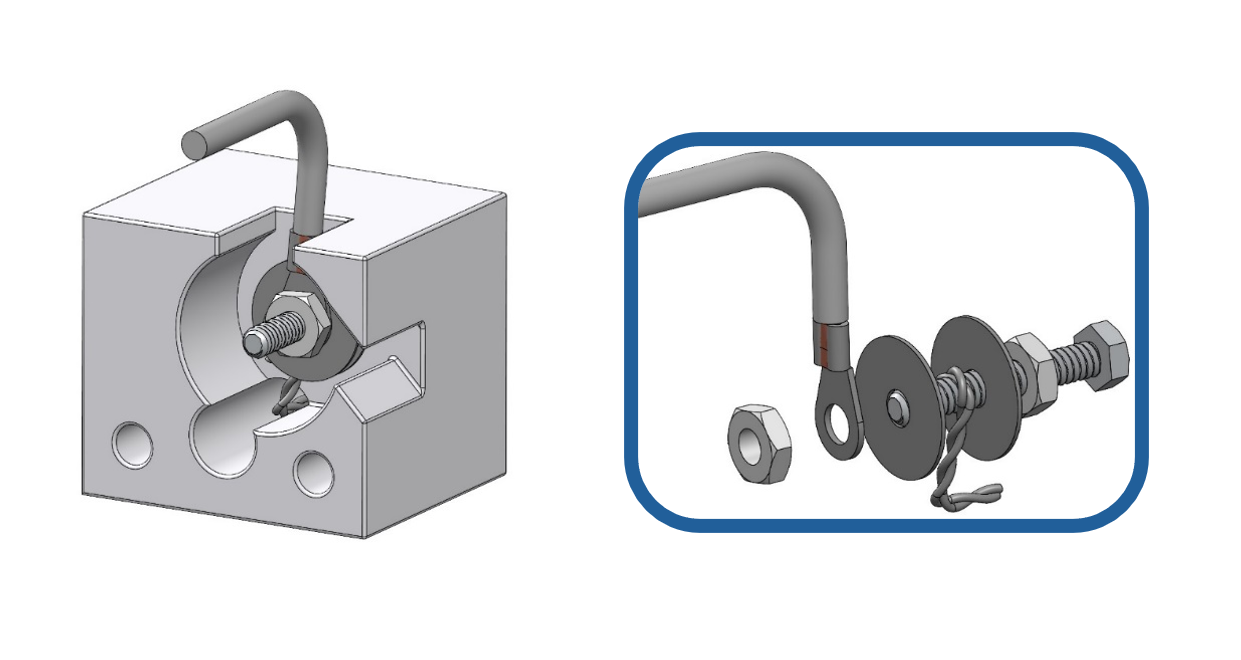
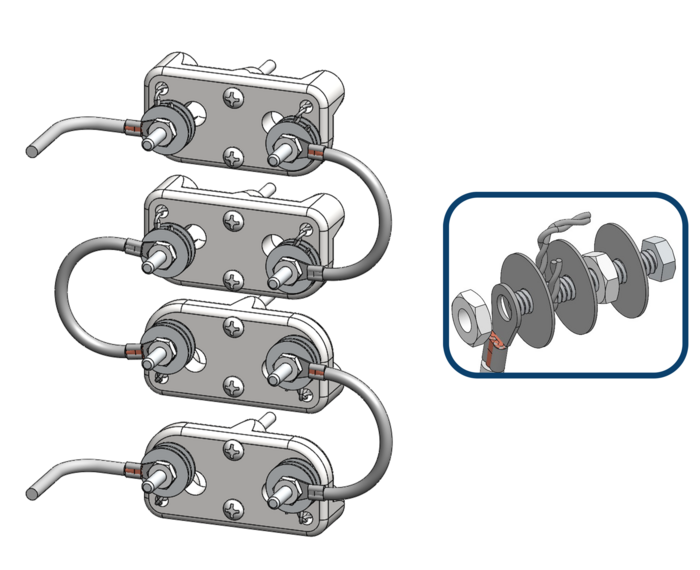
- Be sure to install the elements and hardware in the correct order. Consult the diagram for your specific configuration. For a standard terminal block with parallel wiring (the most common configuration), the proper order will be as follows:
- The first washer.
- A hex nut. Tighten to secure the bolt to the terminal block.
- A second washer.
- The first element tail. When you wrap the element tails around the bolt, wrap them tightly, only halfway around, making a “U” shape. This ensures that they remain flat and make complete contact with the washers. You do not want to wrap them all the way around, having the elements overlap. That would create a gap preventing complete contact with the washers.
- A third washer.
- The second element tail.
- The final washer.
- The power wire.
- A final hex nut. A tight connection is vital for proper contact. If you under-tighten, the element tails may not make complete contact and could overheat. But if you overtighten and twist the element on the bolt too far, you could break the element or bolt.
Repeat this process with every terminal bolt.
Note: Over the years we have changed the order of terminal hardware to simplify the process. Your older kiln may be using a different order, but this is our current recommended order and will be what you receive when ordering new hardware (for a standard terminal block in parallel)
- Once the tails are all connected and tightened, you can clip off any excess element wire from the tails.
- Once you have completed the above steps in all kiln sections, reattach the element box and the ground wires if the kiln has them. DANGER: DO NOT FORGET GROUND WIRES; EACH KILN SECTION SHOULD BE GROUNDED
- Test the ohms as described in the measuring element Ohms section.
- Reattach the control box, plug the kiln in, turn it on, and ensure all the elements come on.
First firing with new elements
We recommend running our first firing program to ensure everything is working correctly, to form a protective oxide layer on the elements, and to seat the new elements into the holders. NOTE: You may experience some smoking from the kiln on its first firing with new elements. This is normal and due to residual oil left on the element wire from manufacturing.
Stretching Quad Elements
If you are replacing elements in a quad polygonal kiln, you might need to stretch them to fit. See the video demonstration below.
Installing Quad elements in the lower sections can be awkward. To make it easier, you can first stretch and fit the element in the top section to size it, then remove it and install it in the bottom.

See https://www.youtube.com/video/w7dsHK-3l4w
Bending Quad Elements
If you are replacing quad elements in a Davinci or front-loading kiln, you will need to bend the elements. Video demonstrations below.

See https://www.youtube.com/video/qVgIIdsfzXI

See https://www.youtube.com/video/NOHqeB6An_w
Terminal Block Wiring Diagrams
The following diagrams show how to wire and configure the terminal hardware in most L&L kilns.
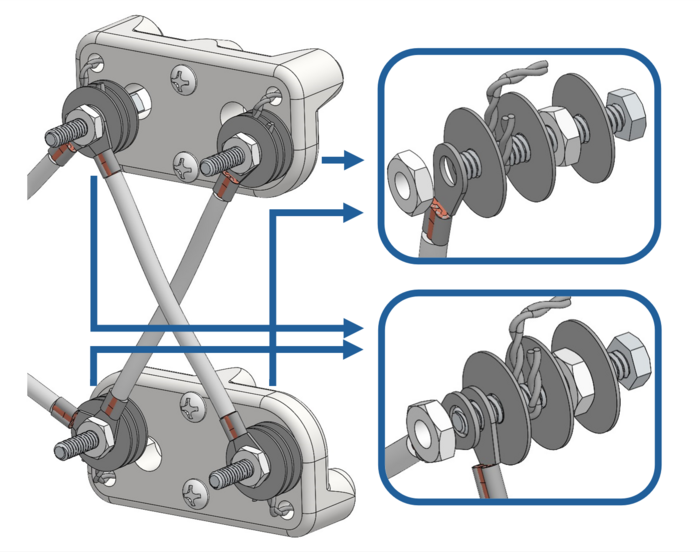
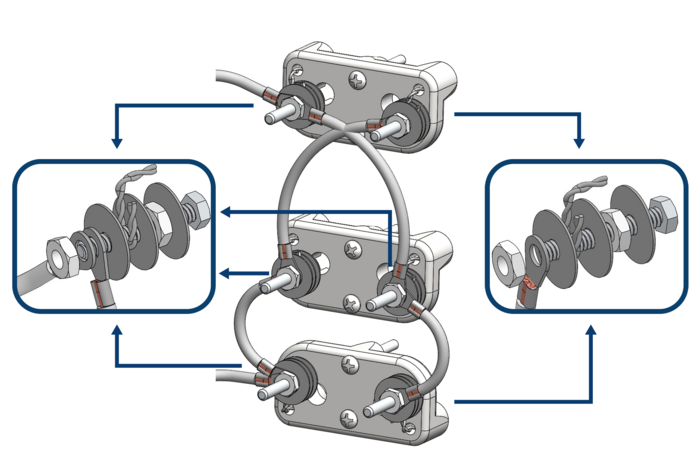
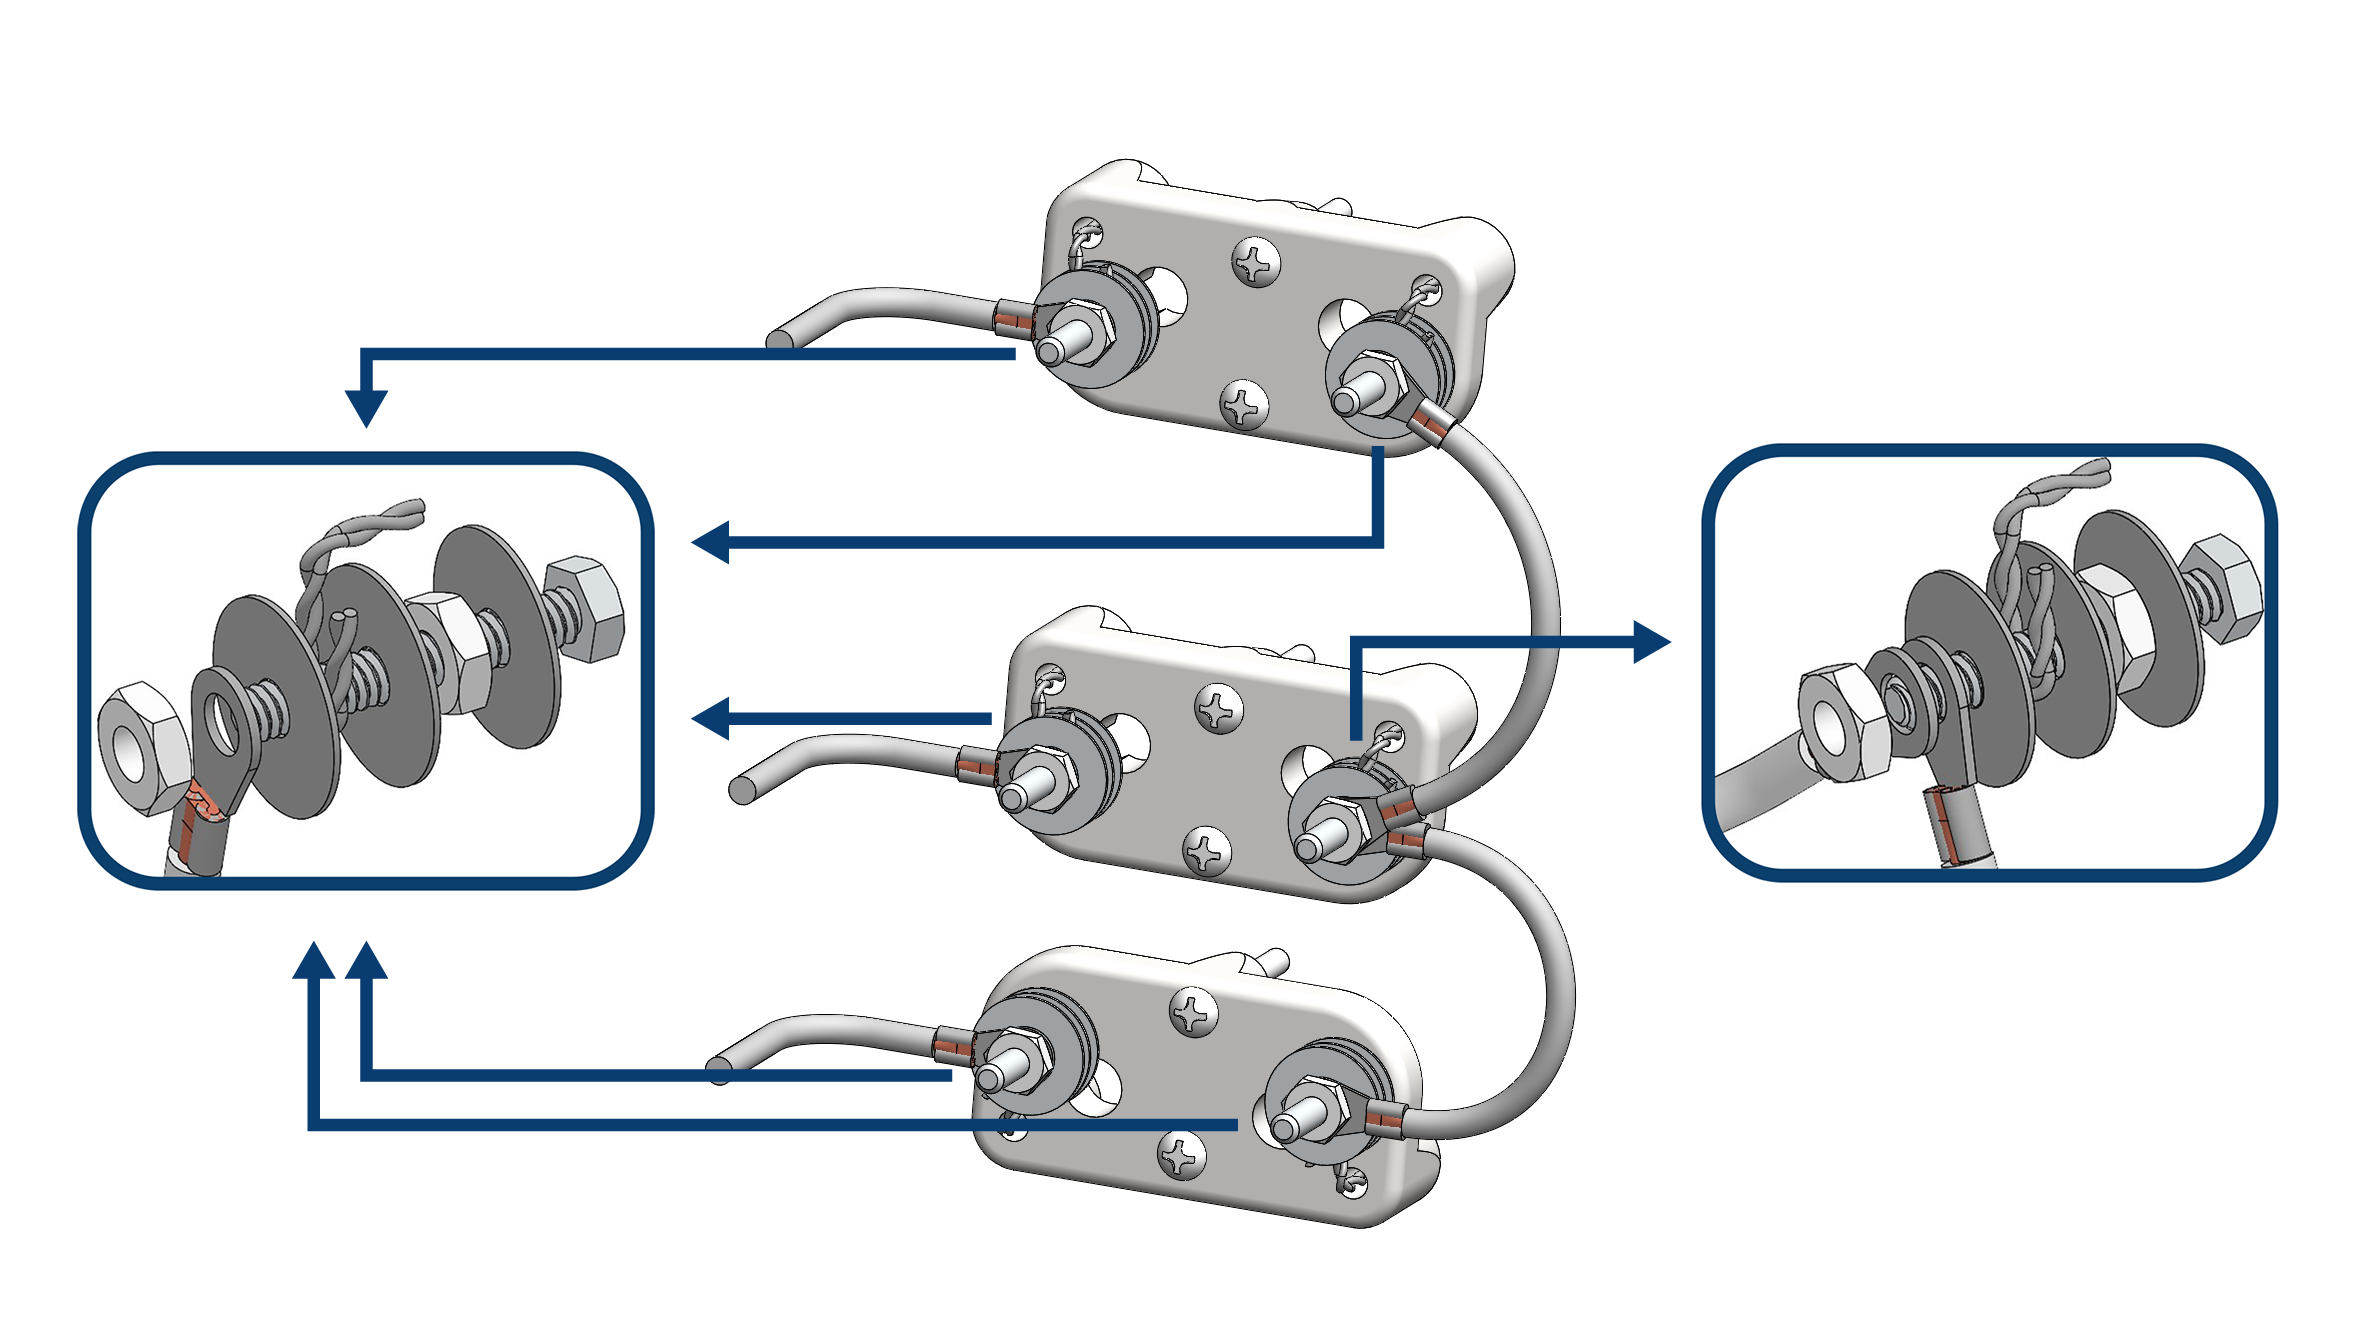
Standard terminal block with PARALLEL wiring
The Standard Terminal Block with Parallel Wiring is the most common configuration and what you are most likely to find in your kiln.
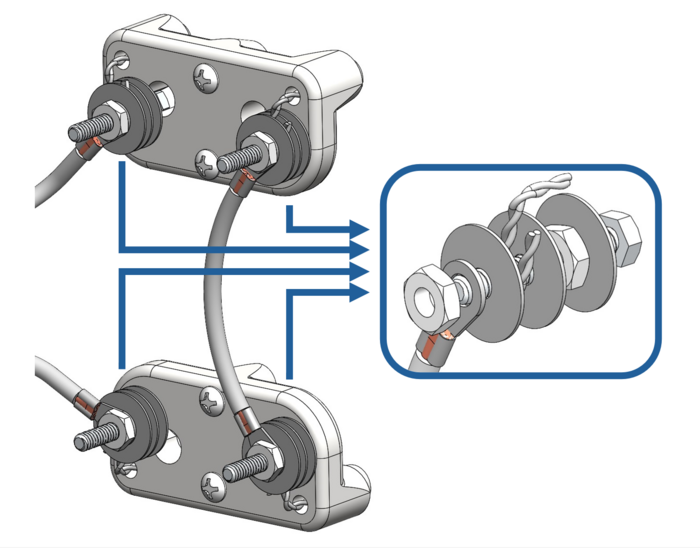
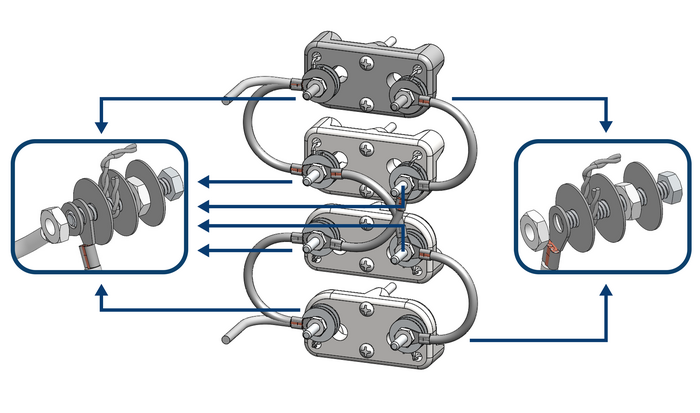
Standard terminal block with SERIES wiring
The Standard Terminal Block with Series Wiring is found on the JD230V and most 18” kilns, such as the e18T.
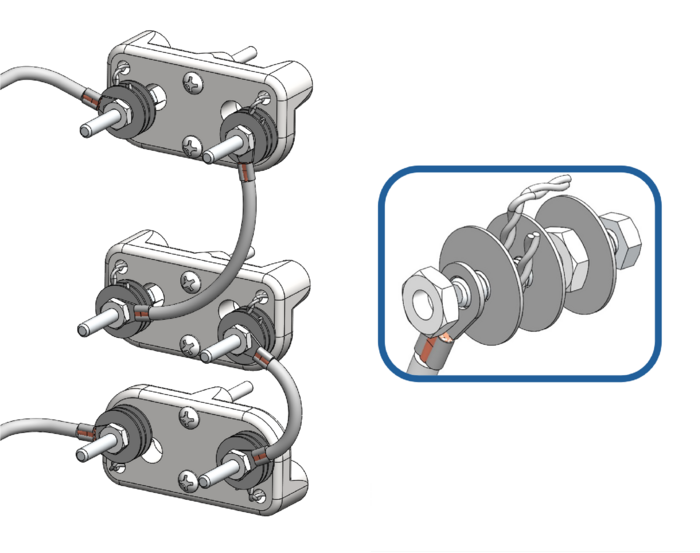
M-Series terminal block
The M-Series Terminal Block is found on the M-Series (middle section) Easy-Fire Kilns.
Easy-Load terminal block
The Easy-Load Terminal Block is found in Easy-Load kilns. These blocks feature a single Terminal bolt. However, there will be multiple Terminal blocks per section.
Universal terminal block with PARALLEL wiring
Our new Universal Terminal Block design will eventually replace the Easy-Load, M-Series, and Standard terminal blocks. The Universal terminal block with Parallel Wiring will become our most common configuration.
Universal terminal block with SERIES wiring
The Universal terminal block with Series Wiring will replace the Standard terminal block with Series Wiring and will be found on the JD230V, the PF8, and most 18” kilns, such as the e18T.
Universal terminal block with SERIES wiring - Triple Groove Kilns
This configuration applies to triple groove kilns with series wiring.
Universal terminal block with PARALLEL wiring - Triple Groove Kilns
This configuration applies to triple groove kilns with parallel wiring.
Universal terminal block with PARALLEL wiring - Triple Groove 480V Kilns
This configuration applies to triple groove kilns with parallel 480V wiring.
Universal terminal block with PARALLEL wiring - Quad Kilns
This configuration applies to Quad kilns with parallel wiring.
Universal terminal block with SERIES wiring - Quad Kilns
This configuration applies to Quad kilns with series wiring.
Universal terminal block with SERIES-PARALLEL wiring - Quad Kilns
This configuration applies to Quad kilns with series-parallel wiring.