
SAFETY APPROVALS & LISTINGS
Codes, UL499, Fire Codes
LOCAL CODES
- Local fire and safety codes supersede information that is provided in these installation instructions or in our caution instructions.
MET LISTING TO UL STANDARDS
- Many but not all kilns are listed to UL 499 Standards for both the US and Canada by MET (An NRTL - Nationally Recognized Testing Laboratory).
- The Vent-Sure vent is listed in both the US and Canada for use with L&L listed kilns by MET to UL 499, CSA C22.2, No. 122, CSA C22 standards. Listing No E112742.
- If your kiln is listed it will have a listing mark on the data nameplate and on the wiring diagram. You can also check hotkilns.com/kiln-features/listed-ul499-standard-met/met.
NATIONAL ELECTRICAL CODE
- Ensure all kiln installations comply with the National Electrical Code, specifically that overcurrent protection must be rated at 125% of the kiln's maximum amperage draw.
- This requirement is designed to enhance safety by accommodating potential surges and nuisance disruptions.
- See the NEC entry on Wikipedia.
NATIONAL FIRE PROTECTION ASSOCIATION
- The NFPA has nothing specific about the installation of kilns. The NFPA 86 goes into considerable detail about industrial furnaces and ovens but generally with respect to internal processes and gas-fired equipment.
- There is one section in the NFPA 86 (Section 2-1.5 concerning Floors and Clearances) that might be construed as applicable to kilns.
- This code requires that temperatures at combustible ceilings and floors be kept below 160°F (71°C).
- In general the NFPA recommends installing furnaces on noncombustible surfaces and has specific requirements if this is not possible.
- You can order a copy of this by going to their web site at www.nfpa.org.
UNIFORM MECHANICAL CODE
- Section 920.0 specifically discusses Small Ceramic Kilns and their installation.
- Some of the clearance information from this section is detailed later on this page.
- However, it is best to refer to this book for complete details. This is published by the International Association of Plumbing and Mechanical Officials and can be purchased online at iapmomembership.org.
CLEARANCES & SURFACES
Distances and materials
GENERAL DIMENSION DRAWINGS
-
Download the General Dimension Drawing for your kiln model from our website. Find the "Drawing" button on your kiln model page. This drawing provides all necessary dimensions, clearance information, and BTU ratings for HVAC design.
Clearances in Kiln Room:
- Maintain an 18" clearance from all walls.
- Ensure the floor is non-flammable.
- The Uniform Mechanical Code 2000 Edition states: "Sides and tops of kilns must be at least 18 inches (457 mm) from noncombustible walls and 3 feet (914 mm) from combustible walls."
- The National Fire Protection Agency states that temperatures at combustible ceilings and floors should be kept below 160°F (71°C) near industrial furnaces, including kilns.
- L&L's testing found safe temperatures 12" from kiln walls. However, 12" clearance may violate the Uniform Mechanical Code and local fire codes.
- Lining your walls with heat-resistant material is also a good idea.
- Check temperatures on the walls and floor when your kiln is at its highest temperature and longest soak for assurance.
Wall Materials:
- Check local building codes for recommended non-combustible wall materials near the kiln.
- Options include cement board, cinder blocks, and masonry tile.
Floors:
- The Uniform Mechanical Code 2000 Edition states: "Kilns must be installed on noncombustible flooring of at least 2 inches (51 mm) of solid masonry or concrete extending 12 inches (305 mm) beyond the kiln base or supports."
- Recommended floor surfaces are cement, ceramic tile, stone, slate, cinder blocks, or brick.
- Do not install on wood floors or carpet. Vinyl flooring may be combustible. Protect linoleum flooring from discoloration with a noncombustible covering.
- Be cautious about these recommendations. Kilns produce heat over long periods, which could start a fire. Overfiring can cause materials to become super-heated and electrically conductive, potentially melting through the kiln floor and igniting combustible flooring.
- Continuous kiln heat can dry out combustible surfaces over time, lowering their flash point.
- NFPA 86 requires keeping temperatures at combustible ceilings and floors below 160°F (71°C). NFPA recommends installing furnaces on noncombustible surfaces and specifies requirements if this is not possible.
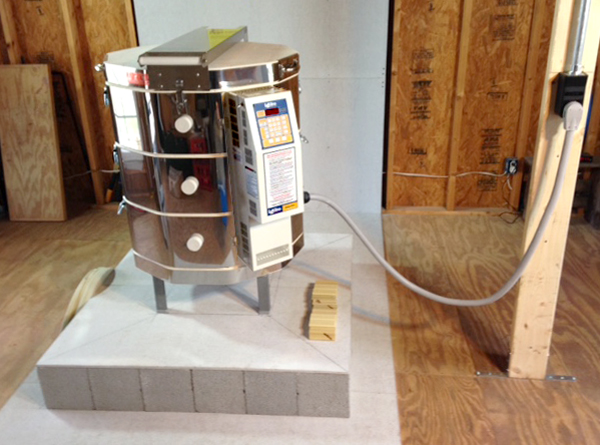
A nicely done simple but safe kiln installation done by Virgil Lawrence in Calico Rock, Arkansas
Use the Supplied Kiln Stand:
- Always use the factory-supplied stand.
- L&L stands typically raise the kiln floor by 8" (20 cm) (The stand on the Plug-n-Fire is shorter)
- Air circulation under the kiln is critical to prevent heat conduction to the floor, which could cause a fire. Even non-combustible floors, like cement, can become inefficient if the kiln is placed directly on them.
- Proper stands prevent radiant heat from causing fires. Over time, radiant heat can dry out wood and lower its ignition temperature, making it more flammable.
Other Clearances:
- Ensure there is adequate clearance to open the kiln lid and perform maintenance tasks such as opening the element connection boxes, control panel, and replacing thermocouples. An 18" to 24" clearance around the kiln's outside wall is usually sufficient.
- Combustible surfaces that stay below 71°C (160°F) are generally safe from starting a fire, but it is recommended to keep surface temperatures near the kiln under 52°C (125°F).
KILN ROOM ENVIRONMENT
Keep Kiln Dry and in Protected Space:
- Keep the kiln in an enclosed room away from bad weather.
- Ensure the electrical circuits stay dry.
- If the kiln gets wet, dry it thoroughly before using it.
- Kilns corrode quickly in rooms without climate control due to temperature changes causing dew on cold metal.
- Salt air exposure speeds up corrosion.
- Poor ventilation during firing allows corrosive fumes to damage metal, wiring, and firebrick. This damage is not covered by warranty.
Ambient Temperature:
- Operate the kiln in a temperature range of 0°F to 100°F.
- Keeping kilns in unheated garages or sheds is okay if the space is dry.
- The DynaTrol and Genesis controllers work from 32°F to 125°F. They can handle temperatures below 32°F, but set the control to Fahrenheit, not Celsius, to avoid issues.
- At low temperatures, the kiln's heat will warm the control for accurate operation.
- At high temperatures, prolonged use above 125°F can degrade the electronics.
Surface is Hot and Can Cause Burns:
- Kiln surfaces can reach up to 260°C (500°F).
- Place a warning sign near the kiln about the high temperatures.
Children and Pets:
- Keep children and pets away from the kiln area to prevent accidental burns or other injuries.
- Install barriers or warning signs to restrict access to the kiln room.
Fire Extinguisher:
- Keep an appropriate fire extinguisher near the kiln and check it regularly.
- Consult local fire authorities for specific requirements like sprinkler systems or automatic foam extinguishers.
- Use a fire extinguisher rated for electrical fires, such as an ABC fire extinguisher.
Fire Sprinklers:
- If you have a sprinkler system, check the temperature rating and location of the sprinkler heads.
- Position sprinkler heads in the ceiling away from the kiln to prevent accidental activation during normal firing.
- Use the highest temperature-rated sprinkler heads allowed by code or consider using smoke-activated ones.
- Monitor the temperature when the kiln is at its highest firing temperature, especially with closed doors or the ventilation fan off.
- Accidental sprinkler activation at high kiln temperatures can cause severe damage, especially if the building is unoccupied.
Electrical Safety:
- Ensure all electrical connections are secure and meet local electrical codes.
- Use a dedicated circuit for the kiln to prevent overloading and potential fire hazards.
- Regularly inspect power cords and plugs for damage or wear.
Ventilation:
- Ensure proper ventilation in the kiln room to remove heat and fumes.
- Use a kiln vent system to reduce exposure to potentially harmful fumes during firing.
- Avoid blocking ventilation openings and maintain clear airflow around the kiln.
Kiln Maintenance:
- Regularly clean the kiln to remove dust and debris that can affect performance and safety.
- Inspect kiln elements and wiring for signs of wear or damage and replace as needed.
- Follow the manufacturer’s maintenance schedule for optimal performance and longevity.
Operational Safety:
- Never leave the kiln unattended while it is operating, especially during the final stages of firing.
- Use appropriate personal protective equipment (PPE) such as heat-resistant gloves and eye protection when loading or unloading the kiln.
- Avoid placing flammable materials near the kiln.
Loading and Unloading:
- Do not overload the kiln or place items too close to the elements.
- Ensure that all items are properly supported and balanced to prevent shifting during firing.
Emergency Procedures:
- Develop and practice an emergency plan for kiln-related incidents, including fire and electrical issues.
- Ensure all users know how to safely shut down the kiln in an emergency.
Fire Hazards:
- Keep flammable materials, such as paper, cloth, and chemicals, away from the kiln.
- Do not use flammable cleaning agents or solvents near the kiln.
Temperature Monitoring:
- Use a reliable thermometer or pyrometer to monitor kiln temperatures accurately.
- Ensure that temperature controls are functioning correctly to prevent overheating.
Proper Training:
- Ensure all kiln operators are properly trained in kiln operation and safety procedures.
- Provide clear instructions and guidelines for safe kiln use to all users.
KILN ADJUSTMENTS
Leveling the Kiln:
- Level the kiln during installation. (Suggestion: use a level)
- Use thin metal shims under the legs (never use wood or combustible materials).
- Some kilns have leveling bolts or pads.
- Ensure the base does not wobble.
Adjust the Hinge Properly:
- Refer to the assembly instructions for your specific kiln (links are on the Instruction Manual Index.
- Adjust the hinge to allow for expansion caused by heating.
- L&L includes expansion slots in the hinges (applies to top-loading kilns only).
Thermocouples:
- Insert thermocouples at least 1” (2.5 cm) from the inside surface of the kiln.
- Ensure the thermocouple tip protrudes into the kiln to avoid measuring lower temperatures, which could cause the kiln to fire hotter than the proper temperature.
- Replace thermocouples when they are no longer accurate (Type K thermocouples last about as long as kiln elements, so replace thermocouples when you preplace elements).
- When reassembling the kiln, carefully observe thermocouple polarity and zone placement. See hotkilns.com/tc-polarity.
VENTILATION
Venting the kiln and the room
See our ventilation page for ventilation requirements and suggestions
Ventilation is Essential:
- Kilns generate harmful fumes, including carbon monoxide, formaldehyde, sulfur dioxide, heavy metal vapors, and fluorides.
- Install the kiln in a well-ventilated area.
- Never operate in an enclosed space, such as a closet, without proper ventilation to avoid fire hazards and toxic fumes.
- Good ventilation minimizes severe corrosion caused by kiln fumes, salt air, or other environmental conditions.
- Ventilation must be to the outside.
- We recommend room ventilation of at least 25-50 times the cubic feet of the kiln per minute. For example, a 10 cubic foot kiln requires 250-500 CFM. See hotkilns.com/calculate-kiln-room-ventilation for precise heat removal calculations.
- Use a variable speed fan for ambient room ventilation and keep a thermometer on the wall to adjust ventilation as needed.
Ventilation for the Kiln:
- We recommend the VENT-SURE downdraft kiln vent system for effective fume venting, improved firing uniformity, and maintaining oxygen levels in the kiln.
- Refer to the separate instructions for the VENT-SURE vent system.
- The VENT-SURE is c-UL-us listed for use with L&L kilns. If UL listing is important, check with local authorities or the vent manufacturer for compatibility with your kiln model. More information is available at hotkilns.com/vent-sure.
ELECTRICAL INSTALLATION
How to Size the Electrical Circuit:
Voltage:
- L&L makes kilns for 208 volts, 220 volts, 240 volts, 380 volts, and 480 volts.
- Ensure the kiln is connected to the correct voltage.
- A 208-volt kiln on a 240-volt supply will generate too many amps and may cause a fire.
- A 240-volt kiln on a 208-volt supply will heat 25% slower and may not reach higher temperatures.
- Connecting a single-phase kiln to two legs of a three-phase supply causes an unbalanced load. Consult a qualified electrician. Use a three-phase kiln for a three-phase supply.
- All L&L kilns have a ground wire, which is not used as a neutral.
- Properly ground the kiln using the ground wire to ensure safety and control operation.
Hooking Up to Power:
- Most L&L kilns under 48 amps include a 6-50P plug (single phase) or a 15-50P plug (three phase). Kilns for markets outside North America do not include a cord.
- Have an electrician install the proper receptacle and safety switch. Ensure fuse ampere capacity and power lines are adequate.
- Follow lockout/tagout procedures in industrial or institutional settings.
Direct Hook-Up Kilns:
- Kilns over 48 amps are directly wired to a fused disconnect or circuit breaker panel.
- Some kilns under 48 amps are also direct hook-up.
Changing to Direct Hook-Up:
- L&L power cords are rated for 105°C. Lower-rated cords can malfunction and cause fires.
- Removing the plug and direct wiring the kiln is acceptable and will not void the warranty. Use connection wires rated for at least 105°C.
Installing a Plug Receptacle:
- If the kiln comes with a plug, install the receptacle so the cord hangs down, not up.
- Ensure the plug seats securely in the receptacle to avoid overheating and corrosion.
Plugs:
- L&L uses UL-listed NEMA 6-50P or 15-50P plugs and cords, rated for 50 amperes at up to 250 volts AC. The current-carrying conductors are 6 AWG, and the grounding conductor is 8 AWG.
-
This is a 6-50P Plug Configuration for single phase Easy-Fire and School-Master kilns.
-
This is a 15-50P Plug Configuration for three phase Easy-Fire and School-Master kilns
Note about Plug and Fuse Ratings:
- L&L Kiln uses a UL listed NEMA 6-50P or 15-50P plug and cord that is robustly designed, and marked for 50 amperes at up to 250 Volts AC, 1 Phase (or 3 phase for the 15-50P), with a grounding prong. The (2 or 3) current carrying conductors are 6 AWG, which according to the 2002 NEC (National Electrical Code) Table 400.5 for flexible cables have an allowable ampacity of 55 amperes, and the grounding conductor is 8 AWG, which does not normally carry any current. The plug, or cap, is designed and constructed so that there are no exposed current-carrying parts except for the prongs, which only carry current when the plug or cap is safely inserted into its mating receptacle.
- This plug and cord set is UL listed for carrying 50 amperes at the proper voltage and phase. All L&L kilns which use these plugs and cords are also UL listed as complete appliances, with the ratings as listed in L&L Kiln Mfg, Inc., catalogs. When installed, the circuit that supplies power to the kiln must be designed per NEC requirements, and in many cases must be provided with conductors and overcurrent protection rated for 60 amperes, or 125% of the ampere listing of the kiln. (E.g., the E23T is listed at 48 amperes. 48 * 1.25 = 60 ampere rating for overcurrent protection and power supply conductor rating.) This may initially create some confusion, but remember that the kiln is UL listed with the NEMA 6-50P plug and cord set as a component of the appliance - it is the power supply circuit that must be protected at 125% of the listed rating, not the individual components inside the appliance.
Protect Power Cord from Kiln Case:
- Route the cord away from the hot kiln case and secure it to prevent contact. Contact with the hot case can cause melting, short circuits, or fires.
Use a Fused Disconnect:
- Install a separate fused disconnect box with a lockout provision near the kiln.
- This allows easy power shutoff and prevents unauthorized use.
- Frequent unplugging can weaken outlet spring tension. A fused disconnect switch provides a reliable power-off method.
Locate Kiln Within 50 Feet of Breaker:
- Position the kiln within 50 feet of the breaker box. Longer runs may require larger hook-up wires. Ensure a licensed electrician follows the National Electrical Code.
Fusing Your Circuit:
- Have an electrician follow the National Electric Code and local requirements. The kiln's full load amps are listed on the data nameplate.
Use Proper Grounding:
- Ensure proper grounding and testing by an electrician.
- Grounding can be to a cold water pipe or system ground in the building. Proper grounding prevents electrocution and handles high voltage safely.
- Replace any deteriorated wires due to heat and wear over time.
Use the Proper Wire Gauge:
- Refer to electrical specifications for hook-up wire sizes, which vary by ambient temperature and wire length.
- Running power over long distances results in voltage drops. These estimates are dependent on the kiln operating at 50% to 100% of its capacity, with the temperature of the wire no more than 167°F.
- 7 volts per 100 feet with 10 awg wire
- 21 volts per 300 feet with 10 awg wire
- 6 volts per 100 feet with 6 awg wire
- 18 volts per 300 feet with 6 awg wire
- 3 volts per 100 feet with 1 awg wire
- 9 volts per 300 feet with 1 awg wire
Use Copper Wire for Hook-Up:
- Do not use aluminum wire. Aluminum wire can cause oxidation, leading to overheating and fires. Braided copper wire is preferred.
- This is of particular importance with kilns not to use aluminum wire for the hook ups.
- The specific reason particular to kilns is that the wire tends to get hotter near the kiln than it might going into some other types of appliance.
- Also, being a resistive load, there is constant heat being generated by the conductors.
- When aluminum wire gets hot it accelerates oxidation. Aluminum oxide is a resistor; copper oxide is not as much. If the connection at the terminal board gets oxidized it will really heat up - to the point where it could cause a fire.
- Braided copper wire is preferred.
Do Not Use Extension Cords:
- Only use extension cords for the 120-volt vent system.
- Do not use high-power extension cords for the kiln.
- A long wire can act as a resistor and get hot.
Off-Peak Electrical Usage:
- Some utilities offer special rates for running energy-intensive appliances like kilns during off-peak hours.
- Check with your local utility. This would require a special time-of-use electrical meter.
Where to Get More Information:
- See ELECTRICAL THEORY AND APPLICATION FOR ELECTRIC KILNS for a complete description of electrical theory, fusing, hook-up wire sizes, etc. as they apply to kilns.
- Refer to hotkilns.com/support/electrical-troubleshooting for basic electrical information.
Electrical Specifications:
- See your wiring diagram and data nameplate for voltage and amperage requirements.
Balanced Three Phase Circuits
- Three-phase circuits are balanced on kilns with three sections (27" high). This is not true for 18", 22", 36" or 45" high kilns unless they are specially designed.
Final Checklist
Voltage, Phase, and amperage capacity
[ ] - Voltage has been checked by an electrician or is known with absolute certainty
[ ]- I have checked the amperage rating of the kiln with the intended voltage and checked (or had an electrician check) to see that I had enough amps available in my building power supply
Ventilation
[ ]- I have a room fan
[ ]- I will also be using a kiln vent
[ ]- I am going to manually vent the kiln but I have adequate room ventilation for this.
Flammability issues
[ ]- I can install the kiln at least 12” away from any wall.
[ ]- My kiln room floor is non-flammable.
[ ]- I will use an insulated floor and check temperatures when the kiln is at its highest point
[ ]- I have a dedicated fire extinguisher or sprinkler system for the kiln room or kiln.
Safety standards & codes
[ ]- UL499 listing is required.
[ ]- UL499 listing is not required.
[ ]- You are using a licensed electrician who knows the National Electrical Code and any other local codes.
Other Safety Issues
[ ]- Children will be adequately protected from the hot kiln.
[ ]- There will be a wall or other permanent fixture to attach the kiln lid safety chain (on the Jupiter kilns) to a nearby wall or post. (This is self-contained on the DaVinci kilns).
Other accessories
[ ]- I have checked into my need for shelves
[ ]- I have decided about gloves and glasses