

Vent-Sure Kiln Downdraft vent Instructions
REV: 2/1/2025
Introduction
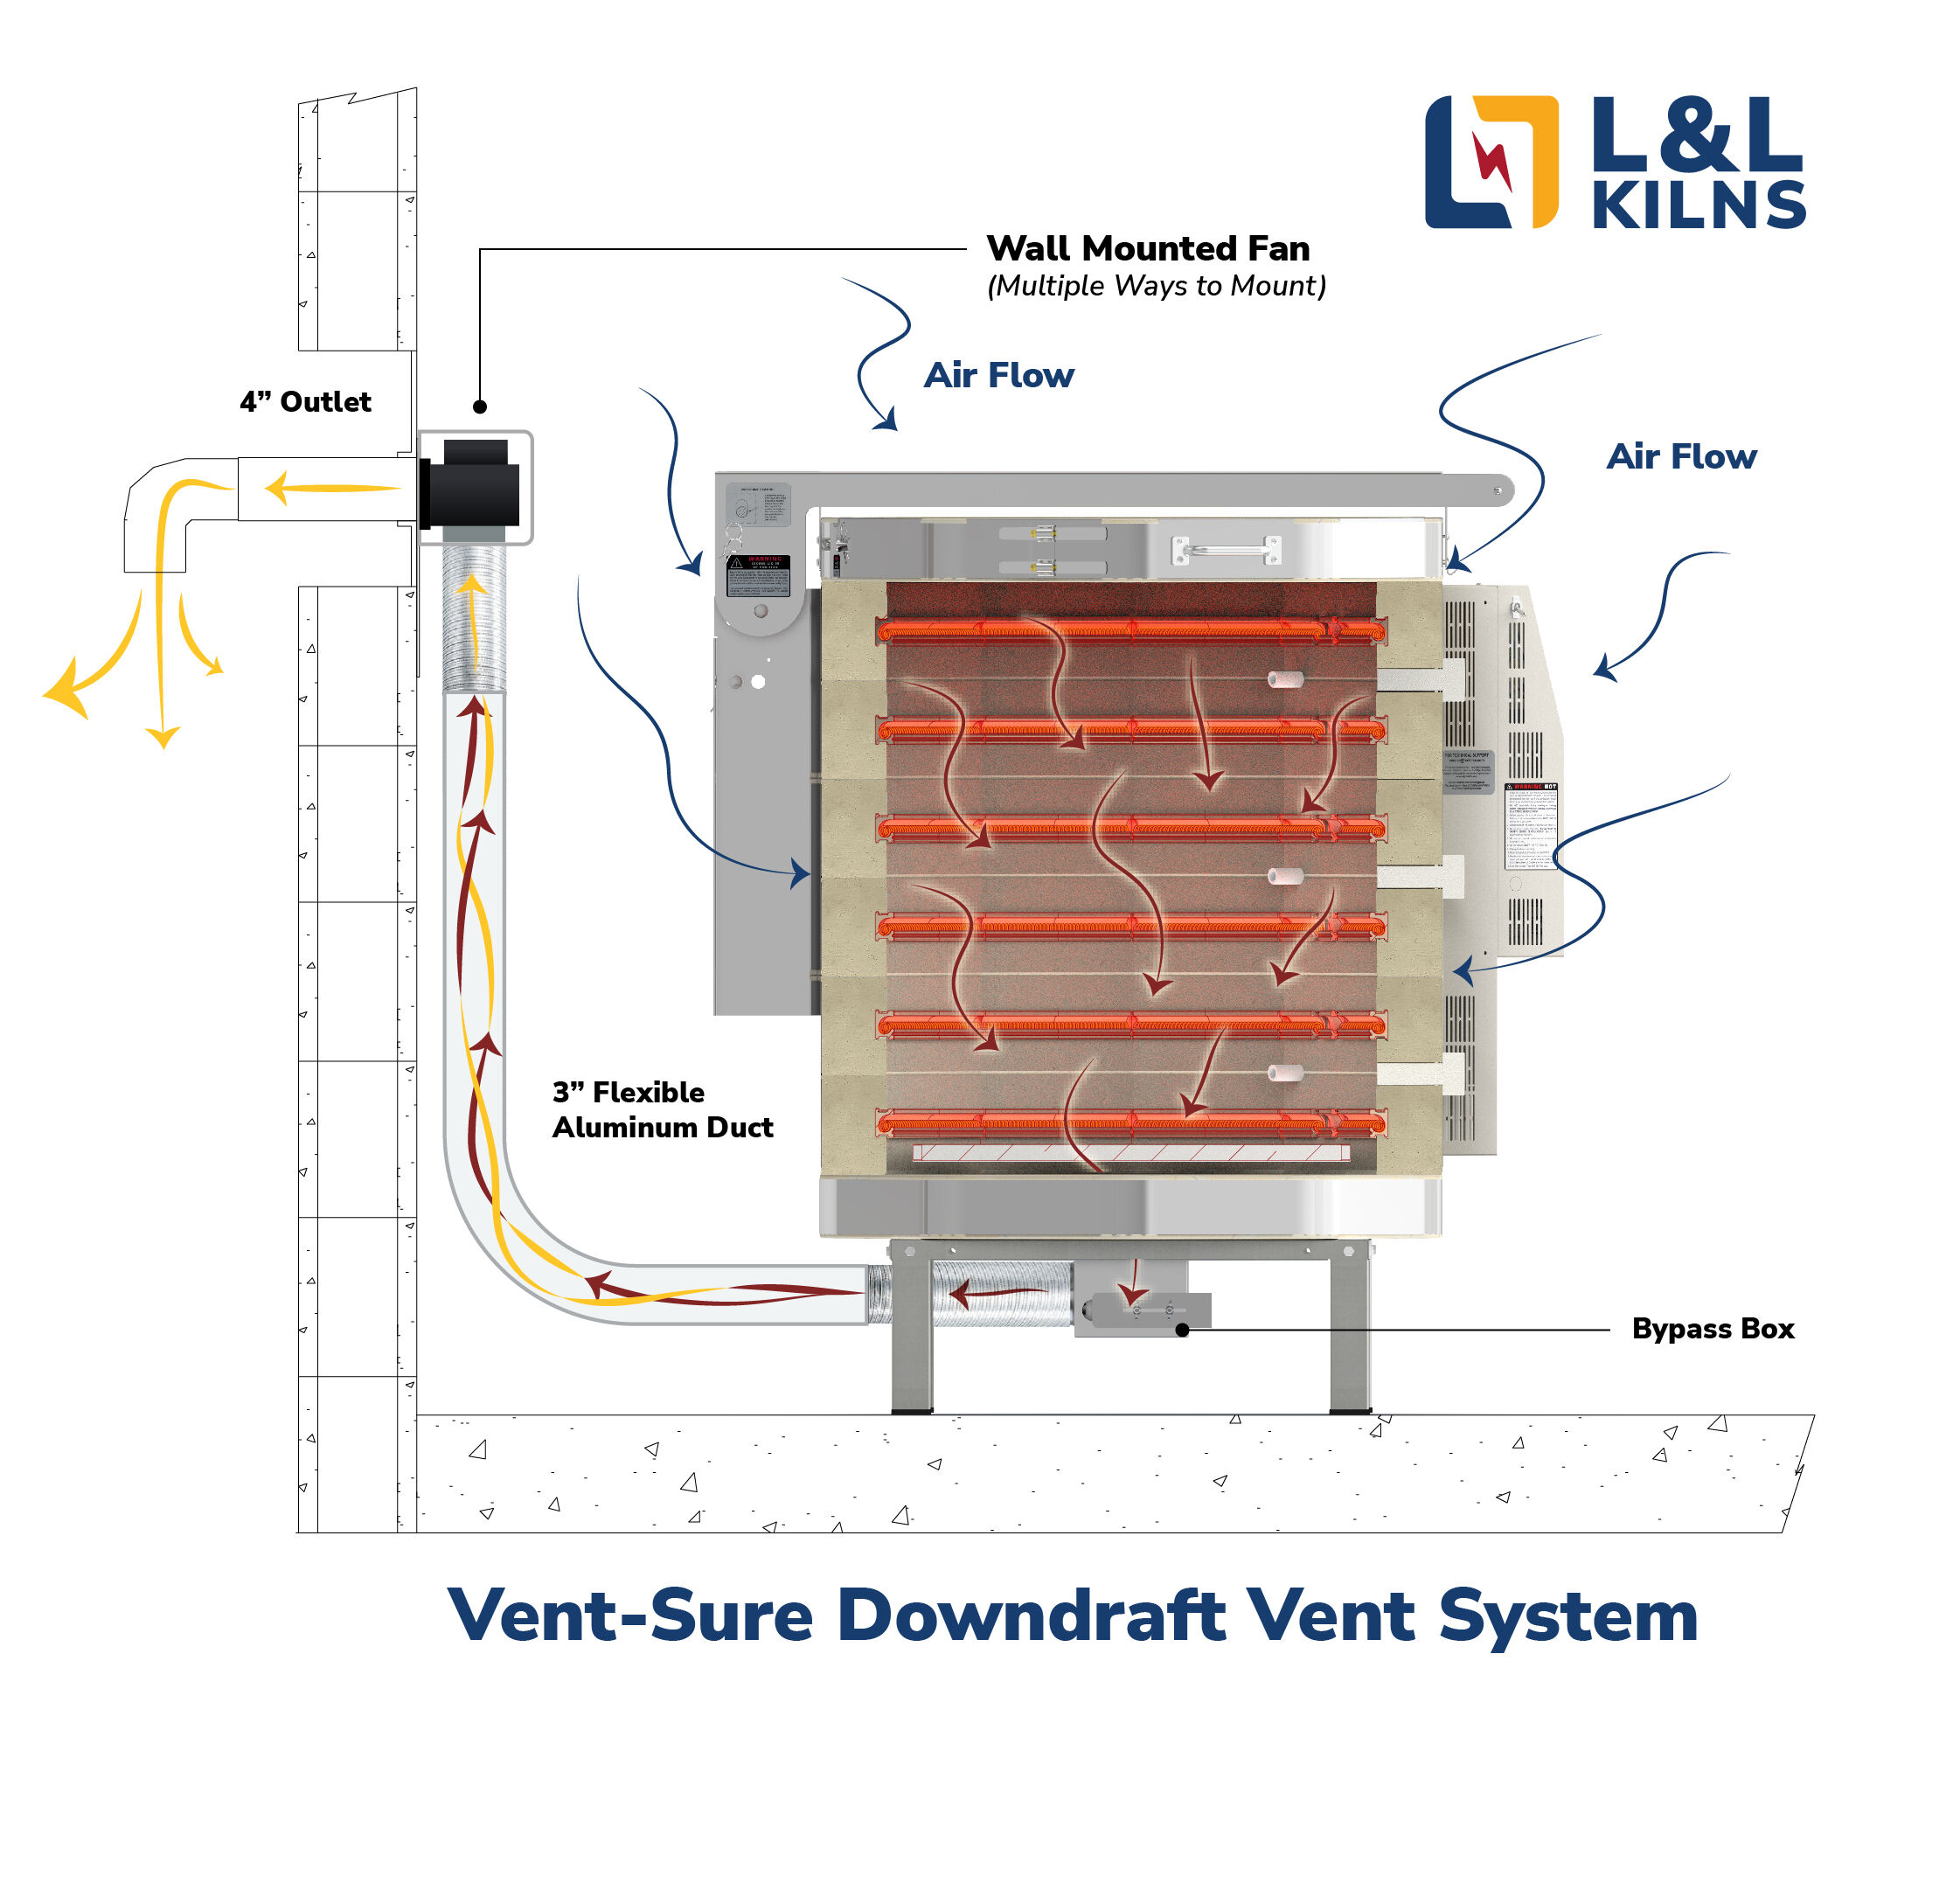
The Vent-Sure Downdraft Vent System is designed to safely remove harmful fumes from your kiln and help maintain a healthier firing environment. By venting directly from the kiln’s chamber, the Vent-Sure offers many benefits:
- Removes Harmful Fumes: Effectively extracts carbon monoxide and other toxic gases produced during firing.
- Prevents Corrosion: It reduces the exposure of kiln components and wiring to corrosive fumes, extending kiln and element life.
- Improves Firing Uniformity: Promotes even heat distribution by counteracting the natural upward rise of hot air.
- Enhanced Atmosphere: Maintains an oxygen-rich environment, improving glaze results.
- Energy Efficient: Minimizes wasted heat by allowing you to adjust how much air is vented.
- Code Compliance: The Vent-Sure is listed to UL499 and Candian Standards for use with L&L kilns.
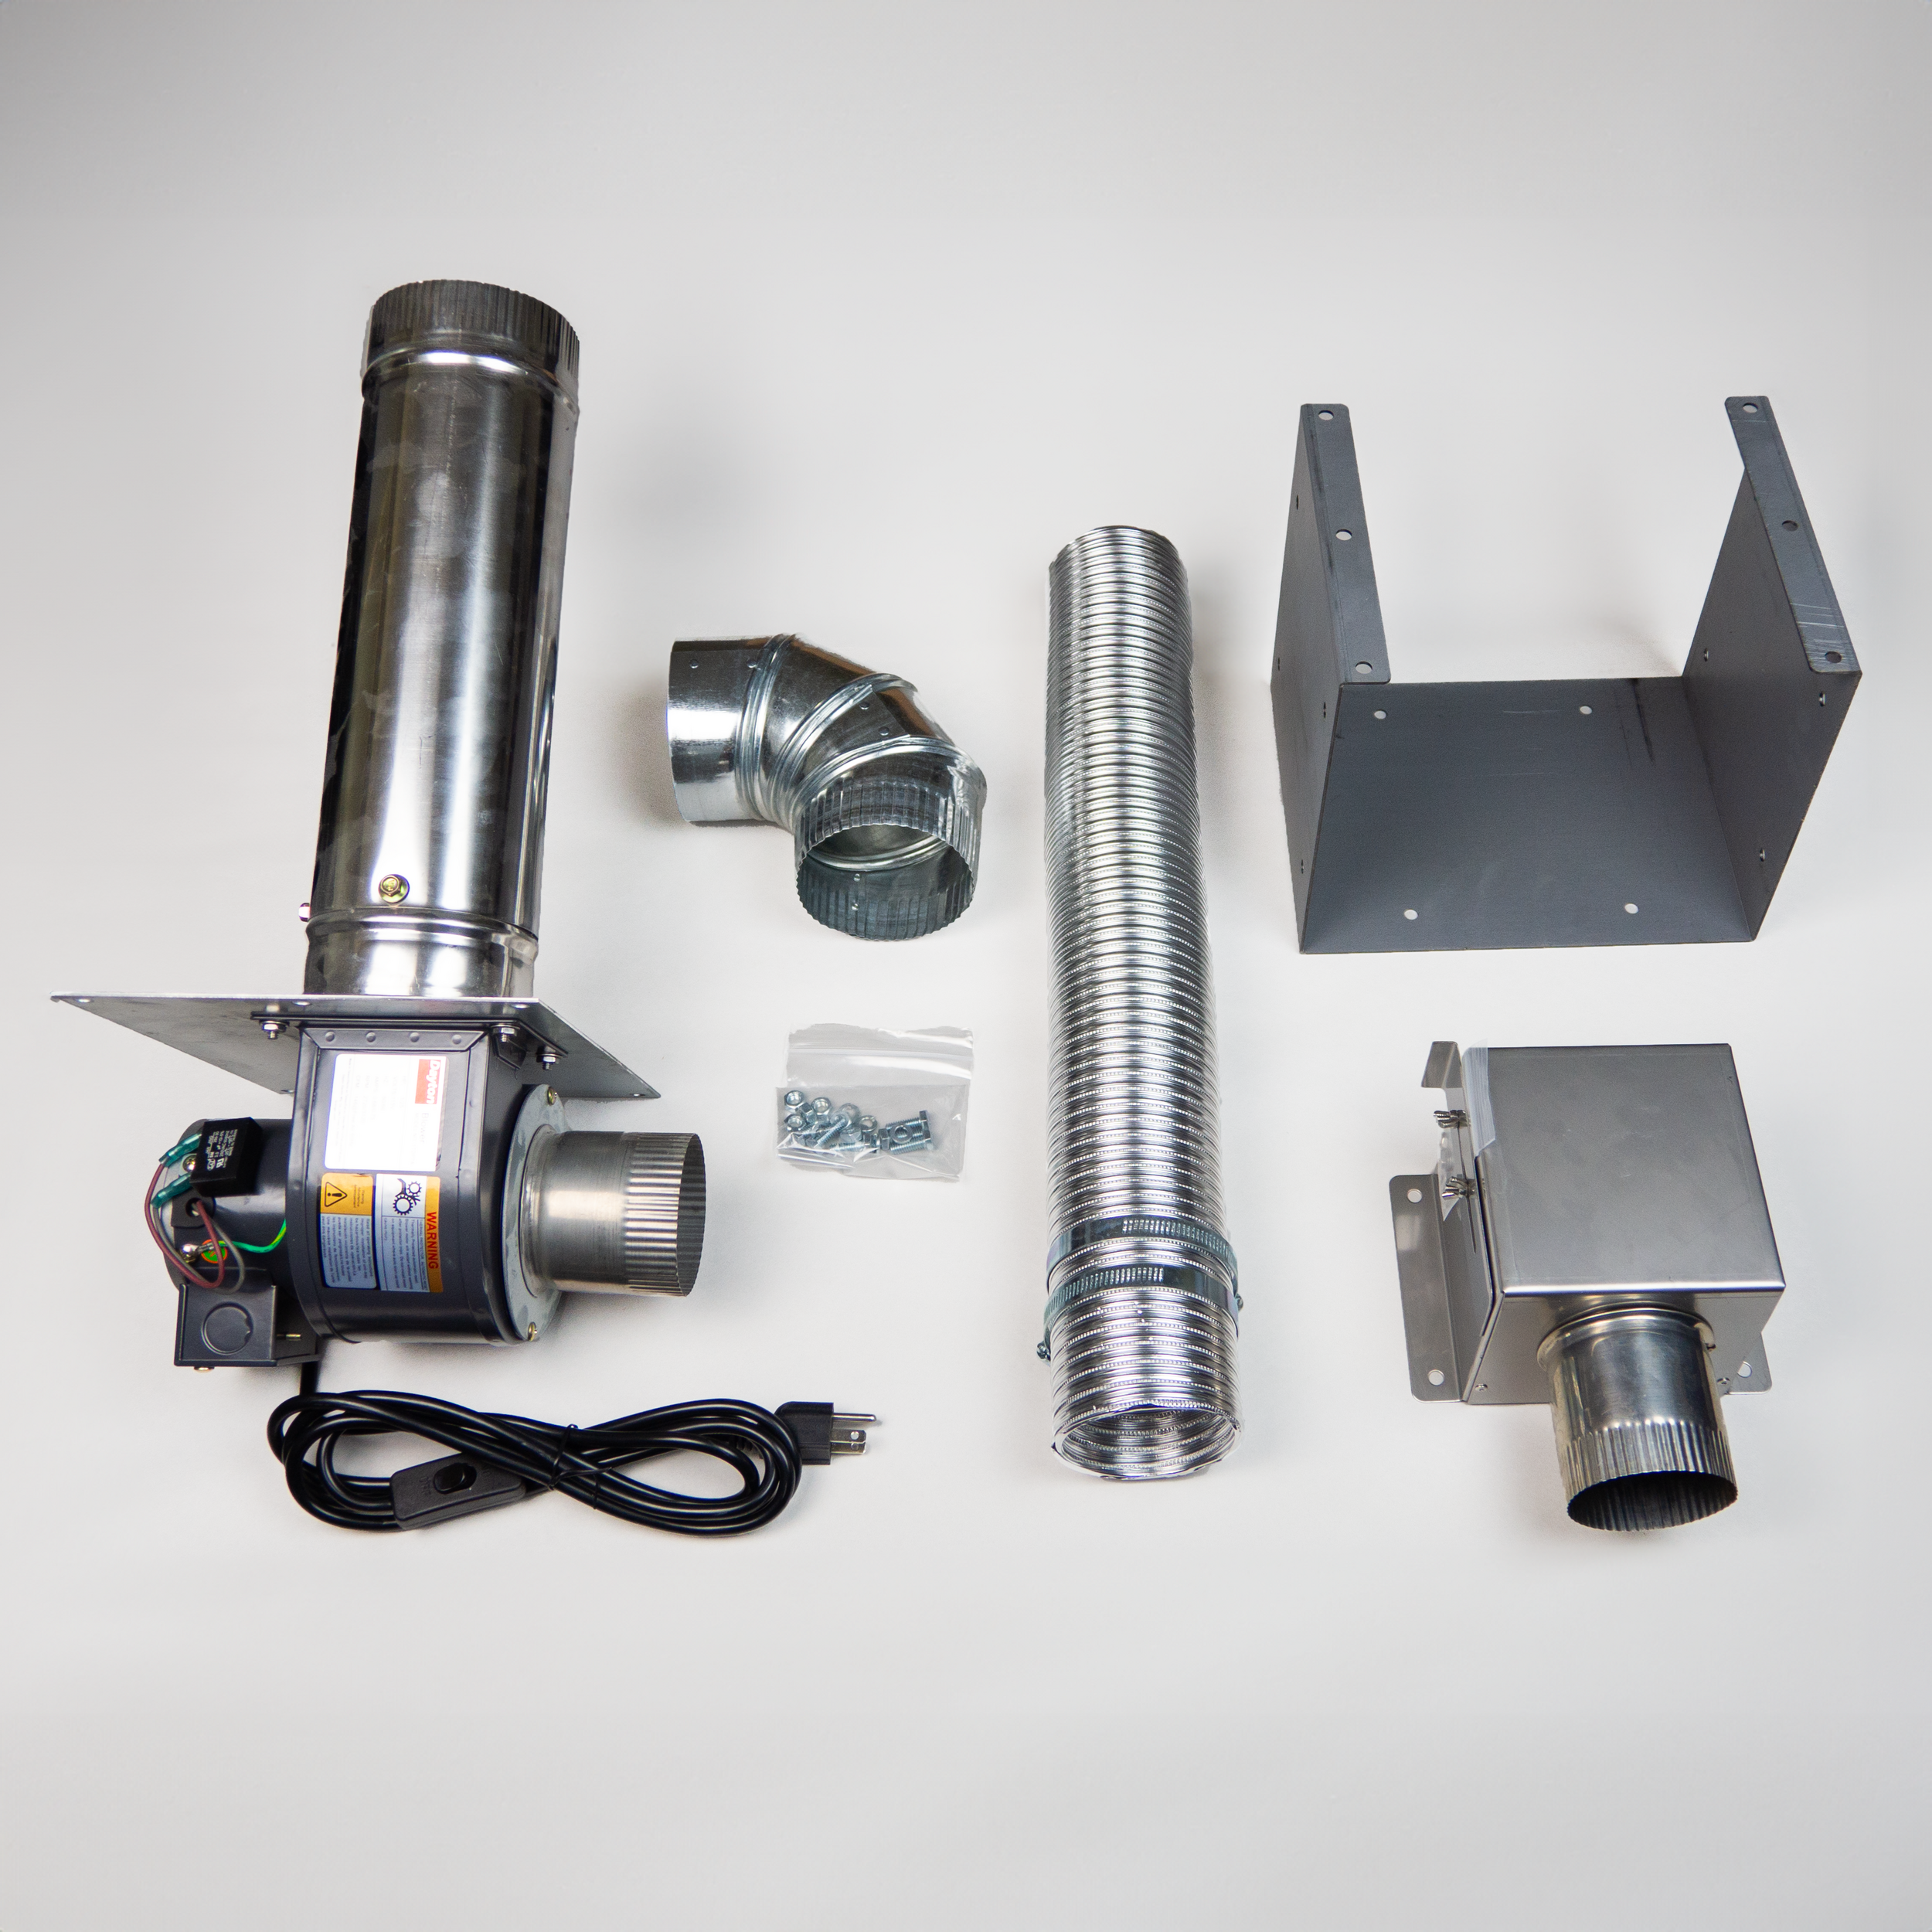
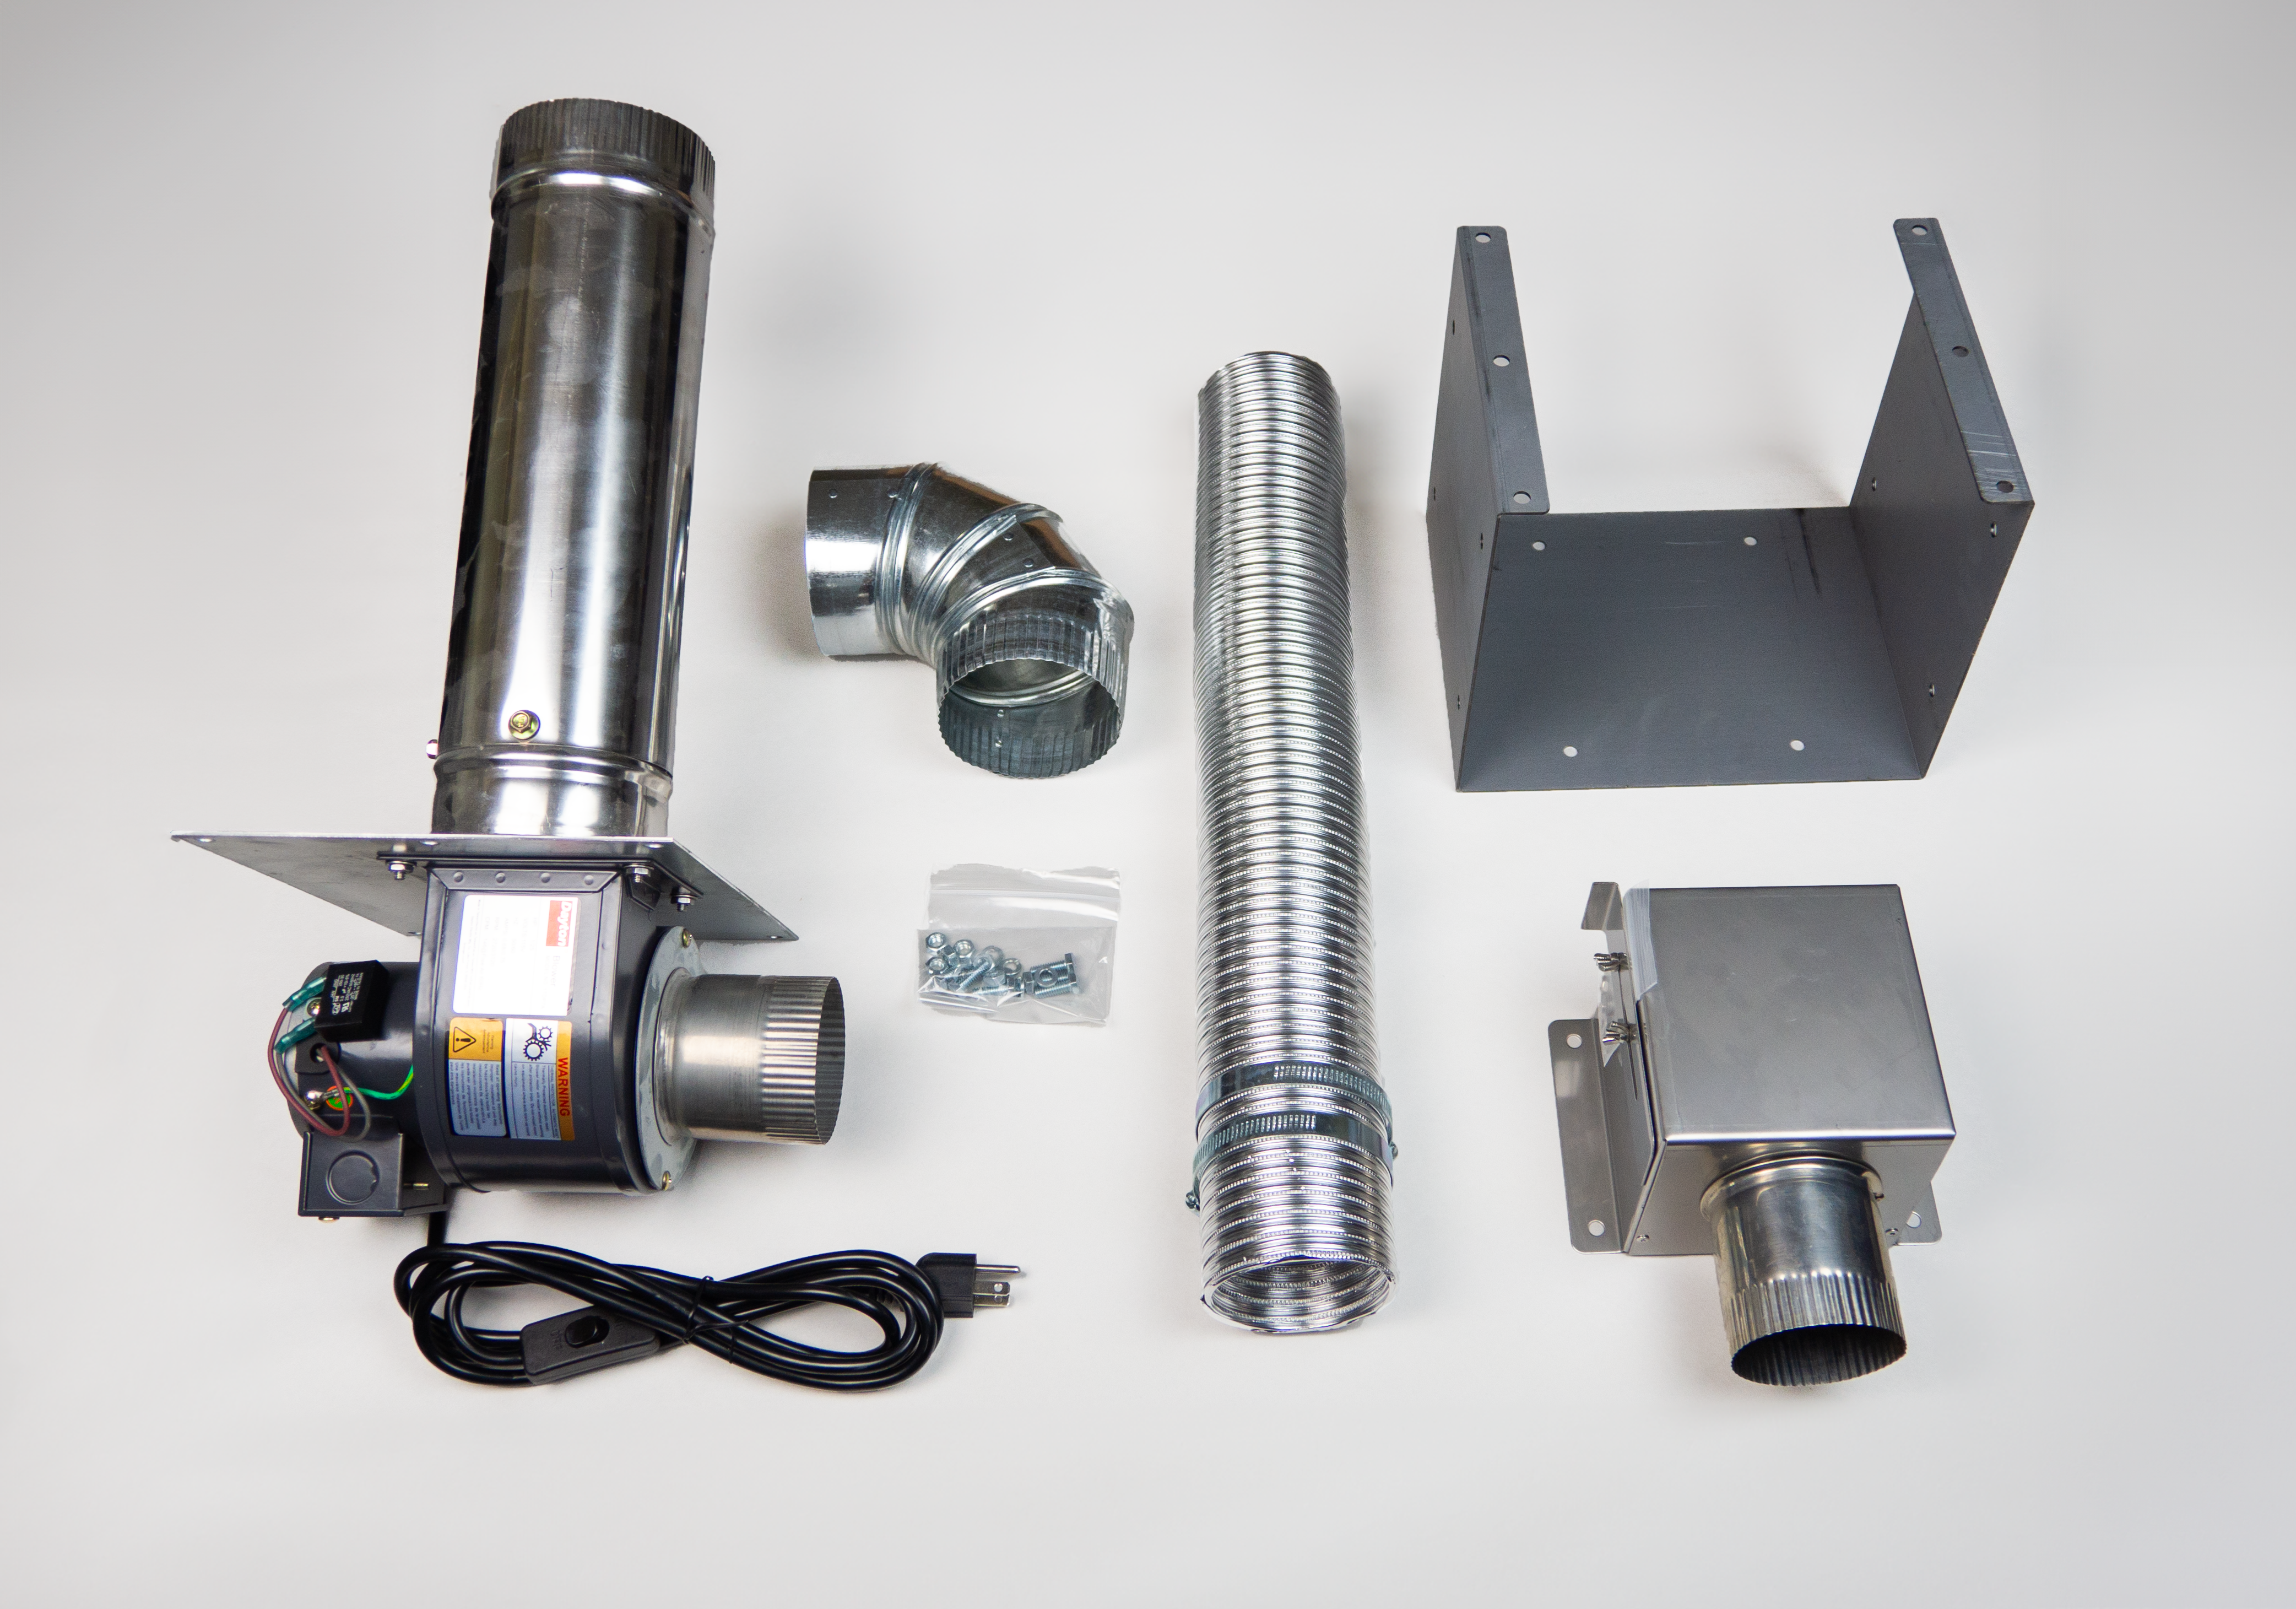
What’s Included
- Vent Blower Assembly: A wall-mounted blower with a 4-inch-diameter, 12-inch-long outlet pipe, 8-foot power cord, and built-in On/Off switch (120-volt standard; 220-240-volt models available).
- Bypass/Collection Box: This box mounts to the underside of the kiln stand and includes an adjustable slide for fine-tuning ventilation.
- Flexible Aluminum Duct: This is an 8-foot expandable duct with hose clamps. An optional 15-foot duct is also available.
- 90° Elbow for Exterior Venting: Directs exhaust downward outside the building.
- Multi-Mount Bracket: This bracket allows flexible blower mounting options—floor, wall, or vertical routing—to accommodate various installation requirements.
Installation

See https://www.youtube.com/video/tet-hSOqAuE

See https://www.youtube.com/video/EJCxVydGP4w

See https://www.youtube.com/video/AuWbXKTWjEc?si=CRBuVLOgxqTgFRem
IMPORTANT: Disconnect the kiln power before installing the vent on an existing kiln.
-
Drill kiln venting holes:
- The bottom slab should have pre-drilled venting holes if the kiln was ordered with a vent (on its original order from the factory).
- If the bottom slab does not have vent holes, drill them following the recommended hole size guidelines (one 1/4-inch hole per 4 cubic feet).
- Ensure the holes are located in the center of the slab, within the circular opening of the kiln stand.
-
Mount the Bypass Collection Box:
- If possible, do this before assembling the kiln on the stand. Once in place, it can be challenging to maneuver under the kiln.
- Secure the box to the studs on the underside of the stand using the provided hardware.
- Ensure the outlet of the box points towards your exhaust location.
- Attach one end of the flexible aluminum duct to the outlet and tighten the provided hose clamp. (Suggestion: do this before you mount the kiln on the stand because it sometimes takes some fitting to put the flexible duct over the bypass box outlet).
-
Install the Vent Blower:
- Depending on your specific circumstances, various ways to install the blower exist. Some options include:
- Create a 4-inch diameter hole through a stable exterior wall. Insert the outlet pipe through the opening and secure the blower to the wall with the attached wall mount bracket.
- Set the blower into a window with the proper support (like a sheet of plywood).
- Use the Multi-Mount Bracket for alternate routes, such as through a roof or into an existing hood vent.
- With the outlet pipe protruding outside, attach the included elbow pointing downward to keep rainwater out.
- Depending on your specific circumstances, various ways to install the blower exist. Some options include:
- Connect the flexible duct:
- Carefully extend the flexible duct from the bypass box to the blower system.
- Attach the other end to the blower's inlet and secure it with the provided hose clamp.
-
Power the Vent:
- Plug the blower cord into a 120-volt outlet (or appropriate outlet for 220-240 volt models).
- The blower draws low amperage and can be used with a grounded extension cord.
- Ensure the cord is not a tripping hazard or coming into contact with the side of the kiln.
Note on Vertical Installations:
If venting straight up, incorporate a condensation trap or drip leg to prevent condensation from dripping back into the motor.
Note on Hood Systems:
If you already have a canopy hood for room ventilation, you can conveniently vent the kiln into that hood. However, a hood alone does not improve kiln atmosphere or firing uniformity like a downdraft vent.
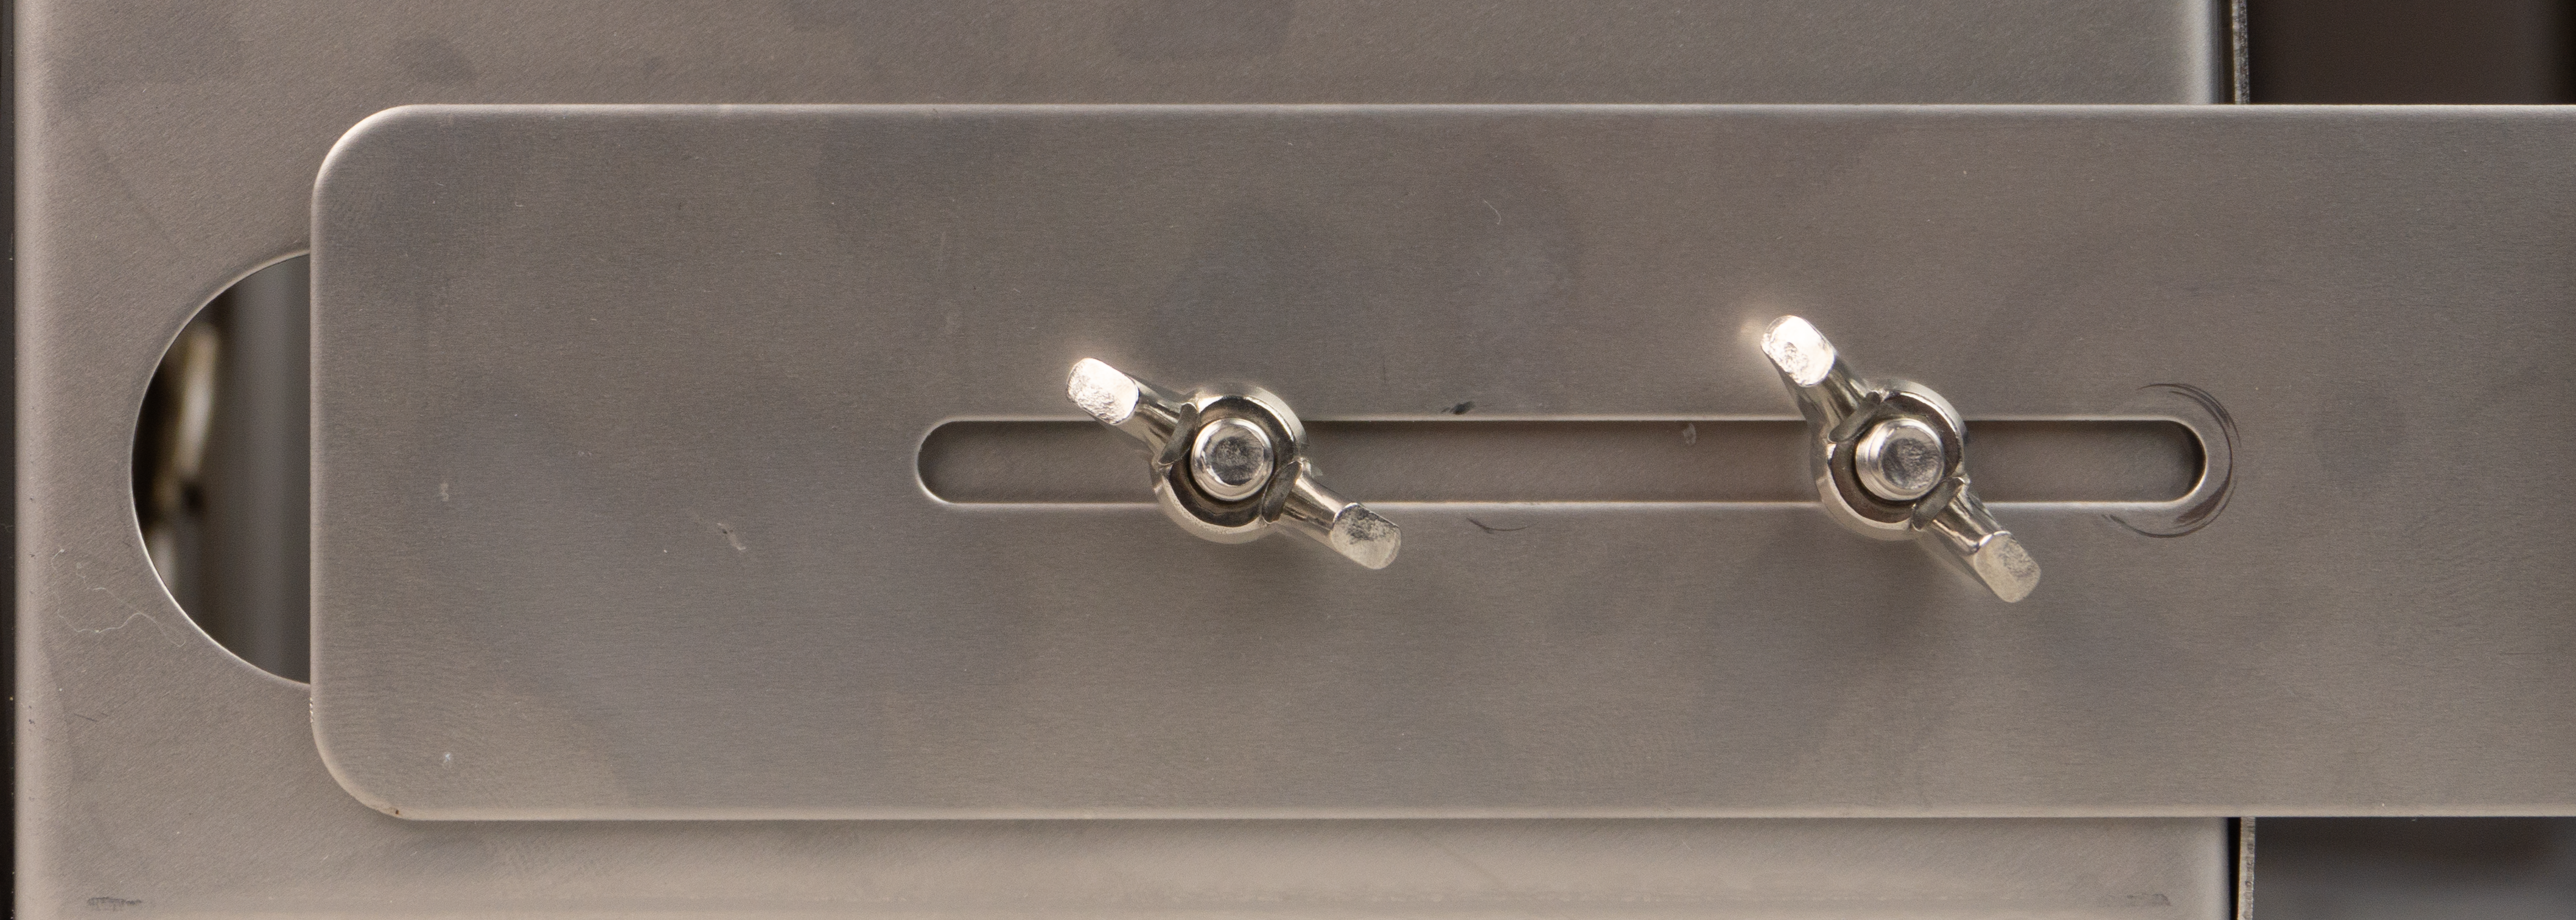
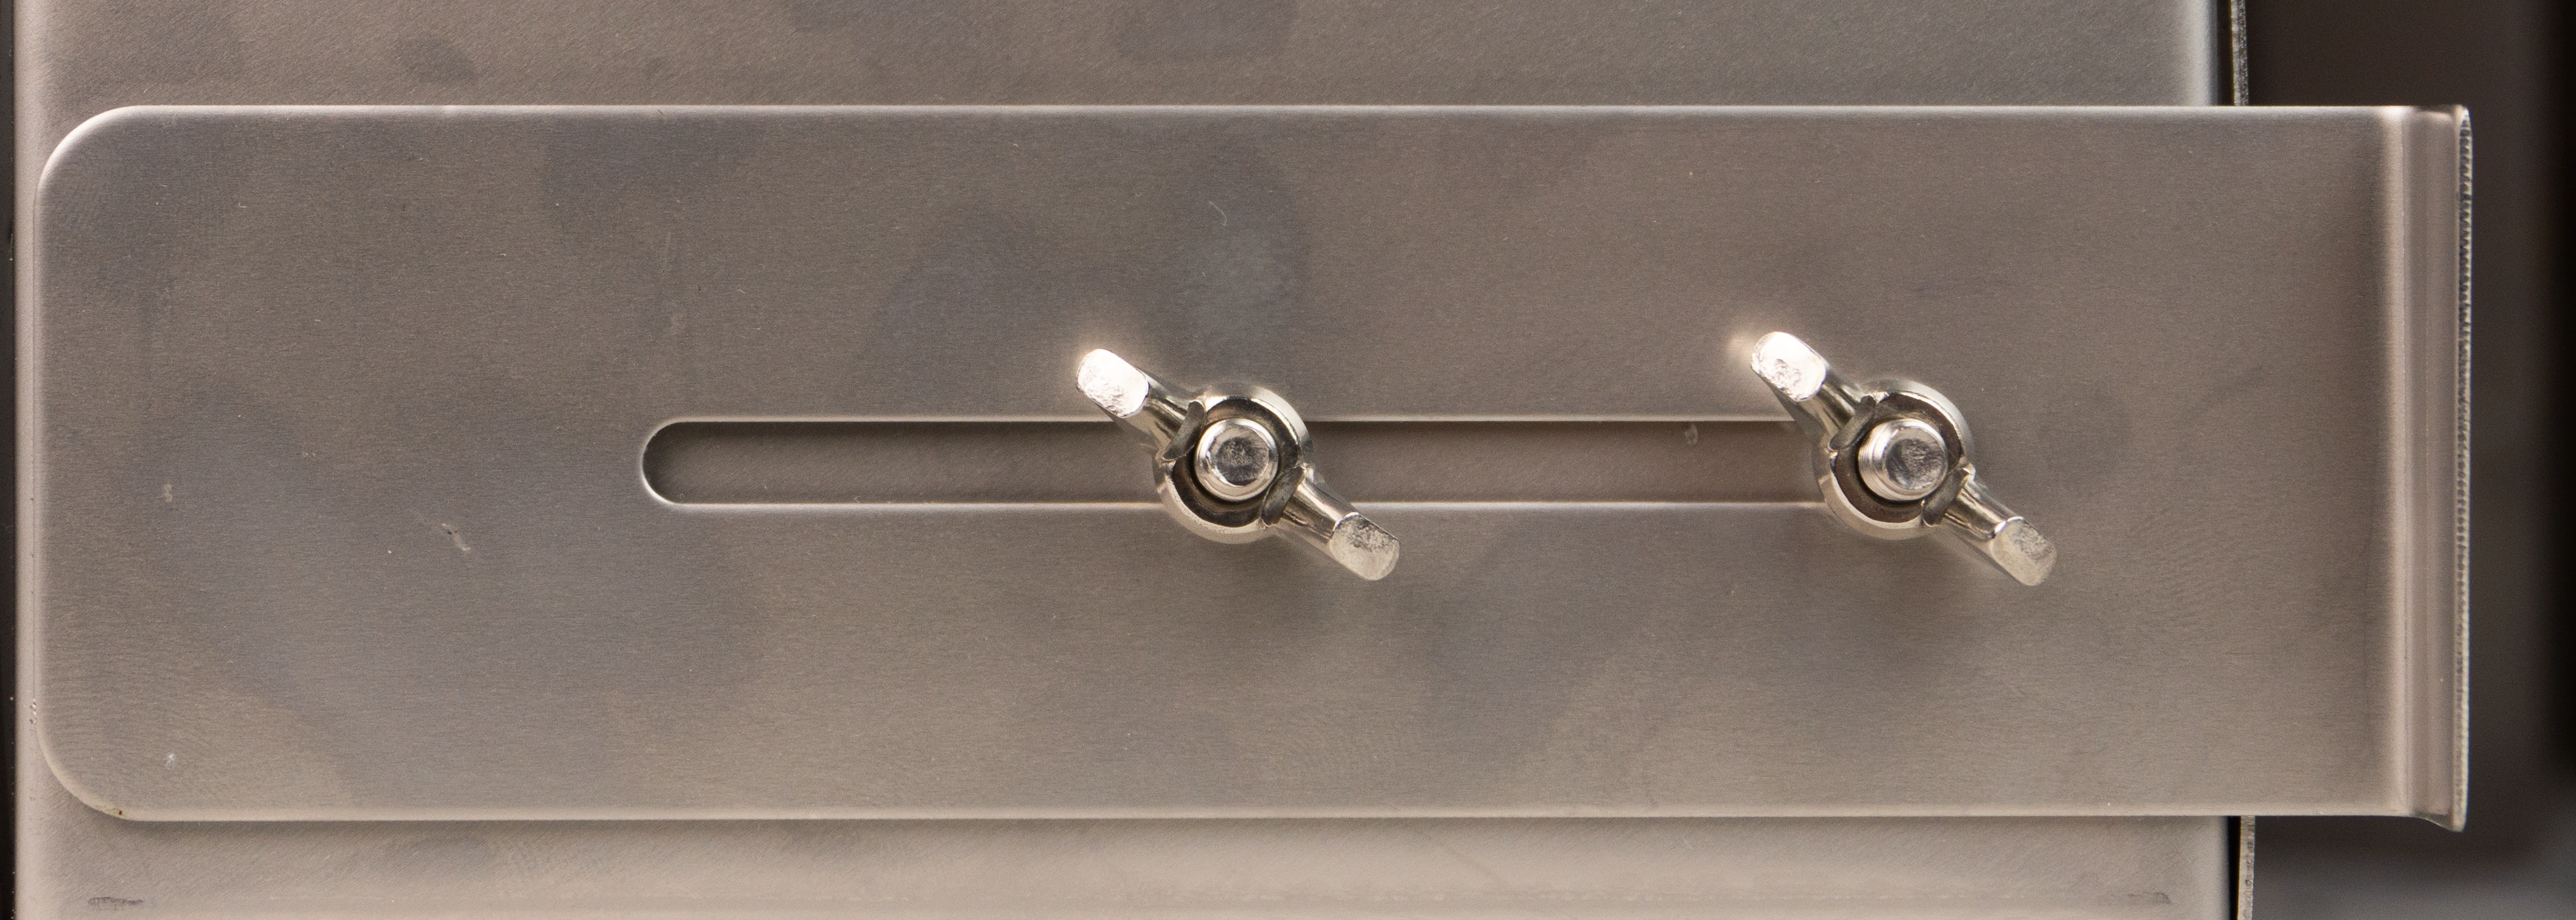
Adjusting the Bypass System
The Bypass/Collection Box allows you to fine-tune the amount of air the vent pulls from the kiln. This process may require experimentation, depending on clay composition, glaze chemistry, and duct layout.
Slider Valve:
The slider valve controls the amount of room air mixed with the kiln’s exhaust. Loosening the two wing nuts allows you to open and close the valve. Opening it reduces kiln suction while closing it increases it.
- Start Halfway: Begin with the slider valve halfway open.
- Incremental Changes: Close it slightly if you need more suction. If you need less, open it more.

Smoke Method for Testing Ventilation:
The smoke test helps confirm you have the right amount of airflow when setting up or fine-tuning your vent.
- Turn on the vent while the kiln is off, cool, and disconnected from power. Close the slider valve fully.
- Light a small piece of paper, blow it out, and hold the smoke near the lid’s cracks.
- If smoke is drawn inside, gradually open the slider valve until the smoke stops being pulled in, then close it slightly for a precise setting.
- If possible, repeat at about 100°F to confirm effectiveness under mild heat.
- Test near the kiln’s bottom vent holes as well, ensuring consistent airflow throughout.
When to Adjust:
After initial setup, you may need to readjust the slider valve over time. Some reasons for adjustment may include:
- Lingering Odors: If the room smells like kiln fumes after firing, close the valve slightly to increase suction.
- Slow Heating: If the kiln struggles to reach temperature, open the valve slightly to decrease suction and reduce heat loss.
- Firing Variations: Unexpected glaze colors or surface issues may indicate a need to adjust airflow further.
Gross Adjustments:
If adjusting the slider valve alone isn’t sufficient, drilling or plugging holes in the kiln’s floor (or occasionally the lid) can significantly alter airflow. Make these changes carefully, as they have a much more significant impact than minor valve adjustments. If you’re unsure, consider seeking professional guidance.
Operation
- Before Firing: Close all peepholes and the kiln lid. Turn on the vent with the in-line switch.
- During Firing: The vent can run throughout the firing. If needed, slow your heating rate to about 150°F/hour for heavy loads with lots of fumes.
- After Firing, you may leave the vent on to help cool the kiln more rapidly or turn it off if you prefer a slower cooling rate.
Maintenance & Safety
- Carbon Monoxide Monitoring: Install a CO detector in the kiln room near the kiln, following the detector manufacturer’s placement guidelines.
- Regular Cleaning: Check the ductwork for leaks, corrosion, or wax buildup and clean it as needed. Unmount the blower and clean the fan with compressed air every two years.
- Temperature Checks: Ensure duct temperatures remain safe. If the duct or motor area overheats, reduce the number of vent holes or adjust the bypass.
- Room Air Replacement: The Vent-Sure moves up to about 146 CFM of air. If the room is tight, open a window or add a fresh air source to prevent negative pressure.
Extended Configurations & Accessories
- Venting Multiple Kilns: A single Vent-Sure can handle up to 20 cubic feet. Use the Vent Doubler accessory for two smaller kilns (up to 10 cubic feet each).
- Long Duct Runs: Ducts up to 60 feet long and with up to four 90° bends are possible without significantly reducing airflow. Use a 4-inch diameter duct after the motor. See this page for more information.
- Vent Control Option: You can add a Vent Control accessory to automate vent operation during the firing cycle with your kiln controller.
Venting Codes & Compliance
- The Uniform Mechanical Code and many local regulations require proper kiln venting.
- The Vent-Sure meets these requirements when installed according to instructions.
- The Vent-Sure is listed to UL499 Standards for kilns and Canadian Standards made by L&L Kiln Mfg. Inc. that are also listed to those standards.
- The Physiological Effects of the Vent-Sure, whether beneficial or otherwise, have not been determined by Underwriters Laboratory or MET Laboratories, Inc.
- Always check local and state health board regulations.